Creating an XML File to Report Custom Inventory Information

Have you ever needed to collect an additional piece of information, not collected by LANDESK by default, from one of your managed Macs?  The answer to that question will very likely be yes simply because every business environment is unique.

Often, the additional information that needs to be collected is simply a matter of enabling the LANDESK inventory scanner to pickup a new file type.   These types of changes are easy and can be added by leveraging the Manage Software List tool within the LANDESK console.  For more information on this method, see the LANDESK 9.6 Help file link.

However, if you want to collect the state of an object on the device, it may require a script to be written to query OS X itself.  The response from the OS will then need to be captured  in a format the LANDESK inventory scanner can then pick up and transmit back.

By default, the LANDESK inventory scanner can parse an XML or PLIST file placed in the “/Library/Application Support/LANDesk/CustomData” directory.  As such, we just need to write a script that places the response from the OS query into an XML or PLIST file and save it to the CustomData folder.  So doing will allow you to collect any type of information that may be relevant in your environment

The script below, written by Steve Goodrich for a LANDESK Interchange session, is an example script in which the OS is queried for the S.M.A.R.T. status after which the result is written to an output XML file.

This article will walk through each step of the script to explain what is going on, however, it will not be covering the details of XML and BASH.   I’ve posted some links below to research additional information on XML or BASH.

XML

Bash Scripting

OK, let’s create our script.  The first thing we need to do is open an editor.  On OS X, I prefer to use Xcode.  However there are a number of editors out there, like TextWrangler.  Just choose one that fits your preference.  The first line in the script needs to specify it’ll be using BASH.  As such, write:

#! bin/bash

Now we need to specify the output file variable that’ll be called throughout the script along with it’s associated file path.  Because we want the LANDESK inventory scanner to pick up the information, we’ll write out output file to the CustomData folder and give it a name of SmartHardDriveStatus.xml.  You can name your file whatever makes sense for the information you’re collecting.

OUTPUT_FILE="/Library/Application Support/LANDesk/CustomData/SmartHardDriveStatus.xml"

Next we’ll specify inside the output file, the XML structure we’ll be creating.  The echo command will place the text after the quotes into our XML file.  The carrot “>” before the “$OUTPUT_FILE” is telling the echo command where to write and the “$OUTPUT_FILE” is referring the variable created previously.

echo "<?xml version=\"1.0\" encoding=\"UTF-8\"?>" > "$OUTPUT_FILE" 

With the output file created and the XML structure specified, we need to create the opening XML tag in which we’ll save the SMART status inside of.

echo "<SMART_info>" >> "$OUTPUT_FILE"

OK, now we’re to the fun part.  We need to query OS X and obtain the status of the hard drive.  This can be accomplished using the diskutil command.  Most likely, the custom information you want to obtain will require a different command to query the OS.  Use the internet to search for the command you need and replace it with what is below.  Just make sure you echo your result and write it to an XML tag.  The example below has the results from the variables DRIVE and STATUS being written to an XML tag named from the DRIVE variable with the STATUS being written as the information inside the XML tag.

diskutil list  | egrep "^/" | while read drive

do
     
     DRIVE=`basename $drive`
     
     STATUS=`diskutil info $drive | grep SMART | awk '{ $1=$2="" ;print $0 }'`
     
     echo "<$DRIVE> $STATUS " >> "$OUTPUT_FILE"
done 

The final step to the script requires us to close out the first SMART_info tag we created.  It’s a pretty simple command.

echo "</SMART_info>" >> “$OUTPUT_FILE"

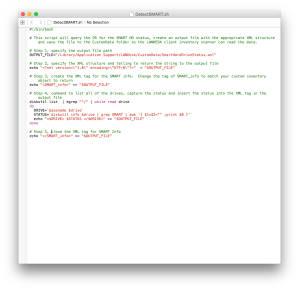
That’s it. You can save your script as a .sh file.  Completed, it’ll look similar to what I have below:

#!/bin/bash


# Create the Output file with the appropriate XML structure so the inventory scanner can read the data


# The output file path

OUTPUT_FILE="/Library/Application Support/LANDesk/CustomData/SmartHardDriveStatus.xml"


# specifying the XML structure and telling to return the string to the output file

echo "<?xml version=\"1.0\" encoding=\"UTF-8\"?>" > "$OUTPUT_FILE"


# creating the XML tag for the SMART info. Change this to match your custom inventory

echo "<SMART_info>" >> "$OUTPUT_FILE"


# command to list all of the drives, capture the status and insert the status as XML output in the output file

diskutil list | egrep "^/" | while read drive

do
     
     DRIVE=`basename $drive`
     
     STATUS=`diskutil info $drive | grep SMART | awk '{ $1=$2="" ;print $0 }'`
           echo "<$DRIVE> $STATUS </$DRIVE>" >> "$OUTPUT_FILE"

done


# close the XML tag for SMART Info

echo "</SMART_info>" >> "$OUTPUT_FILE" 

Screen Shot 2015-06-29 at 9.45.55 AM

To test it out, modify the properties of the file to make it executable.  To do this, you’ll need to open up Terminal and browse to the path of where the script has been saved.  You’ll then need to run the command:

chmod a+x scriptfilename.sh

Once the executable properties have been given to the file, you can manually run it on your test machine by calling it in terminal.

sudo ./scriptfilename.sh

In my next post I’ll walk through how we can use the pkgbuild command to create a package out of our script, deploying it the Apple-esque way as opposed to the UNIX method of deploying a .sh file.

If You Eat All of Your Vegetables…Then Deploy the LANDESK Agent

If this…then that.

As human beings, we’ve been dealing with if/then conditional statements since our childhood. “If you clean your room, then you can go play,” or “if you eat all of your vegetables, then you can have desert.”

You’ve just had terrible flashbacks of being forced to consume all of the broccoli on your plate, haven’t you?

Well, as we grow up, the “if/then” conditions don’t go away. We may or may not know it, but nearly every application we use has some sort of conditional statement buried into the code. It’s how programmers can provide an experience to us as we make decisions interacting with their applications.

A programmer will provide us an option to choose from and based on the outcome of that choice, code has been written to provide the experience to match our choice.

When it comes to systems management, well, we love conditional statements just as much as Mom and Dad did. We have all sorts of scenarios we need to evaluate and then take action based on the results.

One of the most common scenarios of an if/then, when it comes to systems management, is simply verifying if a machine has the systems management agent installed. If it does, great, don’t do anything. If it doesn’t, well then install it.

Not too hard, right?

Well, life is never easy. There is always going to be some sort of exception to any process. You may have been able to discover 80% of your machines and push an agent installer to it. Perfect, you’re 80% there. For the other 20% though, that’s where all of the work is.

To help us in our scenario of getting machines enrolled into our systems management tool, let’s just write a little script that will detect to see if a LANDESK agent is installed or not. If it is, the script can simply exit out or provided feedback and then exit out. If an agent is not installed, then the outcome will be to download the agent, install it, and then clean up all of the install files. Ultimately, the end result is, you can run the detections on every machine and only effect change on those ever elusive twenty-percenters.

I’ve written an example script below that will detect to see if the LANDESK agent has been installed and then proceed appropriately, however, since the script contains variables; you’ll see that it is quite portable and could be adapted to many other types of scenarios.

#!/bin/bash
## replace “coreserver.mycompany.com” with your core server FQDN
## replace “MacAgent.mpkg.zip” with your agent name, remembering to appropriately handle spaces in the name if applicable.
CORE=”http://coreserver/mycompany.com/ldlogon/mac&#8221;
AGENTNAME=”MacAgent.mpkg.zip”

## detect if the agent is already installed
if [ -d “/Library/Application Support/LANDESK” ]; then
echo ‘The LANDESK Agent is Installed’
exit 1

else echo ‘The LANDESK Agent Needs to be Installed’

## download the agent
curl -# -O $CORE/$AGENTNAME

## unzip the downloaded agent
unzip $AGENTNAME

## install the agent
sudo installer -allowUntrusted -pkg “LDMSClient.mpkg” -tgt LocalSystem

## delete the files downloaded
rm $AGENTNAME
rm -rf “LDMSClient.mpkg”
exit 0
fi

For this script to function in your environment, copy it into a text editor such as TextWrangler or Notepad++. Modify the CORE variable as well as the AGENTNAME variable and then save it out as a .sh file. Then, leveraging a login process, such as a Group Policy login, or whatever tool or process you have, deploy out the script to all of your machines (after careful test validation of course). Since it’s a shell script, it just needs to be executed with a “./” command with superuser privileges.

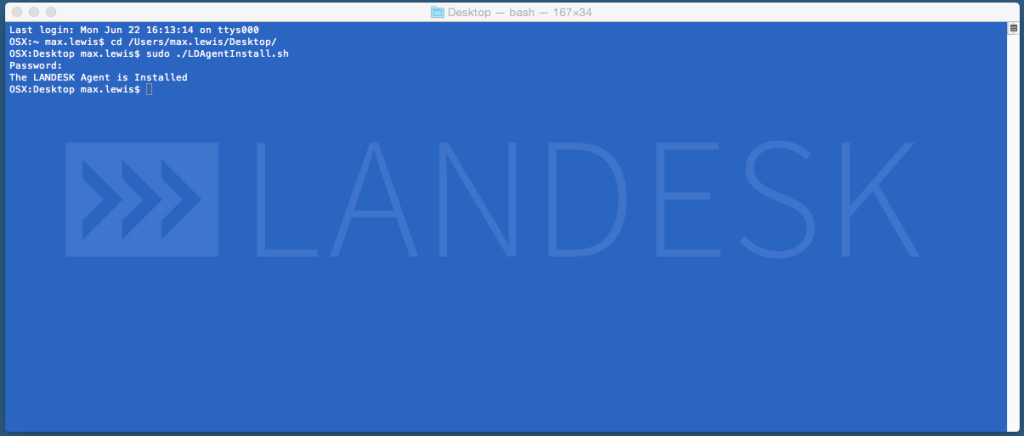
In my environment, I saved the file as LDAgentInstall.sh. As such, for me to execute it, I ran “sudo ./LDAgentinstall.sh” and as can be seen in the screenshot, it returned the phrase “The LANDESK Agent is Installed.”

Screen Shot 2015-06-22 at 4.16.04 PM

VPP Without an Apple ID? Yippee!

Apple’s WWDC is always full of surprises – especially surprises buried in the release notes of a product and not paraded on stage during Tim Cook’s, Forbe’s 25th most powerful person, opening Keynote.

According to the release notes for the beta version of Server; education institutions, healthcare organizations, and retail outlets should be jumping for joy.

While details are not clear as to which platforms will support this new feature (iOS 9 and OS X El Capitan for sure), new functionality has been added to Profile Manager in which, as stated in the document, “you can assign VPP apps to devices instead of a user’s Apple ID. This allows for the installation of VPP apps on iOS devices and Mac computers without configuring an Apple ID or sending an invitation”

This truly is the application deployment nirvana; VPP without an Apple ID!

Without question, the primary complaint I receive from Apple device administrators, particularly those in education, is around the app distribution workflow Apple has previously allowed. While nearly every device management vendor can push an application to a device, including LANDESK, the restrictions from Apple required an end user to consent to installing the application; essentially tying it to an individual Apple ID.

While large inroads have been made by Apple in recent iOS and OS X releases, such as allowing the business to reclaim the license from an Apple ID if purchased through the volume purchase program, which saved businesses a lot of money in lost software, it still required the app to be tied to an Apple ID.

In controlled environments where the devices are utilitarian in nature (think schools, retail, or health care), in which the devices are setup for a specific function with no specific device owner, attempting to push an application was inefficient and very difficult to manage.

Think about it, what end user is sitting on the kiosk iPad eagerly waiting for their shiny new application to be pushed from IT? Not. One. User.

Apple, thank you for unshackling the app from the Apple ID – the Enterprise, Education, Healthcare and Retail worlds have just received a productivity “merit” increase.

How to Upgrade OS X Using LANDESK

OS X El Capitan (10.11) has been officially announced.  The beta for developers is available now, the public beta is to follow up shortly in July, with the official release to come in the Fall.  If you’re a Mac admin, that means it’s time to go through another round of updates and OS validation.  Woot, woot!

As admins we all know we have a love, hate relationship with yearly releases.  Personally we love them, it’s great to play with the latest OS and features it has to offer.  We only hate them because we know how much work it is to evaluate all of our apps and infrastructure services to see how badly we’re broken.

Luckily, LANDESK can help in the process to upgrade the OS.

As a LANDESK admin desiring specific beta users to evaluate El Capitan or if you’re just getting around to evaluating Yosemite, the short guide below can help you push out the OS from the centralized LANDESK console to a LANDESK managed Mac.

(Note: I have not yet validated any of the LANDESK OS X agent functionality with El Capitan.  It’s quite probable that a machine upgraded to El Capitan will no longer actively report in to the LANDESK console, so use caution.)

Pushing out an upgrade can be done in 3 steps.

Step 1 – Create the OS X Installer Package

Apple’s .app installer isn’t in the best format to remotely execute the installer contained within the .app file structure.  Luckily for us admins, there is a utility on GitHub that will convert the Apple .app installer to a .pkg more suitable for distribution.  Follow the directions below to download and create your installer package:

  • Go to https://github.com/munki/createOSXinstallPkg and download the CreateOSXinstallPkg resource files
  • Download the developer beta of El Capitan or any other OS X installer application provided by Apple
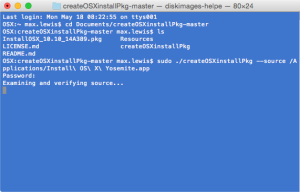
  • From the Terminal app, browse to the folder downloaded from GitHub run the following command :
  • sudo ./createOSXinstallPkg —source /path/to/Install\ OS\ X\ Installer.appCreateOSXInstallPkg
  • Zip the package file created and copy it to your distribution share

Step 2 – Create the LANDESK OS X Upgrade Package

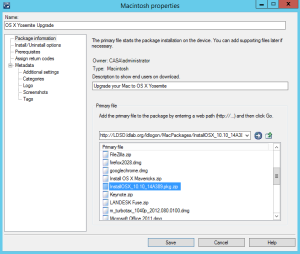
We now need to create a LANDESK package that points to the installer package we just created and copied to the distribution share.  This part is just the standard Mac package you would create for any other type of software distribution task.CreateLDMSUpgradePackage

  • From the LANDESK Console, open Tools > Distribution > Distribution Packages
  • Inside the menu tree, highlight My Packages or Public Packages and then select the New Package button on the menubar and select New Macintosh Package
  • Give the package a name, description and point the primary file to the zip file created previously
  • Fill out the Metadata details if desired
  • Save the package

Step 3 – Deploy the Upgrade Package

Now that we have our package created, we just need to deploy it.  As with any LANDESK package, you can deploy it optionally so that it shows up in the users’ portal or you can make it required.  With this package, just make sure it includes a reboot task.

  • Right click on the OS X upgrade package created and select Create Scheduled Task
  • Target the desired machine(s), user(s) or query(ies)
  • Right click on the task and select properties
  • Set the desired Task type under Task Settings
  • If you desire the end user to be able to initiate the task, set the radio button in the Portal Settings to either Recommended or Optional, otherwise set it to Required and it will automatically begin the upgrade during the next maintenance window
  • Change the Reboot Settings on the task to one that forces a reboot
  • Schedule the task

OSXUpgradeWorkspace

There you go, in short order your machines will be upgraded for OS X El Capitan, Yosemite or whatever other OS install you chose.

Where’s the Moat Around my OS X Castle?

We all want to feel secure and protected, right? Kings, queens and other powerful individuals from ages past, built moats to protect their investments and the people they cared for. Today, while we may not all be kings or queens, we still have the desire to protect ourselves and our personal property.

If you’re a Mac user with the belief that your OS X moat is impenetrable, protecting you from all foreign potential conquerors, it’s time to perk up and use a bit of caution.

According to Pedro Vilaca, a well-known security expert for OS X, the moat around your personal world housed on your Mac has a major flaw. In Pedro’s blog titled, The Empire Strikes Back Apple – how your Mac firmware security is completely broken, he discusses that by simply putting your machine to sleep, an attacker can compromise the device; gaining root access to the firmware.

So where did your moat around our OS X castle go?

In the age of global connectivity, creating a moat sufficient to protect our personal worlds is proving to be increasingly difficult. Just ask the US government who publicly announced they’ve potentially suffered the biggest data breach in government history – a breach that could affect up to 4 million government employees.

Unfortunately, our desire for uber-convenience enabled by near ubiquitous access to the Internet, with all of the benefits constant connectivity grants us, is also causing us to find there are more people trying to tear down our moats than people capable of building and maintaining them. After all, we’re the figurative kings and queens, we don’t build the moats; we just take advantage of them.

So what does this mean for you and me?

Well, the bad news is that unless you’re on a mid-2014 or later Mac model, the exploit is accessible without direct, physical access to the machine itself. Essentially, anybody with the proper wherewithal can compromise the firmware on your machine and take it over simply by targeting you before you put the machine to sleep. Then, when it wakes up, your moat will have suddenly vanished, giving the attacker full-root access to the firmware and subsequently all of the data on your device.

With firmware level access, more calculated attacks are feasible and they could happen without you even knowing about it. Jose Pagilery, writing for CNN money, says that because the vulnerability gives attackers time, they can plot an attack on a much larger scale, similar to the Sony Pictures hack from late last year.

This is really bad. If your machine were infected, even if you buy a new hard drive, or format your existing drive, and reinstall OS X, it wouldn’t take care of the issue. The compromise happens at such a low level on the machine that you won’t be able to get rid of it until Apple releases a new firmware that builds the moat anew.

The good news, well, there isn’t a lot to write about just yet. As a personal user, exercise caution and prudence in the sites you visit on the web. Apple has not publicly commented on the vulnerability yet and there are no known fixes. If you’re not famous or a public figure, the odds are ever in your favor that you will not be randomly targeted. As a corporation, however, there is cause for concern as your employees may be a deliberate target.

If you are in charge of corporate machines, for now, make note of the Boot ROM version on all of your Macs. In LANDESK, this can be done by creating a query and storing it for later use. When Apple releases a firmware update, you’ll already have a list of all vulnerable machines and will quickly be able to take action to repair.

To create this query, right click on the My Queries or Public Queries from the Network View and select New Query.

  1. Give your query a name, something like Mac Boot Rom Version would suffice.
  2. From the Machines Components pick list in the upper left-hand quadrant, scroll down and find the attribute Type, it’s the second to last object under Computer. Select Type, then select the = sign from the operators column and select MAC from the right hand column for scanned values.
  3. Hit insert to create the query syntax
  4. In the Machine Components colulmn in the bottom left-hand quadrant, expand BIOS and add Boot ROM Version to the column set of data to display.
  5. Save the query.

Once you have the query, get on the phone and call Apple asking them when a security fix will be coming. They’ve fixed the exploit on their newer hardware, either knowingly or unknowingly, regardless of which it is, they have the receipt to fix the moat…at least this time and your castle needs it.


The release name of OS X 10.11 is…

With WWDC just around the corner, we have a competition going on at work as to who can accurately pick the release name for version 10.11 of OS X (pronounced /ˌ ɛs ˈtɛn/;[11] originally Mac OS X  see – http://en.wikipedia.org/wiki/OS_X).

For years and years OS X was named after large cats.  It began in 2001 with 10.0 Cheetah and progressed through with each release.  10.2 was Jaguar, that was the first official version of OS X I personally used day in and day out. Through the years, other cat names followed, Panther, Tiger, Leopard, Snow Leopard, Lion, and Mountain Lion.

Well, Apple ran out of cool cat names and the theme changed in 2013 to California state attractions, the first of which was OS X 10.9 Mavericks.  A year later OS X 10.10 Yosemite followed suit and next week OS X 10.11 will be announced – presumably with a new shiny name.

As a result, the betting is on.  Here are some of the potential names we’ve come up with:

  • Redwood
  • Mammoth
  • California
  • Big Sur
  • Pacific
  • Diablo
  • Miramar
  • Rincon
  • El Cap
  • Redtail
  • Condor
  • Grizzly
  • Farallon
  • Tiburon
  • Monterey
  • Skyline
  • Shasta
  • Sierra
  • Mojave
  • Sequoia
  • Ventura
  • Sonoma

I’ve selected Condor and feel like I have about a 2% chance of getting it correct.  What’s your pick?

Apple in the Enterprise

Technology’s ability to enhance life has inspired me since childhood. Merging the humanities, the personal side of why a piece of technology is necessary, with the latest in what technology can offer me, is what draws me to Apple. Technology doesn’t succeed based on its technical merits alone, it needs to speak to you at a very individual, and personal level. When it does, that’s when the magic happens.

Unfortunately for many, that magic remains at home, on their desks, while they go to work using a platform that is not their preferred choice.

I was on the phone with someone from a prominent Midwest, US-based firm this week who made the oft repeated statement that ‘Macs don’t belong in the enterprise.’ I laughed, mentioning that I am an Apple champion in the enterprise. He immediately followed up by telling me that all his personal computers are now Macs.

I’ve heard this statement over and over again while traveling the globe for the last 15 years. It amazes me what people will put up with because ‘that’s just how it is.’

It’s 2015 and time to stop perpetuating the idea that Macs don’t belong. I disagree with the entire notion.

If you personally prefer the Windows platform and want to use it, great, use it.  If you don’t prefer Windows and want to use an alternate platform, it’s time to raise your voice.

If you’re in IT and have the ability to influence direction, look at the guys at the top of the organization latter.  Many of the CxOs are now using Macs. It’s definitely time to see what you can do to bring their Macs into the fold.

Like many things in life, a little bit of education and effort will uncover all sorts of new opportunities. It’s a lot easier for IT to say Macs don’t belong than to invest in the effort of delivering cross-platform services.

Now, not all companies restrict the freedom of platform choice. Intuit is one of those companies that is enabling their employees.  I have a good friend who works in their IT department.  He has mentioned to me on a number of occasions the IT department will spent 10 to 20 times the investment in man power to save their end users minutes of time – and supporting Macs is one of those initiatives.

While it’s not easy for their IT department, nor is it the cheapest option, it leads to better moral and the ability to attract better talent.

You may be asking how Intuit or other companies out their like Inuit justify the additional spend.  They’re looking at the bigger picture.  Intuit’s goals of platform freedom and the mantra of empowering the end user has had a significant impact on their culture. Just look at where Intuit sits on the Fortune 100 Best Places to Work. (It’s the 31st spot in 2015 in case you don’t want to google it http://fortune.com/best-companies/intuit-31/).  Better talent and happier employees drive results.

I’ve worked at LANDESK for over seven years, all the while I’ve been using a Mac for my day-to-day use and I’ve loved it. Best part is, I don’t have to be the guy that has all Macs at home but a PC at work because “it doesn’t belong.”

I get that there are hurdles to overcome to support Macs in the enterprise. Often, it’s simply a lack of time to learn, knowledge to know how and the right tools to get the job done.

So, to combat the “Apple-doesn’t-belong”-notion, it’s time I start being a producer and helping others succeed in managing their Macs in the enterprise.  My goal is to provide some tips and tricks to decrease the time to learn and empower those with know how to provide platform freedom. I’ll primarily be focusing on how Macs can be managed using LANDESK Management Suite, but at times I may highlight other tools as needed.

I’m starting now to be the counter-culture advocate: Macs do belong in the enterprise.  No longer will I just laugh at the IT admin who says ‘Macs don’t belong.’