OS X El Capitan (10.11) has been officially announced. The beta for developers is available now, the public beta is to follow up shortly in July, with the official release to come in the Fall. If you’re a Mac admin, that means it’s time to go through another round of updates and OS validation. Woot, woot!
As admins we all know we have a love, hate relationship with yearly releases. Personally we love them, it’s great to play with the latest OS and features it has to offer. We only hate them because we know how much work it is to evaluate all of our apps and infrastructure services to see how badly we’re broken.
Luckily, LANDESK can help in the process to upgrade the OS.
As a LANDESK admin desiring specific beta users to evaluate El Capitan or if you’re just getting around to evaluating Yosemite, the short guide below can help you push out the OS from the centralized LANDESK console to a LANDESK managed Mac.
(Note: I have not yet validated any of the LANDESK OS X agent functionality with El Capitan. It’s quite probable that a machine upgraded to El Capitan will no longer actively report in to the LANDESK console, so use caution.)
Pushing out an upgrade can be done in 3 steps.
Step 1 – Create the OS X Installer Package
Apple’s .app installer isn’t in the best format to remotely execute the installer contained within the .app file structure. Luckily for us admins, there is a utility on GitHub that will convert the Apple .app installer to a .pkg more suitable for distribution. Follow the directions below to download and create your installer package:
- Go to https://github.com/munki/createOSXinstallPkg and download the CreateOSXinstallPkg resource files
- Download the developer beta of El Capitan or any other OS X installer application provided by Apple
- From the Terminal app, browse to the folder downloaded from GitHub run the following command :
- sudo ./createOSXinstallPkg —source /path/to/Install\ OS\ X\ Installer.app
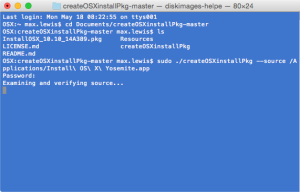
- Zip the package file created and copy it to your distribution share
Step 2 – Create the LANDESK OS X Upgrade Package
We now need to create a LANDESK package that points to the installer package we just created and copied to the distribution share. This part is just the standard Mac package you would create for any other type of software distribution task.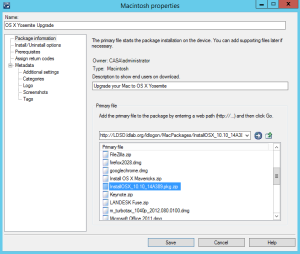
- From the LANDESK Console, open Tools > Distribution > Distribution Packages
- Inside the menu tree, highlight My Packages or Public Packages and then select the New Package button on the menubar and select New Macintosh Package
- Give the package a name, description and point the primary file to the zip file created previously
- Fill out the Metadata details if desired
- Save the package
Step 3 – Deploy the Upgrade Package
Now that we have our package created, we just need to deploy it. As with any LANDESK package, you can deploy it optionally so that it shows up in the users’ portal or you can make it required. With this package, just make sure it includes a reboot task.
- Right click on the OS X upgrade package created and select Create Scheduled Task
- Target the desired machine(s), user(s) or query(ies)
- Right click on the task and select properties
- Set the desired Task type under Task Settings
- If you desire the end user to be able to initiate the task, set the radio button in the Portal Settings to either Recommended or Optional, otherwise set it to Required and it will automatically begin the upgrade during the next maintenance window
- Change the Reboot Settings on the task to one that forces a reboot
- Schedule the task
There you go, in short order your machines will be upgraded for OS X El Capitan, Yosemite or whatever other OS install you chose.


Recent Comments