Force the Removal of a Specific macOS Configuration Profile

We’ve all done it.  We installed something without fully vetting it out and now we need to get it off – of all of our machines.  Whoops!

The other day, I received a question from a customer asking how he could remove a configuration profile from all of his machines at once – without having to log in to each machine.

Apple actually makes such a task quite easy as viewing, installing and removing a profile from a Mac is inherently built into the operating system itself.  Therefore, with a short script we can detect whether the profile is installed and then remove it if it is.

To manually check the status of a machine’s profiles, you can run, inside of Terminal, the following command.

View All Profiles

sudo /usr/bin/profiles -P

So doing should give you a report out of both the machine and user based profiles installed.

profiles -P.png

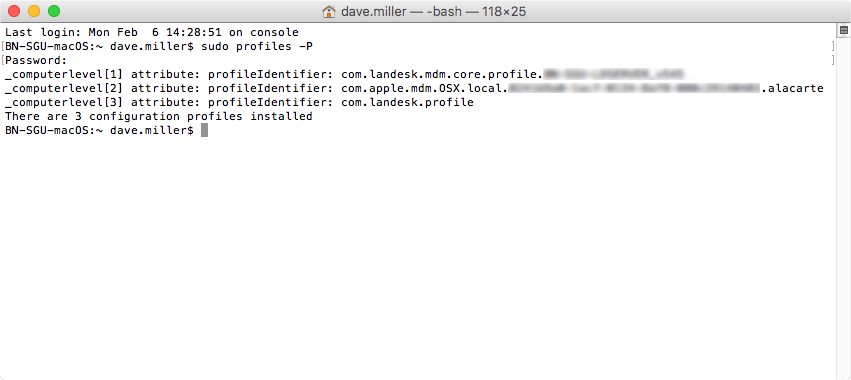
In the screenshot above, all 3 profiles are computer based profiles.  If I wanted to remove all of the profiles listed above, all I need to do is use the ‘profiles -D’ command and call the respective profileIdentifier.

Remove All Profiles

sudo /usr/bin/profiles -D

However, removing all profiles is probably a bit forceful, often a little precision can help us in the long run.  In our example above, we may choose to only remove one of the profiles instead of all of them.  To do this, we just need to specify that we’re removing a profile and what the profile identifier name is.

Remove a Single Profile

sudo /usr/bin/profiles -R -p com.landesk.profile

-R is the command to remove the profile and -p specifies we’re removing it by the identifier name.  There are actually quite a few other options available as well, so check out the man page for more info.  For example, you may need to add in the password to remove so the user doesn’t get prompted.  This switch is -z.

Automation

Now, let’s use LANDESK Management Suite to create a custom patch definition that will detect the machines that have a given profile and remove it if you choose to repair it. You can download the custom definition I built on my GitHub site here or build it yourself using the scripts below.

Custom Patch Detection Logic

Just change the variable profileIdentifier to match your desired profile identifier.

#!/bin/sh

# singleConfigurationProfileDetection.sh
# Created by Bennett Norton on 2/6/17.
# Detects the whether a specific profile exists on a machine

# Profile Identifier Name Variable
# Change this name to match the profile identifier you want to remove
# Find the name by typing sudo /usr/bin/profiles -P in Terminal

profileIdentifier="com.landesk.profile"

#  create an output variable with the the potential profile from the machine
#  grep filters all of the results to only show that which matches our desired configuration profile
#  awk allows us to pull just the data we're looking for from the command line

discoveredProfileIdentifier=( $( sudo /usr/bin/profiles -P | grep "$profileIdentifier" | awk '{print $4}') )


if [[ $profileIdentifier != $discoveredProfileIdentifier ]] ; then
 echo "Found: Configuration profile $profileIdentifier was not found on the machine."
 echo "Reason: $profileIdentifier not intalled."
 echo "Expected: $profileIdentifier to not exist."
 echo "Detected: 0"
 exit 0
else
 echo "Found: Configuration profile $discoveredProfileIdentifier was found on the machine."
 echo "Reason: $discoveredProfileIdentifier intalled."
 echo "Expected: $discoveredProfileIdentifier to not exist."
 echo "Detected: 1"
 exit 1
fi

Custom Definition Repair Script

Just as in the first script, you need to change the variable profileIdentifier to match your desired profile identifier.

#!/bin/sh

# singleConfigurationProfileDeletion.sh
# Created by Bennett Norton on 2/6/17.
# Deletes a specific profile on a machine

# Profile Identifier Name Variable
# Change this name to match the profile identifier you want to remove
# Find the name by typing sudo /usr/bin/profiles -P in Terminal

profileIdentifier="com.landesk.profile"

# Delete
sudo /usr/bin/profiles -R -p "$profileIdentifier"


Create and Deploy a VPP Software Package to a macOS or iOS Device

Creating and deploying a VPP software package to either a macOS or iOS device is a very simple process within LANDESK Management Suite 2016.3.  See the instructions below or watch the short video vignettes to be off and racing down the VPP software distribution track.

macOS VPP Package Creation and Deployment

  1. Open the LANDESK Management Suite Console
  2. Navigate to the top menu bar, select Tools > Distribution > Distribution Packages.
  3. In the lower left menu tree, highlight My Packages or Public Packages from within the Distribution Packages window
  4. On the Distribution menu bar, press the New Package button and select Macintosh > Macintosh MDM macmdmbutton
  5. Give the package a name
  6. Press the arrow button surrounded by the blue circle next to your Token alias mdmpackagecreation
  7. Highlight the desired VPP app and hit the Select button – note only macOS apps will display in this window mdmpackage
  8. Save the package
  9. Right click on the resultant package and select Create Scheduled Task(s)…
  10. Add one or more macOS devices that have been enrolled with MDM
  11. Start the task


iOS VPP Package Creation and Deployment

The iOS package creation is nearly identical, so I won’t include screenshots in these steps.

  1. Open the LANDESK Management Suite Console
  2. Navigate to the top menu bar, select Tools > Distribution > Distribution Packages.
  3. In the lower left menu tree, highlight My Packages or Public Packages from within the Distribution Packages window
  4. On the Distribution menu bar, press the New Package button and select Mobile > iOS
  5. Give the package a name
  6. Select the VPP radio button in the right hand pane, select the appropriate token alias if you have more than one VPP token and then click the arrow within the blue circle
  7. Press the arrow button surrounded by the blue circle next to your Token alias
  8. Highlight the desired VPP app and hit the Select button – note only iOS apps will display in this window
  9. Save the package
  10. Right click on the resultant package and select Create Scheduled Task(s)…
  11. Add one or more iOS devices that have been enrolled with MDM
  12. Start the task

How To Enroll into LANDESK Management Suite’s MDM for both iOS and macOS

As mentioned in my previous post, LANDESK announced their 2016.3 release for Management Suite and with it comes the ability to completely manage macOS and iOS via via an MDM profile.  If you’re lucky enough to have all of your macOS and iOS devices participating in Apple’s DEP, getting the devices enrolled into the LANDESK Management Suite server will be pretty straight forward.  In a later blog post, I’ll cover how to configure DEP within LANDESK

If you’re asking how you place your devices into Apple’s DEP, it may be too late.  As discussed in Apple’s DEP FAQ, in order for a device to be enrolled into the DEP program, it’ll need to be purchased directly from Apple or from an authorized DEP reseller. Which means it’s likely that ship has already sailed for you.

Alas, all is not lost.  You can manually enroll any device into LANDESK, whether or not it’s participating in Apple’s DEP program.

Before you get started, make sure you have all of the architecture pieces in place as outlined here.  Also, if your Macs already have a LANDESK agent installed, at this time, do not place an additional MDM profile on it as well.

macOS Enrollment Steps

  1. Download the enrollment app here or get the latest and greatest version from the LANDESK Community and install it on the desired Macs.  In the future, we will place the enrollment app in the ldlogon/mac directory and possibly even have it available on the Mac App Store if Apple permits it.
  2. Enter a valid Active Directory user account and password.  If you’ve properly configured the DNS TXT entry, it should automatically discover the server URL.  If the enrollment app prompts for a server, enter “fully.qualified.cloudserviceappliancename/coreservername” enrollment-screen
  3. Enter an administrative username and password on the local Mac

iOS Enrollment Steps

  1. Download the LANDESK enrollment app from the iTunes store
  2. Enter a valid Active Directory user account and password.  If you’ve properly configured the DNS TXT entry, it should automatically discover the server URL.  If the enrollment app prompts for a server, enter “fully.qualified.cloudserviceappliancename/coreservername” img_0002


LANDESK Mac Management Part 9: Creating an OS X Provisioning Template

In part 9 of the LANDESK Mac Management video series, we more or less get to bring together everything we’ve done up to this point, agent deployment, software deployment, configuration profile deployment which can include binding the machine to the domain , patch deployment and even FileVault deployment; all in a chained template experience when we provision a new device.

I created slides for our Interchange event explaining each step of the provisioning template build process, available here, but for many of you, the video below may be more beneficial.

LANDESK Mac Management Part 6: Create and Deploy an OS X Upgrade Package

In part 6 of the LANDESK Mac Management video series, I discuss how to use a freeware utility called CreateOSXInstallPkg, available at https://github.com/munki/createOSXinstallPkg, to build an upgrade package that can be easily deployed with LANDESK Management Suite 2016.  While this can be done as a required package, this video will walk through the process using Workspaces; focussing in on the end user experience via a self-guided upgrade.