


In my previous blog post, I discussed how to capture a bunch of custom data attributes from a Mac, create a PLIST file and send that information up with the client’s inventory scanner. This custom data collection process is very helpful as it can be tailored to your environment’s exact specifications.
In that post I used Data Analytics to extend my database. Not everyone has access to the Data Analytics toolset, which is the purpose of this post.
Now, if you don’t mind placing the custom data you collect under the Custom Data inventory tree for the device, all you have to do on your core server is to unblock your “unknown items.”
This is done by first sending in a scan from a client with your custom data. It won’t be processed the first time, but it will help you get to your final goal. The reason it won’t be processed is, that by default, LANDESK blocks the insertion of any unknown data objects. It will build a list of those objects, allowing you to approve them, which is what you will need to do now that your first scan has been sent to the core server.
You approve your custom data or unknown items, by going to the Configure menu on the Core server, selecting Services, tapping on the Inventory tab, and then clicking on the “Unknown Items” button. From there, you need to find your attributes from the list, highlight them and then click on the Allow button.
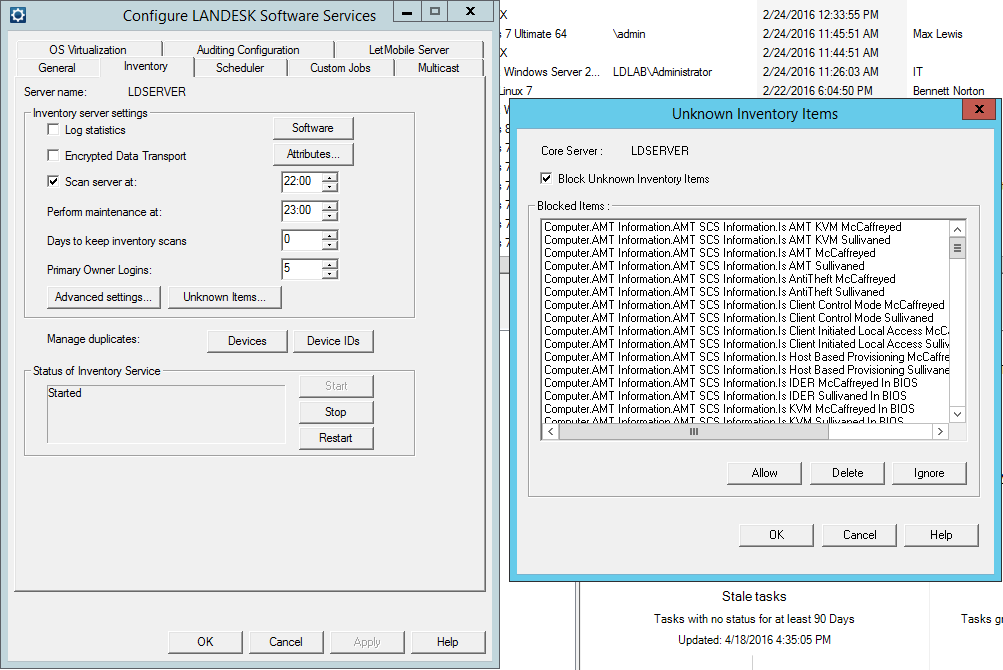
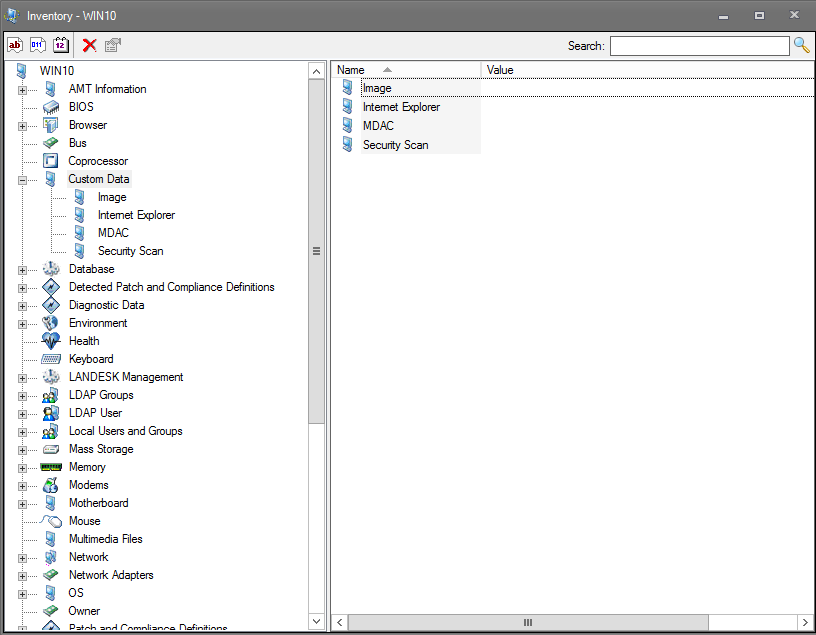
Once allowed, you’ll restart the inventory service and send up another scan from your client. This time everything should process appropriately and you should see your information under the Custom Data section of the Inventory tree.
However, more likely than not, you’re going to want to place your custom data in different locations within the inventory tree. If that is the case, we need to extend the LANDESK database and create the custom tables and columns.
Extending the LANDESK database is actually quite simple when using the built in tool to LANDESK Management Suite, called CoreDBUtil.exe.
While adding new tables and columns is easy, undoing a mistake is not easy at all. Please make sure you test on a non-production core server. Have a snapshot you can revert to or a backup of your database for when things go wrong. Even a tiny misspelled word can cause a lot of grief, so plan ahead. At times it takes me two or three tries to get everything correct, so I always test in my lab before I take my changes to production.
So, to properly leverage CoreDBUtil.exe to extend the database, we need to create a custom XML file that will define the tables and/or columns we want to create. Luckily for us, LANDESK has a blueprint of what it used to create the database during the install, called datamart.xml. All we need to do is copy a like table from the datamart.xml file and tweak for our own needs.
If you’re just going to be adding a new column to an existing table, all you need to do is find the table you’re going to add a new column to, add in the line for the column names and save the file out. You can choose to leave or remove all of the other existing columns, it doesn’t matter either way.
To do this, make a copy of the datamart.xml file, located under Program Files\LANDESK\Management Suite and paste it somewhere easy to access, I typically put it on my desktop. From there, you need to open the XML file with a text file editor, I prefer to use Notepad ++ on my Windows machines.
The two most critical lines you need to copy from the datamart.xml file are the first two. These two lines specify the XML structure for the file as well as the version of the LANDESK database that you’re currently on. Create a new file in Notepad ++, or whatever editor you’re using, and then copy these two lines from your file and paste them into a new text file. They should be similar to the two lines below, but may vary slightly in the second line depending on the version of LANDESK Management Suite that you’re on.
<?xml version="1.0" encoding="utf-8"?>
<schema version="10.0.0.0" type=“tables">
Once you’ve added those two lines, it’s easiest for me to remember to close out the schema tag right now, so I’ll add in the closing tag </schema> at this time. My file now looks like this:
<?xml version="1.0" encoding="utf-8"?>
<schema version="10.0.0.0" type=“tables">

</schema>
Now I go back to the LANDESK blueprint and find a like table to copy and paste to. If adding to an exiting table, find it, copy it to your custom file and make your small tweaks.
In my example today, I’m going to be collecting all of the package receipts on a Mac and therefore need an entirely new table. Since these package receipts are related to Software installed, I want to put all of this information under the Software inventory tree, but in a new section titled Package Receipts. Therefore, I’m going to search the datamart for computer.software to fine a like table that I can use as my baseline.
The first parentRelation that is solely “Computer.Software” I found in the datamart.xml file was one for the table Data_Files. I’m going to copy everything from the opening <table> tag to the closing </table> tag. Typically this will be between 10 and 20 lines of text, but may be more.
<table name="Data_Files" desc="" metaAdd="Yes" equiJoin="No" displayName="Data Files" parentRelation="Computer.Software" parent="Computer" tableType="26" image="Software.bmp" rollupIdentity="Yes" >
  <column name="Computer_Idn" type="Int" null="No" />
  <column name="Data_Files_Idn" type="Int" identity="Yes" null="No" />
  <column name="FilePath" type="Varchar(255)" null="No" displayName="Path" PK="Yes" />
  <column name="FileName" type="Varchar(255)" displayName="File Name" />
  <column name="ModDate" type="DateTime" displayName="File Date" />
  <column name="FileSize" type="Int" displayName="File Size" displayMask="%d KB" />

  <primaryKey name="XPKDATAFiles">
    <primaryKeyColumn column="Computer_Idn" />
    <primaryKeyColumn column="FilePath" />
  </primaryKey>

  <foreignKey name="R_DATA_Files" foreignTable="Computer">
    <foreignKeyColumn column="Computer_Idn" foreignColumn="Computer_Idn" />
  </foreignKey>

  <index name="XIFDATA_FilesId">
    <indexColumn column="Data_Files_Idn" />
  </index>
</table>
From here, I need to make this table my own. I’m going to change the table name to “PackageReceipt”, change the display name to “Package Receipt” with a space and then leave the other information as is. If you don’t like the image associated based on the table you copied, look in the datamart for other values and use one that suits you.
My table name tag now looks like the following:
<table name="PackageReceipt" desc="" metaAdd="Yes" equiJoin="No" displayName="Package Receipt" parentRelation="Computer.Software" parent="Computer" tableType="1" image="Software.bmp" rollupIdentity="Yes" >
I’m now going to add in my own column names based on the information I’m collecting from my custom script I wrote to collect package receipt data. Therefore, I’m going to create columns for the PackageID, Version, Volume, Location and Install Time. Because these are all string values, I’m just going to use a type of Varchar. You may want to use an Int or DateTime value, so look at the datamart.xml for examples.
I’m also going to add into the tag an attributetype=99. This will allow the data to persist, even when an inventory scan is sent up without package receipt information. It will only be overwritten by new data types, not a blank value.
I also need to define what column is going to be the primary key. In my script, I want PackageID to be my primary key, with all of the other attributes being written to it. As such, I’m going to add PK=“yes” and null=“No” to this column tag.
<column name="Computer_Idn" type="Int" null="No" />
<column name="PackageReceipt_Idn" type="Int" identity="Yes" null="No"  />
<column name="PackageID" type="Varchar(255)" displayName="Package ID" attributeTableType="99" PK="Yes" null="No"  />
<column name="Version" type="Varchar(255)" displayName="Version" attributeTableType="99" />
<column name="Volume" type="Varchar(255)" displayName="Volume" attributeTableType="99" />
<column name="Location" type="Varchar(255)" displayName="Location" attributeTableType="99" />
<column name="Install_Time" type="Varchar(255)" displayName="Install Time" attributeTableType="99" />
You can see that I left the Computer_IDN from the Data_Files table I copied over but removed the rest. This is so I can link the Package Receipt to the appropriate computer. I’ve also created a PackageReceipt_Idn that will be a unique value counter, just to ensure I can handle multiple PackageIDs with the same name, yet still have a unique object in the database.
Now I need to adjust the Primary Key section of the table. I’m going to make sure that Computer_Idn is set as a Primary Key, PackageReceipt_Idn and PackageID. So I’ll remove the FilePath Primary Key from the template I copied and add the two aforementioned.
In addition to adding in the Primary Key Columns, I need to adjust the PrimaryKeyName to match that of my table name, leaving XPK. In my template, the primaryKey name value was XKPDataFiles. I named my table PackageReceipt so I’m going to change the primaryKeyName to be XPKPackageReceipt.
<primaryKey name="XPKPackageReceipt">
  <primaryKeyColumn column="Computer_Idn" />
            <primaryKeyColumn column="PackageReceipt_Idn" />
            <primaryKeyColumn column="PackageID" />
</primaryKey>
I’m going to remove the foreign keys completely because I don’t need them.
As for the indexes to set, my two solely unique values in this table are the computer_idn and the packagereceipt_idn. Since computer_idn is being indexed under the computer table, I’m going to use packagereceipt_idn as my index. Change the index name to match the column name, leaving XIF. In my example, I changed index name=“XIFDATA_FilesId” to “XIFPackageReceipt_Idn”.
 <index name="XIFPackageReceipt_Idn">
            <indexColumn column="PackageReceipt_Idn" />
 </index>
With those changes, I’m now done. Just make sure you still have your closing </table> tab as well as your closing </schema> tag. My entire Package_Receipt.xml file looks as follows:
<?xml version="1.0" encoding="utf-8"?>
<schema version="10.0.0.0" type="tables">

    <table name="PackageReceipt" desc="" metaAdd="Yes" equiJoin="No" displayName="Package Receipt" parentRelation="Computer.Software" parent="Computer" tableType="1" image="Software.bmp" rollupIdentity="Yes" >
        <column name="Computer_Idn" type="Int" null="No" />
        <column name="PackageReceipt_Idn" type="Int" identity="Yes" null="No"  />
        <column name="PackageID" type="Varchar(255)" displayName="Package ID" attributeTableType="99" PK="Yes" null="No"  />
        <column name="Version" type="Varchar(255)" displayName="Version" attributeTableType="99" />        <column name="Volume" type="Varchar(255)" displayName="Volume" attributeTableType="99" />
        <column name="Location" type="Varchar(255)" displayName="Location" attributeTableType="99" />
        <column name="Install_Time" type="Varchar(255)" displayName="Install Time" attributeTableType="99" />

        <primaryKey name="XPKPackageReceipt">
            <primaryKeyColumn column="Computer_Idn" />
            <primaryKeyColumn column="PackageReceipt_Idn" />
            <primaryKeyColumn column="PackageID" />
        </primaryKey>

        <index name="XIFPackageReceipt_Idn">
            <indexColumn column="PackageReceipt_Idn" />
        </index>
    </table>
</schema>
Save your XML file in an easy to access location. Again, I’m going to use my Desktop. Now, on my core server, I’m going to open up a command prompt and browse to “\Program Files\LANDesk\ManagementSuite” and hit Enter.
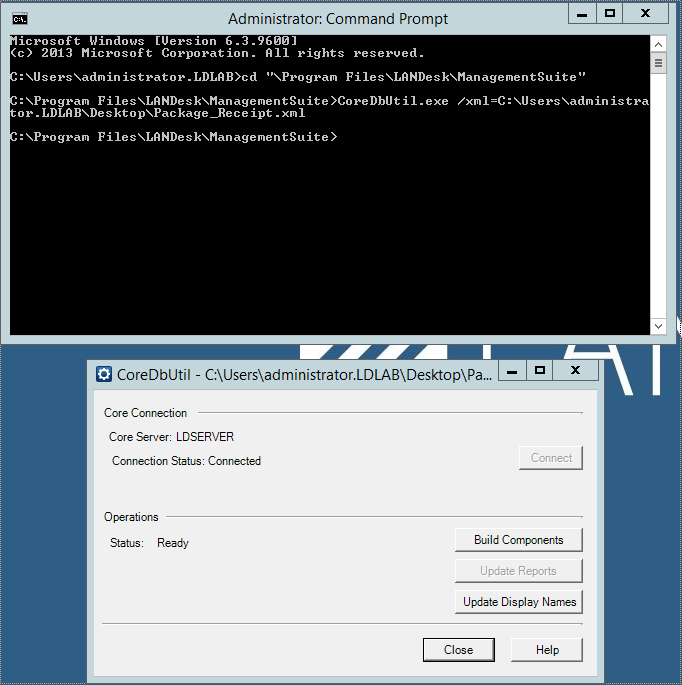
Now, type in CoreDBUtil.exe /xml=path/to/your/filename.xml. Include parentheses if you have spaces. To make my life simple, I type in CoreDBUtil.exe /xml= and then I drag the file onto the command prompt. Click Enter and you should see a GUI popup. If you’ve built your XML file correctly, you should be able to hit the Build Components button and the utility will create your tables and or columns.
If you run into any problems or if the utility throws an error, go to C:\Program Files\LANDesk\ManagementSuite\log and examine the coredbutil.exe.log.
Assuming all went well for you, after the coredbutil.exe utility finishes, you need to restart your services that connect to the database or just restart the server.
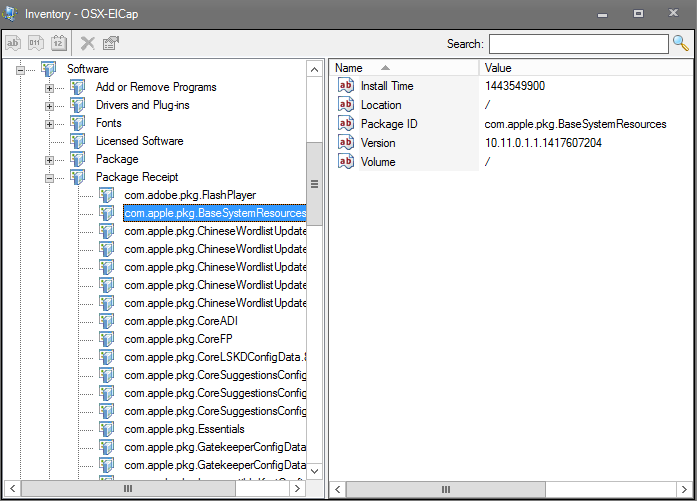
Once your server is back online, send in your custom inventory scan. Everything should process without having to approve any unknown items, as your script should be writing all of the data to the tables and columns you just created. Go and browse your inventory tree for the computer scan you just sent in and validate your work. That’s it, you’re all finished.
To assist you in your testing efforts, below is the Package_Receipt collection script I used in this example as well.
#!/bin/bash
##################################################################
###   Part 1 - Create an Output File with the Package Receipts ###
##################################################################
# Create the Output file with the appropriate XML structure so the inventory scanner can read the data
# Set the Output file path, do not change
outputFile="/Library/Application Support/LANDesk/Data/ldscan.core.data.plist"

# Detect if there is an existing plist file, make a backup and delete the original to ensure clean data is sent up
if [ -e "$outputFile" ]
then
cp "$outputFile" "$outputFile.old"
rm "$outputFile"
fi

# specifying the plist structure
echo '<?xml version="1.0" encoding="UTF-8"?>'  >> "$outputFile"
echo '<!DOCTYPE plist PUBLIC "-//Apple//DTD PLIST 1.0//EN" "http://www.apple.com/DTDs/PropertyList-1.0.dtd">' >> "$outputFile"
echo '<plist version="1.0">' >> "$outputFile"
echo "<dict>" >> "$outputFile"

packageReceipts=( $( pkgutil --pkgs ) )
for receipt in "${packageReceipts[@]}"
do

# create the variables for the different attributes
    IFS=$'\n'
    packageID=( $(pkgutil --pkg-info $receipt | grep "package-id" | sed 's/package-id: //' ) )
    version=( $(pkgutil --pkg-info $receipt | grep "version" | sed 's/version: //' ) )
    volume=( $(pkgutil --pkg-info $receipt | grep "volume" | sed 's/volume: //' ) )
    location=( $(pkgutil --pkg-info $receipt | grep "location" | sed 's/location: //' ) )
    installTime=( $(pkgutil --pkg-info $receipt | grep "install-time" | sed 's/install-time: //' ) )
    unset IFS

    echo "<key>Software - Package Receipt - (Package ID:$packageID) - Package ID</key>" >> "$outputFile"
    echo "<string>$packageID</string>" >> "$outputFile"

    echo "<key>Software - Package Receipt - (Package ID:$packageID) - Version</key>" >> "$outputFile"
    echo "<string>$version</string>" >> "$outputFile"

    echo "<key>Software - Package Receipt - (Package ID:$packageID) - Volume</key>" >> "$outputFile"
    echo "<string>$volume</string>" >> "$outputFile"

    echo "<key>Software - Package Receipt - (Package ID:$packageID) - Location</key>" >> "$outputFile"
    echo "<string>$location</string>" >> "$outputFile"

    echo "<key>Software - Package Receipt - (Package ID:$packageID) - Install Time</key>" >> "$outputFile"
    echo "<string>$installTime</string>" >> "$outputFile"

done

# close the plist file
echo "</dict>" >> "$outputFile"
echo "</plist>" >> "$outputFile"

#################################################################
###   Part 2 - Force an Inventory Scan to Run                 ###
#################################################################
# -e forces a hardware and software scan and -s forces a sync
# this step is optional
/Library/Application\ Support/LANDesk/bin/ldiscan -e -s

Recent Comments