Introduction
LANDESK’s Workspaces application for iOS has the capability to integrate with LANDESK Management Suite; enabling users to see software catalog objects and Launchpad links published from Avalanche on Demand. In addition, based on a user’s role, he/she can see other devices and users information, such as the asset information related to a device, remote control options, tasks applied to a device and even install software to a managed node, all from within the Workspaces app for iOS.
Overview
While the Workspaces app for iOS is powerful, it requires a few unique configuration steps in order to properly take advantage of all of the features. This white paper will discuss the steps required to obtain full integration with LANDESK Management Suite and LANDESK Mobility Manager.
Pre-Requisites
- A fully functioning Avalanche On Demand (AOD) instance. If you need to obtain one, you can click on https://billing.aod.wavelink.com/Account/Login.aspx and hit the register button.
- iOS Devices enrolled into AOD
- A Cloud Service Appliance
- LANDESK Management Suite 9.6 or later or LANDESK Service Desk 7.8 or later installed with the BridgeIT services configured
Backend Configuration Overview
LANDESK Workspaces is driven by an HTML 5 backend service that is hosted on LANDESK Service Desk or LANDESK Management Suite. You need to ensure you have the proper settings applied within the Configuration Center for the respective platform you’re using to host the Web Services. If you own both LANDESK Management Suite and LANDESK Service Desk, you should host the service on LANDESK Management Suite so that it can properly integrate with the user/device based search. For more details on the different types of configurations, seehttps://community.landesk.com/support/docs/DOC-34966
To properly apply the appropriate settings for LDMO integration, launch Configuration Center by going to http://servername/ConfigurationCenter. The default username is ‘sa’ and the default password is ‘administrator.’ Now you are also going to need to know your customer ID, generate a workspace public key then apply it and sync managed devices from AOD. To do this, you’re also going to need to launch http://aod.wavelink.com or your own hosted instance and follow these steps:
- Login to Avalanche and click the ‘My Account’ link in the upper right corner.
- Select the ‘Company ID’ and copy it.
- On the server that you will run BridgeIT from, launch the configuration center and log in.
- Click the instance you are using. For LDMS customers, the default instance will be named ‘My’

- Click the ‘Edit’ link on the BridgeIT application to access the configuration options, again for LDMS customers the default name will be ‘My.BridgeIT’

- Fill in the dialogue with the below properties:
| Configuration Parameter |
Value |
| Name |
Whatever this is already set to (My.BridgeIT) |
| Application Pool |
Whatever this is already set to (My AppPool1) |
| Logon Policy |
Token Only |
| LDSD Web API URL |
http://servicedeskservername/tokenonlyinstancename |
| LDMS Web API URL |
https://ldmsservername/ldapi/api |
| STS Issue Token URL |
https://ldmsservername/STS/issueToken (This may be set to the SD token server LDMS is not in the environment. If LDMS is present, use it) |
| Avalanche Enterprise Server URL |
https://aod.wavelink.com (This server will be different if you’re hosting AOD in your own environment. Refer to your ‘My Account’ page in AOD). |
| Avalanche Smart Device Server URL |
https://sds.aod.wavelink.com (This server will be different if you’re hosting AOD in your own environment. Refer to your ‘My Account’ page in AOD). |
| Avalanche Company ID |
Paste your value from step 2 (aa1a1111a-aaa1-1111-11aa-1a1111a1111a) |
| Enable LDMS Agent Integration |
True (If using LDMS) |

- Click the ‘Generate’ link.
- Click the ‘Download Public Key’ link.
- Click ‘OK’.
- Go back to Avalanche, in the ‘Tools’ panel, click ‘System Settings’.
- In the ‘Public Key (BridgeIT Server)’ section, click ‘Add’ or ‘Replace’ and select the key you downloaded from Configuration Center.

- Select the key generated from Configuration Center and click ‘Open’.
- Ensure the ‘LDMS Core Server’ section contains the right settings.
| Core Fully-qualified server name |
- Coreservername.domain.extension
|
| LDMS Service account |
Domain\username |
| LDMS Password |
serviceaccountpassword |
- Ensure your ‘LDAP Account’ section contains the right settings.
| LDAP Server Address |
- xxx.xxx.xxx.xxx
|
| LDAP Username |
Domain\username |
| LDAP Password |
serviceaccountpassword |
- Check the box for ‘Use Cloud Services Appliance’ and provide the proper public FQDN for your CSA.

- Check the box for ‘Enable User Targeting (Requires LDAP Integration Services Configuration)’ under the User Targeting Mode heading
- Click ‘Test Connectivity’ on both the ‘LDMS Core Server’ and ‘LDAP Account Settings’ and validate the tests pass.
- At the top of the page, click ‘Save’.
- To sync the server certificates, open the ‘Inventory’ panel and click the ‘Needs Deployment’ link.
- In the ‘Server Deployment’ dialog, click ‘Finish’.
iOS Device Configuration for Workspaces
For proper integration with LDMO and LDMS, LANDESK Workspaces must be deployed from AOD itself. Therefore, before any additional steps can be taken, you need to make sure your iOS devices are under management. For more information on how to enroll an iOS device into AOD, see:
Create the Workspaces Software Payload
A payload is essentially a package with instructions for the mobile device. Payloads can consist of specific settings such as restriction settings, app package information, certificates or links to files or services. We are going to create a software payload that distributes LANDESK Workspaces to all managed nodes.
- Login to the Avalanche console (aod.wavelink.com)
- Select the profiles tab from the left-hand pane
- Click on the plus(+) button within the ‘Available Payloads’ section

- Ensure the radio button is set to iOS under the platform heading and then click on the ‘Software’ link for the payload type
- Give the payload a descriptive name, such as LANDESK Workspaces – iOS
- Leave the radio button set to ‘Automatically push to device’
- Leave the radio button set to ‘AppStore’ for the software hosting
- Click on the magnifying glass within the App input box
- In the Search box, enter LANDESK Workspaces and click the magnifying glass

- From the Search Results, select LANDESK Workspaces app and then click the ‘Add Selected App’ button
- The App box should now be populated with an App ID number, something similar to 888025691 and you should see the LANDESK Workspaces icon and text in the Preview Box. Leave all other settings as is and click Save.

Create Optional Software, Links and Documents for the iOS Device
One of the primary purposes for the Workspaces application is to allow end-users the flexibility to install optional software titles, view documents published and to access links to external services. Use this step to configure some optional objects so that when the user accesses Workspaces, content will be available to them.
Create an Optional Software Payload
- Login to the Avalanche console (aod.wavelink.com)
- Select the profiles tab from the left-hand pane
- Click on the plus(+) button within the ‘Available Payloads’ section
- Ensure the radio button is set to iOS under the platform heading and then click on the ‘Software’ link for the payload type
- Give the payload a descriptive name for the application to be published
- Set the radio button set to ‘Display this option in the corporate portal’
- Leave the radio button set to ‘AppStore’ for the software hosting
- Click on the magnifying glass within the App input box
- In the Search box, enter the name of your app and click the magnifying glass
- From the Search Results, select your desired app and then click the ‘Add Selected App’ button after the preview has properly updated in the preview panel.
- The App box should now be populated with an App ID number and you should see the app icon and text in the Preview Box.
- Leave the Destination folder as is
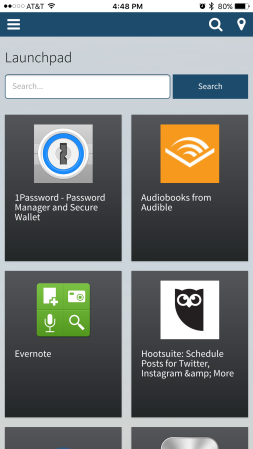
- If you would like an installed application to show up in Launchpad within Workspaces, you need to supply the deep link url in the format of the linkname://. Discovering the deep link name can be a challenge. For additional information on deep links, see my blog post here.
- Click Save
Create a Link Payload
- Login to the Avalanche console (aod.wavelink.com)
- Select the profiles tab from the left-hand pane
- Click on the plus(+) button within the ‘Available Payloads’ section
- Set the radio button is set to iOS and Android under the platform heading and then click on the ‘Link’ object for the payload type
- Give the payload a descriptive name for the link to be published
- Give the payload the desired label you want the users to see
- Enter the appropriate URL or deep link
- Provide an icon if desired (this will not display at this time, but worth setting for the future)
- Check the additional options as desired
- Select the ‘Display this option in corporate portal’
- Leave the destination folder as is
- Select the ‘Default browser’ option for the desired application to launch the link
- Click Save
Create a Document/Media Payload
- Login to the Avalanche console (aod.wavelink.com)
- Select the profiles tab from the left-hand pane
- Click on the plus(+) button within the ‘Available Payloads’ section
- Set the radio button is set to iOS and Android under the platform heading and then click on the ‘Document/Media’ object for the payload type
- Give the payload a descriptive name for the link to be published
- Leave the destination folder as is
- Set any appropriate storage options
- Click Save
Create the Profile to Deploy the Workspaces Payload
A profile consists of one or more payloads that can be assigned to the mobile devices via group based targeting. We now need to create a Profile that contains, at the minimum, the LANDESK Workspaces payload. However, if you desire, you may also include other payload types, such as a passcode settings payload, wifi settings, certificates, links, documents as well as other optional or required applications.
- Login to the Avalanche console (aod.wavelink.com)
- Select the profiles tab from the left-hand pane
- Click on the plus(+) button within the ‘Available Profiles’ section
- Select the link for ‘Device settings and contents’

- Give the profile a distinctive name
- From the available payloads section, scroll down to the ‘Software (iOS) section and select the LANDESK Workspaces payload or whatever you named your profile in step 5 of the previous section. Include any additional payloads if desired and then click the Save button.

Assign the Profile to a Group or a User for Deployment
Profiles are targeted to a user, Active Directory group or mobile device group. Mobile device groups allow you to group devices together based on selection criteria you configure. You can create dynamic or static groups. In both group types, new devices can be added to the group based on changes to the selection criteria. For additional information on creating mobile device groups, click here.
- Login to the Avalanche console (aod.wavelink.com)
- Select the profiles tab from the left-hand pane
- Highlight the user, Active Directory group or mobile device group to be used for device targeting
- Check the box left of the name for the profile created previously in the Available Profiles section
- While ensuring the proper user, Active Directory group or mobile device group is highlighted and the appropriate profile has been checked, click the checkbox (√) button in the Available Profiles section

- Apply any selection criteria if desired or simply click on the Schedule Deployment button to target the users or all devices assigned to the group
- From the Schedule Deployment window, select the Deploy Now option and hit Apply
Finalize the iOS Workspaces Configuration
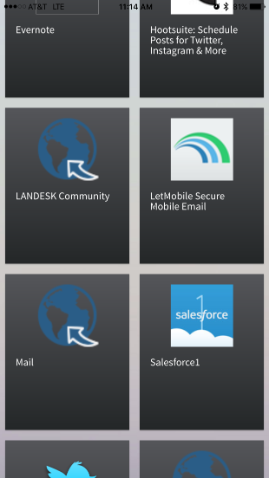
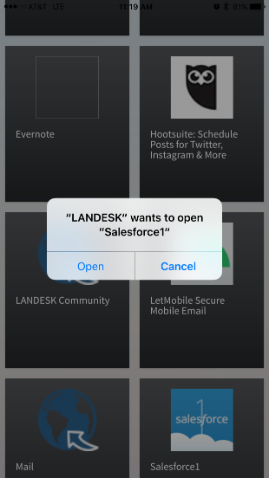
On the iOS device, the end user should be prompted to install the ‘LANDESK’ app. Proceed with the install on a device by device basis. If this is the first time a device is receiving an application, additional prompts for VPP or other configuration settings may also prompt. Once the application is installed, we also need to force the devices to check in and sync their information two separate times in order to finalize the Workspaces app enrollment.

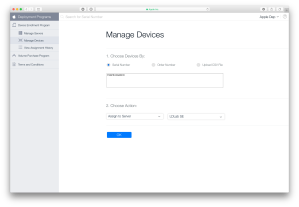
- Login to the Avalanche console (aod.wavelink.com)
- Select the inventory tab from the left-hand pane
- Search for your desired device or highlight the device group that contains your desired devices
- Check the box for one or more of the devices in the list
- Click on the second icon, Update, from the menu bar, it has a down arrow surrounded by two circular arrows

- When prompted, click the Update Device(s) button

- Wait for a short period of time and refresh the console to validate the device updated its Last Contact date
- Repeat the update process a second time
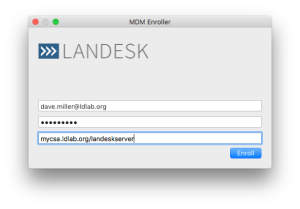
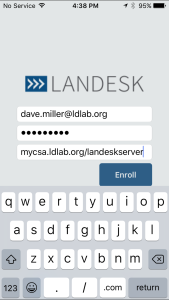
Login to the iOS Workspaces Configuration
You should be all set at this point and capable to login to Workspaces for iOS on your device.
- Launch Workspaces on the iOS device
- Enter your email or domain ID
- Supply your password
- Check the box to ‘Sign in Automatically’ if desired
- Provide the Workspaces server URL. This should be something like https://coreservername/my.bridgeit or https://servicedeskservername/instancecreated

- Click the ‘Sign In’ button


Recent Comments