Migrate a Mac’s Outlook Settings from an On Premise Server to a Hosted Office 365 Instance

Last week a customer approached me asking for some assistance in migrating their client devices from an on-premise server to their new Office 365 instance hosted in the cloud. In addition to migrating to a new Exchange server, the customer was also planning on moving all of the clients to Outlook 2016 from Outlook 2011.

Having not had the experience personally in doing this in a business environment, I was unsure what the entire process was going to look like.  Luckily, with only a few minutes of google searching, I discovered a post in which Talkingmoose outlined how a simple Applescript would do the trick.

tell application "Microsoft Outlook"
    set server of exchange account 1 to "https://outlook.office365.com/"
end tell

With the AppleScript in hand, we just needed to put together a process to use LANDESK or what is now rebranded as Ivanti.  The Ivanti Mac agent itself, unfortunately, doesn’t support AppleScript directly.  That means that rather than creating an AppleScript file, I needed to write a shell script and simply change the shebang line environment to be osascript as opposed to the standard shell.

#!/usr/bin/env osascript

And that’s it.  I pushed out the script using LANDESK Management Suite, and even with the Outlook client open on the test device, the server URL was appropriately changed.

You can download the script from GitHub, or as I typically do, the full script is below. You’ll see it’s very short.

#!/usr/bin/env osascript
# changeOutlookServer.sh
# Created by Bennett Norton on 1/25/17.

tell application "Microsoft Outlook"
 set server of exchange account 1 to "https://outlook.office365.com/"
end tell

Remember, after you save your file, set the execute permissions on it by opening terminal and running the command below and then copy it to your package server share.

chmod +x /path/to/your/script.sh

With the script ready, you now need to build the software package to distribute to the Macs.  To do this, follow these steps below:

  • From the LANDESK Console, open Tools > Distribution > Distribution Packages
  • Inside the menu tree, highlight My Packages or Public Packages and then select the New Package button on the menubar and select New > Macintosh > Macintosh Agent
  • Give the package a name, description and point the primary file to the .sh file created previously
  • Fill out the Metadata details if desired
  • Save the package

In a true migration environment, I would create a bundle package that pushes out both the Office upgrade as well as the script to change the Exchange server address.  See my previous blog post on how to build an Office 2016 package.


Recover Hard Drive Space by Purging the LANDESK SDCache Folder

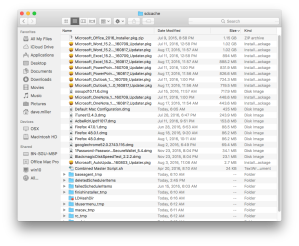
Whenever a Mac is told to perform a software distribution or patch task, the LANDESK agent will download the binaries for that task and store them in the sdcache folder found under /Library/Application Support/LANDesk. By default, the LANDESK agent will purge any file older than 45 days, so in most scenarios, there is little need to pay attention to what is in that folder.

full-sdcache

However, if you find that your Mac is short on hard drive space, perhaps due to the GB’s worth of patch binaries that were placed on it after having recently updated to the 64-bit version of Microsoft Office, you might find the little purgeSDCache.sh script available on my GitHub site or pasted below a beneficial tool to have in ready in your arsenal of LANDESK packages.

#!/bin/sh

# purgeSDCache.sh
# Created by Bennett Norton on 9/16/16.
# This script will delete all non-standard files/folders from the LANDESK sdcache folder
# Change the path variables


#Script Variables
#change these variables to match your token and desired destination paths
landeskPath="/Library/Application Support/LANDesk/sdcache"


#Check to see if destination path exists and if it does, delete the files older than x number of days old
#The +10 after the -mtime switch tells the command to delete everything older than 10 days. You can adjust that number.
if [ -d "$landeskPath" ]; then
 echo "LANDESK Agent present, deleting and recreating the sdcache folder. "
 find "$landeskPath"/* -mtime +10 -exec rm -rf {} \;
fi

So what does this script do?  It is quite simple really, the script does a search inside the SDCache folder and deletes any and all files older than “10 days.” You can easily adjust age of the files to keep and there is no reason you can’t set that value to 0 days and essentially purge everything.  Just adjust the number after the -mtime switch to whatever suites you.

Now you just have to create the package and deploy to the machines that are short on hard drive space.  Just remember to set the execute permissions on your script prior to copying it to your file share.  You do that by opening Terminal and running the command below:

sudo chmod +x /path/to/script.sh

Creating LANDESK Management Suite Mac Packages

  1. Open the LANDESK Console
  2. Navigate to the top menu bar, select Tools > Distribution > Distribution Packages.
  3. In the lower left menu tree, highlight My Packages or Public Packages from within the Distribution Packages window
  4. On the Distribution menu bar, press the New Package button and select New Macintosh Package.
  5. Give the package a name
  6. Provide a description as well as any metadata information desired
  7. Set the primary file to the script file you previously transferred to your package share
  8. Fill out the Metadata details if desired, specifically supplying a logo so it shows up properly in the portal
  9. Save the package

Creating a Scheduled Mac Software Distribution Task

  1. Right click on the Mac software distribution package created and select Create Scheduled Task
  2. From the network view, select and drag the desired machine(s), user(s) or query(ies) and drop them onto the task
  3. Now, right click on the task and select properties
  4. Set the desired Task type under Task Settings as to whether you want a push, a policy or a hybrid of the two types in a policy-supported push
  5. Set the radio button in the Portal Settings to either Recommended or Optional if you desire to put the package into Workspaces.  If you’d like to automatically deploy the app, select Run automatically
  6. Change the Reboot Settings or Distribution and Patch settings if desired
  7. Set the schedule task settings with the appropriate start time

Provide Remote Assistance to Your Off-Network OS X Users

It’s forecasted that 202 million laptops will be sold in 2016, compared to 127 million desktops.  As we all know, laptops are mobile and often off of the corporate network.  Not only does that mean the device should have proper encryption to protect the private data, it also means that standard administrative tasks such as patching a machine, distributing software and having access to the device to perform a remote control session can be much more problematic – or even down right impossible with the current management tools.

For LANDESK Management Suite customers, however, off-network access is completely feasible. An administrator can essentially follow the exact same workflow to patch, distribute software or perform a remote control session when properly configured with a LANDESK Cloud Service Appliance.  No VPN is necessary and no end-user interaction is required!

If you need to know how to install a Cloud Service Appliance in your environment, see Best Known Method for Configuring LANDESK Cloud Service Appliance (former Management Gateway) version 4.2 and newer

Better yet, in LANDESK Management Suite 2016, the certificate approval process has been significantly simplified by switching the certificate approval process to the core server. Essentially every agent install will create certificate for the Cloud Service Appliance and present itself to the LANDESK Core Server.  The administrator just needs to approve or block the per device certificate on the LANDESK core to grant or deny that device off-network access.  For more detail around this process, see this LANDESK Community article.

Once the certificate is approved on the core server for the device, an administrator can deploy patches and software distribution via a policy delivery method and perform an on-demand remote control session to the device off the network.  The client will also continue to send in it’s scheduled inventory and security scans assuming it has internet connectivity.

How to Perform a Remote Control Session to an Off-Network OS X Device

  1. Launch the LANDESK Management Suite Console
  2. Expand the Network View and find Devices > All Devices
  3. Find your desired machine from the list or use the search bar at top
  4. Right click on your OS X device and select ‘HTML remote control’ and the machine’s default browser should launch
    • If nothing happens and you don’t see a browser launch, it means the machine is not connected to the CSA and may either be powered off or without internet connectivity.
    • To verify, you can go to the remote control page on the CSA by using the URL: https://cloudserviceappliancename/rc. Not only this an alternative way to remote control a machine, but it will show you a list of all available clients that have an active internet connection.
  5. Enter your LANDESK username, password and the domain associated with the user that has access to perform a remote control session. If you’re using a local account, you can leave the domain blank.
  6. Note: Not only does the user need to be a remote control operator, but the machine must be enabled for remote control as well. Furthermore, the machine may be setup with user permissions that would require someone physically present on the device to grant access.

How to Deploy Software to an Off-network OS X Device

 When a LANDESK agent is deployed to a client device, is creates a scheduled task to call back into the core server to see what policies it has been targeted for.  For machines that are going to be off-network you may want to set policy check in to be every 2 hours. There is obviously a trade-off between over burdening the core server with requests and knowing a machine only checks in once a week, so find what the right balance is for your environment.

  1. Open the Distribution Packages tool within the LANDESK console
  2. Right click on the Mac software distribution package to deploy and select Create Scheduled Task
  3. Right click on the scheduled task that was generated and select properties
  4. Add your desired targets to the Targets menu
  5. Set the Task type under Task Settings as a policy
  6. If you’re targeting a group of machines that may have some of them on the network and some off, you may want to use a policy-supported push
  7. Set the radio button in the Portal Settings to either Recommended or Optional if you desire to put the package into Workspaces.  If you’d like to automatically deploy the app, select Run automatically
  8. Change the Reboot Settings or Distribution and Patch settings if desired
  9. Set the schedule task settings with the appropriate start time

How to Deploy Patches to an Off-network OS X Device

  1. Open the Patch and Compliance tool within the LANDESK console
  2. Ensure your desired content is in the Scan folder
  3. Right click on the definition and select Repair
  4. From the Add targets select on the Repair settings task panel, select Add all affected computers
  5. Set the Task type under Task Settings as a policy
  6. If you’re targeting a group of machines that may have some of them on the network and some off, you may want to use a policy-supported push
  7. Ensure the Display in portal option for the portal settings panel is set to Run automatically (unless you want your users to update their own apps, in which case you can select Recommended or Optional)
  8. Schedule the task to start when desired from the Schedule task panel
  9. Save the task

Frustrations in the Sky…Why So Many Plugins and Restrictions to Watch a Movie?

Flying is something I do a lot.  Having spent as much time on the road as I have, I’m accustomed to the frustrations that take place with all of the questions one goes through in order to prepare for travel.   Thankfully, I have the “rituals” in place to be able to travel without frustrations…at least for the frustrations that are in my control.  No longer do I have to mentally spend effort and time on:

  • When do I need to leave for the airport?
  • Which route should I take to avoid traffic?
  • Long term or short term parking?
  • Will the security line make me miss my flight? (Thanks TSA Pre√ )
  • Will the liquids in my bag flag me for an inspection?
  • Will this belt set off the metal detector?
  • What pre-flight food should I purchase that won’t cause indigestion?
  • Will my carryon bag fit in the overhead bins?
  • Will my seat offer adequate leg room?
  • How do I get to the rental car agency?

So while I fly often, 95% of the time it is for business travel.  When flying for business, while in the air traversing the skies, I’m typically working and preparing for the upcoming meeting or I’ll spend my time catching up from being out of the office.  This week, however, I took a personal flight after standard business hours and due to the craziness leading up to the flight, I was looking forward to pulling out my iPad to relax and watch a movie on Delta Studios. 

As soon as the airplane beeped indicating we’d reached 10,000 feet, I grabbed my iPad Mini 2 ready to browse my movie option list.  Unfortunately, I forgot to install Fly Delta prior to take off, a rookie mistake I think.  Not a huge deal, but on flights that are less than 3 hours, I know that timing is important as you don’t want to be in the last 10 minutes of movie during landing when the flight entertainment is shut off.  It is frustrating, I know.  GoGo did reimburse me on that occasion though, so props to their customer service. 

Knowing I can download it Fly Delta for free, without having to pay for Internet, I launch Safari and browse to video.gogoinflight.com. I’m quickly whisked away to a page letting me know that my browser is not supported. 

What, why I ask?  I’m using Safari on iOS.  Why would it not be supported?  I look through the supported browser list and the only supported browser for iOS is Safari 5.0 and up.  Well, the perils of being an early adopter bit me.  Apparently in inflight entertainment provided by GoGo or Delta Studios checks for a minimum and maximum version of the browser.  My iPad is on iOS 9 beta, and because of the coding restriction, it’s therefore not supported.

My frustration begins, however, I can see the logic in the decision.  Early adopters for Operating Systems could be purchasing movies and then complaining about their experience when using a browser the vendor has not yet been able to properly evaluate.  Refunds and support costs go up, service experience goes down, etc.  Whatever, I get it. I have options, no big deal. 

I then pull out my phone.  Not exactly the ideal video experience, but I don’t want to use my laptop.  Unfortunately for me, my phone battery was at 36%.  It had been a long day with a lot of phone use, not leaving me with enough battery to watch a movie, so outcomes my MacBook Pro.

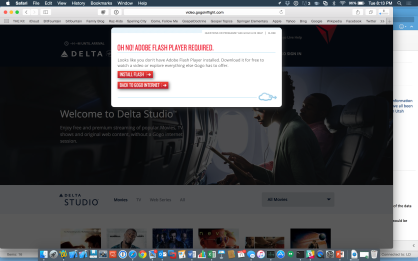
Oh no!  Adobe Flash player required. 

GoGo video entertainment requiring flash

Oh no is right!  After the latest exploits in Flash, I purposely removed it from my MacBook

Turns out to watch a movie, Flash is required.  Ugh!  Furthermore, Chrome is not supported so i can’t use the embedded Flash support available via Google Chrome.  Now the frustrations are really starting to mount.  I’m on my third option and what was supposed to be a relaxing time has turned into a lot of troubleshooting and back and forth between devices. 

Reluctantly I decide I’ll install Flash and remove it when the flight is over. Success is imminent.

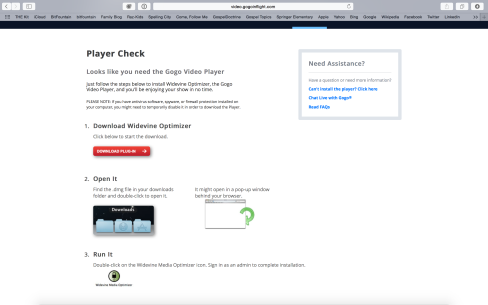
Or maybe success is not to be had at all!  I guess it’s a good thing I have not ordered popcorn from the flight attendant yet. In addition to needing to install Flash, I also need to install plugin for the GoGo video player.  Now I’m really reluctant to proceed.  With Flash, I understand the risks and I know how to remove it.  In regards to the Widevine Optimizer, I’m clueless and at 30,000 feet and Internet-less, so I can’t do a proper discovery. Widevine Plugin Required

Motivated now by competition and unwilling to let the situation get the best of me, I install a second plugin onto my machine.  My frustration level is at a peak and I’m ready to call the product manager over the inflight entertainment and ask him/her the below: 

  • Where’s the GoGo app to handle all of this for me? 
  • Is there a way to have a one click install to take care of what is needed? 
  • Why use technology that requires so many plugins when people are trying to use this when flying at 30,000 and may be without the Internet? 
  • What are the goals in the future to make the end-user experience more enjoyable?

Anyways, after one more browser restart, it looks as if I’ll be able to watch a movie.  By this point, I’m an hour into the flight, the flight attendant has come and gone which means know movie popcorn and I know full well I won’t be able to finish the movie. 

Why so many plugins and restrictions to watch a movie?

Automating the Mundane…Scripting for VMWare Fusion Efficiency

Growing up, it was not uncommon to hear someone quote the phrase “you tell me what you think about when you do not have to think, and I’ll tell you what you are.”  It’s a quote that can be deep, philosophical and ignite some serious introspection.

For me, the answer is easy.  It’s efficiency.  My brain is constantly chewing on how to make whatever insufferable process I’ve been experiencing in the last hour, day, week, etc; more palatable, more efficient, less…well, less sufferable.

Now, I know that declaring war on inefficiency should not be humanity’s primary purpose in life; not everything is a race to the finish line with as limited wasted movement as possible, but tell that to some other guy who’s brain doesn’t dissect every tiny amount of wasted time as potential opportunity for improvement.

When a former employer was asked by a potential new employer what my biggest weakness was, he responded with “well, I don’t know if this is exactly a weakness, but Bennett will constantly be looking for a way to improve a process, to make things more streamlined, even if he spends weeks devising a plan to save a minute’s worth of work during an 8 hour work day.”

Personally I hear that and I think, “wow, look how inefficient I’m being on spending such time to save so little.”

Nonetheless, hear I sit, a self-proclaimed efficiency hunter ready to tell you how I spent last week efficiency hunting within my daily workflow, to save not only time, but frustration and to improve the consistency of my work.

My daily routine as a LANDESK Sales Engineer consists of demonstrating one or more of our products to potential customers.  Due to the number of different products desired to be seen and the potential use cases from the customer that may require an integration demo, I may have up to 8 different virtual machines that need to be spun up.

In order to maintain consistency in my demo environment, I will take snapshots of each VM so I can demo the full capabilities of the software products and quickly reset back to square one for the next demo.

As such, I’m often starting a number of machines, stopping a number of machines, snapshotting them, reverting to snapshots, deleting old snapshots and even just needing to see what snapshots I’ve created.  All of this can be a bit cumbersome when you do it many times a day.

So when I received my new MacBook Pro last week, my efficiency brain kicked in, it was time to automate the entire process.  Luckily for me, VMWare has a utility that allows command line access to do all of the starting and stopping of the machines, as well as the snapshot management.

Perfect right?  Well almost, I didn’t want to write my own script, I wanted to just borrow someone else’s.  Alas, I scoured page one and even page 2 of Google (I know, page 2!) for a number of different search criteria hoping to find a hit, only to come away empty handed.

My efficiency brain wouldn’t let me just quit and give up though.  So I went to work and spent from 9 PM to 3 AM writing my own script and am now making that script available to you for your own efficiency pleasure.

Enjoy!  All you should have to do is fill out the variables at the top and you’ll soon be on your way to VMWare Fusion Management efficiency bliss.  I’ve saved my script as a .command file so I can execute directly from my desktop.

#/bin/bash 


# Version history 
# v1.0 - initial release
# 

# Add the paths to all of your VMs
declare -a arrayPathForVMs=("Documents/VMs/LDSERVER/LDSERVER.vmx" "Documents/VMs/OSX/OSX.vmx" "Documents/VMs/Win8/Win8.vmx")


# Create a directory location variable
vmrunPath="/Applications/VMware Fusion.app/Contents/Library/vmrun"
setScriptPath="$HOME"


while :
do
 clear
 cat <<EOF
 =========================================
 VM Fusion Management
 -----------------------------------------
 Please enter your choice:
 
 (1) Start VMs
 (2) Revert to a Snapshot
 (3) Create a Snapshot
 (4) Delete a Snapshot
 (5) List Snapshots
 (6) Suspend all VMs
 (7) Exit
 
 -----------------------------------------
EOF
 read -n1 -s
 case "$REPLY" in
 

 "1")
 echo "Starting your VMs..."
 cd "${setScriptPath}"
 for i in "${arrayPathForVMs[@]}"; 
 do
 echo "Launching" "$i"
 "${vmrunPath}" -T fusion start "${i}";
 done
 echo "All VMs started."
 Sleep 2
 exit 0
 ;;

 "2")
 echo -n "Which snapshot do you want to revert to?"
 read snapshotName
 cd "${setScriptPath}"
 for i in "${arrayPathForVMs[@]}"; 
 do
 echo "Reverting to" "$snapshotName" "on" "$i"
 "${vmrunPath}" -T fusion revertToSnapshot "${i}" "${snapshotName}";
 done
 echo "All VMs reverted."
 Sleep 2
 exit 0
 ;;

 "3") 
 echo -n "What will the snapshot name be?"
 read newSnapshotName
 cd "${setScriptPath}"
 for i in "${arrayPathForVMs[@]}"; 
 do
 echo "Creating" "$newSnapshotName" "on" "$i"
 "${vmrunPath}" -T fusion snapshot "${i}" "${newSnapshotName}";
 done
 echo "Snapshots created for all VMs"
 Sleep 2
 exit 0
 ;;

 "4")
 echo -n "Are you sure you want to delete a snapshot (y/n)? "
 read answer
 if echo "$answer" | grep -iq "^y" ;then
 echo -n "What snapshot do you want to delete?"
 read snapshotToDelete
 cd "${setScriptPath}"
 for i in "${arrayPathForVMs[@]}"; 
 do
 echo "Deleting" "$snapshotToDelete" "on" "$i"
 "${vmrunPath}" -T fusion deleteSnapshot "${i}" "${snapshotToDelete}";
 done
 echo "Snapshot deleted for all VMs"
 read -p "Press [Enter] to close."
 exit 0
 else
 echo "No changes have been made."
 read -p "Press [Enter] to close."
 exit 0
 fi
 ;;

 "5")
 echo "Listing your snapshots..."
 for i in "${arrayPathForVMs[@]}"; 
 do
 echo "Snapshots for" "$i"
 "${vmrunPath}" -T fusion listSnapshots "${setScriptPath}/""${i}";
 done
 echo "All snapshots displayed"
 read -p "Press [Enter] to close."
 exit 0
 ;;


 "6")
 echo "Suspending your VMs..."
 cd "${setScriptPath}"
 for i in "${arrayPathForVMs[@]}"; 
 do
 echo "Suspending" "$i"
 "${vmrunPath}" -T fusion suspend "${i}";
 done
 echo "All VMs suspended."
 Sleep 2
 exit 0

 ;;
 
 "7")
 echo "Exiting..."
 exit 0

 ;;
 
 "Quit")
 break
 ;;

 *) echo invalid option;;
 esac
done

How to Install Microsoft Office 2016 for Mac Using LANDESK Management Suite

Goodbye 2011 and hello 2016!  After five long years, Microsoft has finally replaced its outdated and very un-Macish Office 2011 product with an ultra-sleek and modern Office 2016 for Mac. Re-written from the ground up, Microsoft is promising an “unmistakably Office” experience; something we Mac users have not previously enjoyed without compromising the Mac experience itself.

The one major caveat for the Office 2016 for Mac release…you must be an Office 365 subscriber, or you must be a student to get access to the product today. If you don’t fall into one of those two categories, you’re going to need to hold tight. While the full details are not yet known, such as the exact release date or price, the one-time product purchase option will have you waiting until September sometime. If you don’t feel you can wait that long, head over to office.com/mac and become a subscriber today.

Kirk Koenisbauer, the corporate vice president for the Office Client Applications and Services team, writes on the Office Blog:

“Today we are taking a big step forward for Mac® users—Office 2016 for Mac is now available in 139 countries and 16 languages. Based on feedback from the great Mac Office community, we’ve made major updates to each of the apps, and we couldn’t be more pleased to deliver it first to our Office 365 customers.”

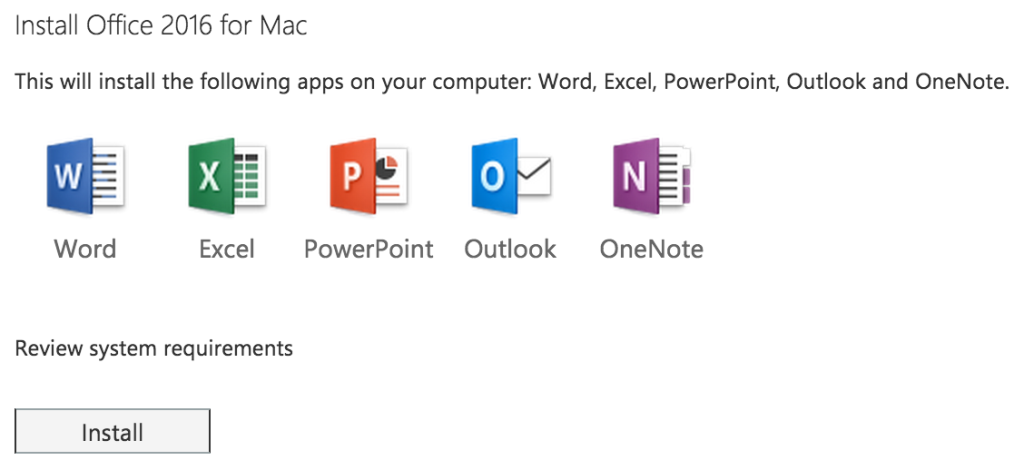
So just how can you get this wonderful new Office suite installed on all of your Macs? Just sign in to your office.com/myaccount area, or into your personalized corporate portal, hit the Office 365 settings cog icon and then navigate to the Software section.

Once on the Software page, you’ll see the Install button. Click it and the 1.1 GB .pkg installer will begin to download.

OfficeInstallButton

When you have the installer downloaded, the fun can finally begin. To deploy it out to all of your OS X machines, you’re going to want to use LANDESK Management Suite.

Remember, with the install being tied to your Office 365 account, there are no customization options that need to take place with the installer itself. And, as a step of precaution, zip up the installer since it’s a pkg file type, as you don’t want Windows to think it would be a good idea to mess with the permissions on the installer files themselves. When you’ve completed zipping the installer, place it into your software distribution share you use for LANDESK.

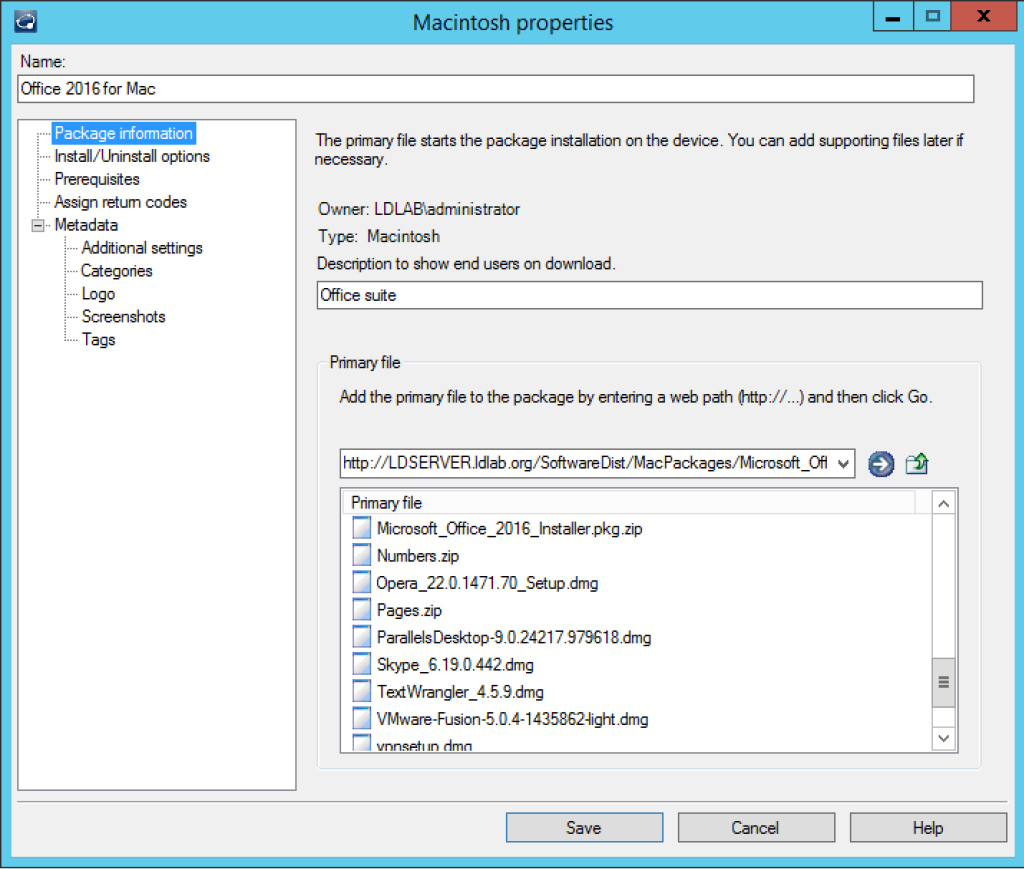
From there, you’ll need to create a LANDESK Mac distribution package. The nine-step process below contains information on how to create the package:

  1. Open the LANDESK Console
  2. Navigate to the top menu bar, select Tools > Distribution > Distribution Packages.
  3. In the lower left menu tree, highlight My Packages or Public Packages from within the Distribution Packages window
  4. On the Distribution menubar, press the New Package button and select New Macintosh Package.
  5. Give the package a name, something like Office 2016 for Mac
  6. Provide a description if desired
  7. Set the primary file to the zip file you previously transferred to your software distribution folder
  8. Fill out the Metadata details if desired
  9. Save the package

Office 2016 Package

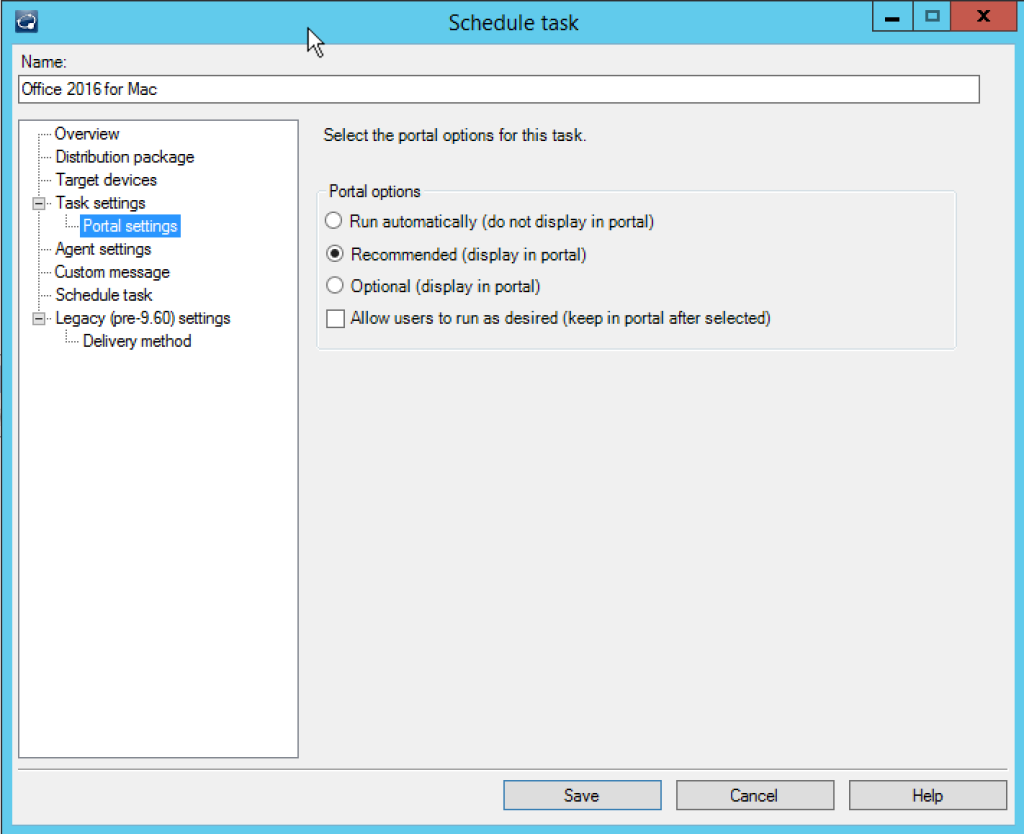
With the LANDESK Mac package created, you now just need to schedule a task for deployment. This too, is a pretty simple process.

  1. Right click on the Office 2016 for Mac package created and select Create Scheduled Task
  2. From the network view, select and drag the desired machine(s), user(s) or query(ies) and drop them onto the task
  3. Now, right click on the task and select properties
  4. Set the desired Task type under Task Settings as to whether you want a push, a policy or a hybrid of the two types in a policy-supported push.
  5. If you desire the end user to be able to initiate the task, set the radio button in the Portal Settings to either Recommended or Optional, otherwise set it to Required and it will automatically begin the upgrade during the next maintenance window
  6. Change the Reboot Settings or Distribution and Patch settings if desired
  7. Set the schedule task settings with the appropriate start time

Required or Recommended

With that, you can sit back and watch. On my 2015 MacBook Pro, the install took about five minutes. However, it’s worth noting, the Office 2016 for Mac installer does not remove Office 2011 for Mac. If you want it removed, you’re going to need to create a LANDESK Uninstall Mac package and deploy it in conjunction to the Office 2016 for Mac installer.

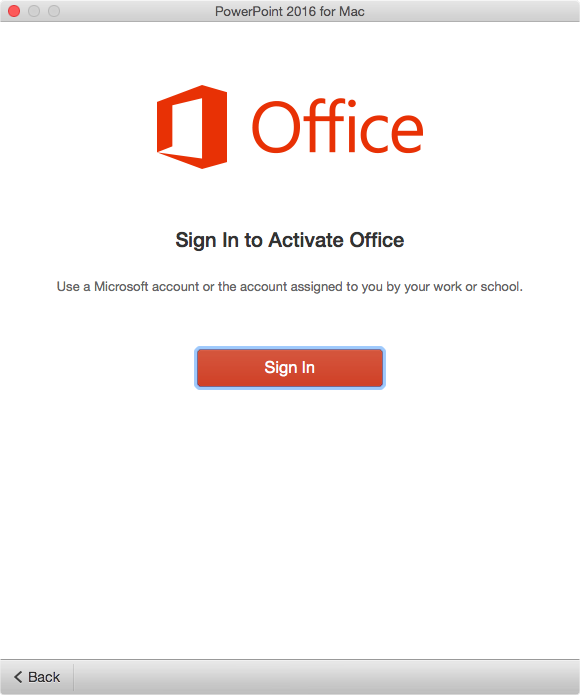
Once installed, the first time any one of the five applications (Word, Excel, Outlook, PowerPoint of One Note) is launched, it will prompt the end user to sign in and activate.

Sign In to Activate