Disable Your Mac from Automatically Booting On Lid Open

The other day I was “flipping” through Flipboard and came across an article on OSXDaily that discussed how one could prevent a Mac from automatically booting when the lid is opened.

The command to enable or disable this setting is quite simple.  By leveraging Terminal, all you need to do is set the AutoBoot value.

Disable AutoBoot:

sudo nvram AutoBoot=%00

Enable AutoBoot:

sudo nvram AutoBoot=%03

While I personally like the AutoBoot feature, I can see why some people may choose to disable it; especially in an academic or corporate setting.

Using LANDESK Security Suite 2016, the NVRAM AutoBoot setting can easily be scanned for with every vulnerability scan, by building a custom definition to evaluate the NVRAM AutoBoot value.  Then, using the repair logic, you can maintain a desired state in your organization even if an administrative user opts to change it.

And, the best part is, I’ve created the custom definition for you – no scripting needed on your behalf.  Download the custom definition from GitHub here and import it to your core server.

Custom Definition Import

  1. Open the LANDESK console
  2. Go to Tools > Security and Compliance > Patch and Compliance
  3. From the definition types dropdown menu, ensure you have selected Custom definitionpatch and compliance dropdown menu.png
  4. In the white space area, right click and select Import custom definition import.png
  5. Browse to the custom definition file and click the Open button to import

Once imported, set the definition to Autofix and it will maintain the AutoBoot state for you.  It’s that easy to maintain, pretty nice, isn’t?  It doesn’t matter if a person changes the value themselves, using Autofix it will continually set the value back to the state defined in the defintiion.

Understanding the Custom Definition

If you’re like me and want to understand how I built the custom definition, as opposed to just blindly importing the file I created, then read on.

There are 5 basic steps to building a Mac custom definition.  First, you need to create the custom definition and add in the Properties Details.  Secondly, you need to create a detection rule and set the affected platform state.  The third step is to provide a script to do the detection work, add that to the Custom Script panel. The forth step is to specify the repair process in the Patch Information panel.  Lastly, you need to provide Patch Install Commands to make the changes necessary if you initiate a repair.

  1. Create a custom definition by clicking on the green circle with a white plus symbol when inside the Custom Definition dropdown panel screen-shot-2017-02-03-at-1-19-16-pm
  2. Enter in your desired information on the General tab and Description tab, like the severity and notes around what the custom definition will do.  Properties Panel.png
  3. Click the Add button under Detection Rules panel and specify your Affected Platforms.  I check both Mac OS X and Mac OS X Server.Affected Platforms.png
  4. Now you need to add in your detection logic in the Custom Script panel.  For the AutoBoot feature, we really only need two lines.  We need to specify the shebang environment and we need to capture the AutoBoot value.  Now, I have added a few extra lines for documentation, which you can leave to assist your coworkers.  My scripts are all pasted below or available on GitHub.  Also, in every custom definition, you need to return the Found state, Reason state, Expected state and a Detected State of either 0 or 1.  I don’t get into the details of this, so for more info see the Interchange Presentation regarding Custom Definitions.Detection Logic.png
  5. Finally, we need to add in the repair logic on the Patch Install Commands.  Patch Install Commands.png

That’s all there is to it.  Just hit OK at this point.

Now, if you’re wondering why I didn’t add in some Uninstall logic to revert our change back, if we desire, it is because the Mac agent doesn’t support it at this time.  Feel free to put in a request with Product Management if you think this would be helpful.

Scripts

Detection Logic
#!/bin/sh

# autoBootNVRAMDetection.sh
# Created by Bennett Norton on 2/2/17.
# Detects the state of AutoBoot set in the NVRAM

# nvram AutoBoot will call and obtain the value for just the AutoBoot variable
# calling nvram -px will show all values and put the output in an XML format
# awk filters out the AutoBoot text and leaves us with just the value

autoBoot=( $( nvram AutoBoot| awk '{print $2}') )

# compare the nvram state with your desired state
# a value of %00 means the autoboot is disabled
# a value of %03 means the autoboot is enabled
# any other value means the autoboot state is undefined

if [[ $autoBoot == *"%00"* ]] ; then
 echo "Found: NVRAM AutoBoot value is $autoBoot"
 echo "Reason: NVRAM AutoBoot value is $autoBoot"
 echo "Expected: NVRAM AutoBoot to be disabled or set to %00"
 echo "Detected: 0"
exit 0
else
 echo "Found: NVRAM AutoBoot value is $autoBoot"
 echo "Reason: NNVRAM AutoBoot value is $autoBoot"
 echo "Expected: NVRAM AutoBoot to be disabled or set to %00"
 echo "Detected: 1"
exit 1
fi
Disable Logic
#!/bin/sh

# autoBootNVRAMDisable.sh
# Created by Bennett Norton on 2/2/17.
# Sets the AutoBoot state in the NVRAM

# nvram AutoBoot=### sets the state
# a value of %00 means the autoboot is disabled
# a value of %03 means the autoboot is enabled

nvram AutoBoot=%00
Enable Logic

While I don’t use the next script in the custom definition, if you wanted to enable the setting for all machines, you’d use this script instead.

#!/bin/sh

# autoBootNVRAMEnable.sh
# Created by Bennett Norton on 2/2/17.
# Sets the AutoBoot state in the NVRAM

# nvram AutoBoot=### sets the state
# a value of %00 means the autoboot is disabled
# a value of %03 means the autoboot is enabled

nvram AutoBoot=%03


LANDESK Mac Management Part 4: Patching OS X and 3rd Party Applications

In part 4 of this LANDESK Mac Management series, we’ll demonstrate how you can patch the Mac OS, walking through the reboot process as well as patching 3rd party application titles on the machine; which typically don’t require a reboot to take place.

How to Patch Mac App Store Apps with LANDESK Patch’s Manual Definitions

Introduction

Patching OS X applications can be quite the adventure.  Due to digital rights management, Apple ID’s and user agreements, not all content found inside of Apple’s Mac App Store for OS X is available for redistribution by LANDESK.  This white paper will discuss how an application installer found in the Mac App Store (MAS) can be captured and used to patch applications deployed on your OS X devices.

Overview

LANDESK has a team of engineers that write content for many of the common applications in use on the OS X platform.  This content can be downloaded by anyone with a LANDESK Patch Manager or LANDESK Security Suite license.  However, unless the application is patched by Apple’s update servers, the content provided by LANDESK will have a “manual” appended to the title of the definition file.

Manual Content.png

This “manual” indication in the title is to inform you that LANDESK cannot redistribute the content for that particular object. In order to do more than just detection for that vulnerability, the application will need to be manually downloaded.  By reviewing the Description tab on the Properties panel, you’ll find the note: “The patches for these applications should be downloaded from the Apple network by the LANDESK administrator. The respective patches should then be compressed into individual packages for each patch and named as *-version.zip (for example, Pages-5.0.zip). The last step would be to copy the zip package to the path \\coreservername\ldlogon\patch” or wherever your patch repository is located.


Pre-Requisites

The LANDESK administrator will need to have access to an OS X device that has purchased the application that is intended to be patched, but that does not have the application currently installed.  A VM set aside just for downloading Apps may be an efficient method for the ongoing patch process.

Enable Debug Mode for the Mac App Store (MAS)

When an application is downloaded from the MAS, the installer file is downloaded, executed and then promptly removed.  By enabling debug mode for the MAS, we can create a link to the downloaded installer(s) allowing for future use on more than just the machine currently downloading the app.

  1. Quit the Mac App Store if currently opened
  2. Open Terminal and run the command ‘defaults write com.apple.appstore ShowDebugMenu -bool true’

EnableDebug.png

Note: To disable debug mode, use the following command: ‘defaults write com.apple.appstore ShowDebugMenu -bool false’

Download the Installer for the App to be Patched

Once the debug mode is enabled, it will be possible to capture the download installer file for later use in patching.

  1. Launch the App Store App (notice you should now have a Debug menu item) and navigate to the Purchased tab.  Sign in if prompted.
  2. Select the app to be patched and click Install
  3. Once the install process shows visible progress in the download process, hit the pause button
  4. From the Debug menu, select the option Show Download Folder
  5. Finder will open and you’ll need to navigate inside the com.apple.appstore folder
  6. Locate the folder with a string of numbers, this should be your app, and navigate inside of it

RandomNameAppStoreApp.png

You now need to create a hard link between the randomly named download to a file name and path of where to store the installer.  You’ll do this by opening Terminal and use the ‘ln’ command followed by the path of the installer from the Mac App Store and then the path to where you want to save your copy of the installer that won’t be deleted as soon as . The easiest way to enter the path of the randomly named installer is to drag and drop it into terminal after typing ‘ln’

  1. Launch Terminal and type ‘ln /path/to/macappstore.pkg /path/to/savedinstaller.pkg’                            HardLink.png
  2. Return to the Mac App Store purchased tab and resume the download
  3. When the installation for your app finishes, you’ll have a signed installer from Apple to use to update your fleet of Mac devices

Automating for Multiple Concurrent Downloads

If the manual linking process described above seems a bit burdensome when in need of downloading many applications, Max Schlapfer has created a script to not only automate the creation of the hard links, but it also has the capability to download multiple files at once.  To download Max’s AppStoreExtract script, seehttps://github.com/maxschlapfer.  These next steps are not requisite, if you have the installers you need to patch, skip forward to Configuring the Output Installers for LANDESK Patch.

Note: You do not need the Debug mode enabled for the Mac App Store, as outlined above, for this script to work.

  1. Download Max’s script from Github and extract it to a folder location of choice                                                 AppStoreExtractGitHub.png
  2. Open terminal and execute the script by typing in ‘./path/to/script/AppStoreExtract.sh’ and hitting Return
    1. Note: Do not run this script as root.                                                                                             AppStoreScriptWaiting.png
  3. Launch the App Store App and navigate to the Purchased tab.  Sign in if prompted.
  4. Click Install on all of theApps you want to create installers for and wait for them to complete the install process
  5. When the installation process has finished, return to the Terminal window and hit any key to finish the script.  When asked to finalize the packages, type Y.TerminalAppStoreExtractProcess.png
  6. The script will name the output files according the product and version and then convert them to DMG files and store them in the /Users/Shared/AppStore_Packages folderOutputAppStoreExtract.png

Configuring the Output Installers for LANDESK Patch

There is a good chance that LANDESK has already created the definitions needed to properly detect and repair the application of choice, you simply need to zip up the installer and name it according to what the definition file expects.  Refer to the description tab for each piece of content for specifics, but in general, you’ll want to name the zip file by the productname-version.zip.  If LANDESK has not already created the content, feel free to reach out to your local support representative and request the content be generated. Alternatively, you can create your own custom definitions as well.  See https://community.landesk.com/support/docs/DOC-6041 for more information on creating your own vulnerability definitions.

  1. Rename each installer according to productname-version.zip as defined in the definition file.  Make sure artifacts such as .dmg or .pkg are removed from the zip file name as well as any underscores “_” where LANDESK patch content may be expecting a dash “-.”    If you want to verify you have properly named your installer, go to the properties panel for the detection rule within the vulnerability definition and highlight the Patch Information menu tree item. TheUnique Filename provided will tell you the exact name it is expecting.                                     UniqueFileName.png
  2. Copy the installers to your LANDESK patch repository
    1. Typically, the path to the LANDESK patch repository will be \\coreservername\ldlogon\patch.  However, this can be changed by an administrator.  If you’re unsure, go to the Patch and Compliance tool within the console and hit the Download Updates icon from the tool’s menu bar.  From there, click on the Patch location tab and validate your UNC path.

Note:  The individual patch content will not show as downloaded until the next scheduled patch download or if you manually attempt to download the patch.  At that point, it will see the file and change the status to yes.

Repair Your OS X Devices Using LANDESK Patch

Now that you have the installers for your content, you can repair your devices by either scheduling a repair task or by setting the content to be repaired by Autofix.

Autofix

  1. Open the Patch and Compliance tool within the LANDESK console
  2. Ensure your desired content is in the Scan folder
  3. Right click on the definition and select Autofix > Enable global autofix or Enable autofix for all scopes.AutofixSelection.png
    1. If you prefer to only enable autofix for a couple of scopes, go to the prosperities panel, select the Autofix tab and  check the boxes for the desired scopes.ScopeSelection.png

For more information on Autofix, see: https://community.landesk.com/support/docs/DOC-33690

Scheduled Repair

  1. Open the Patch and Compliance tool within the LANDESK console
  2. Ensure your desired content is in the Scan folder
  3. Right click on the definition and select Repair
  4. From the Add targets select on the Repair settings task panel, select Add all affected computers                              RepairTaskTargets.png
  5. In the Tasks settings panel, set your desired Task type.
  6. Ensure the Display in portal option for the portal settings panel is set to Run automatically (unless you want your users to update their own apps)
  7. Schedule the task to start when desired from the Schedule task panel
  8. Save the task


For additional information on how to use LANDESK Patch Manager, see: https://community.landesk.com/support/docs/DOC-32250

Does Your Mac Patch Process Rely Solely on Hope and Prayer?

The Hope and Prayer of a Contractor

My family and I love to play pickup basketball games together in our backyard. We do however, live in Texas, and as you probably know, Texas summers are hot. Due to the heat, we decided it would be wise to install an overhead light on the basketball court so we could play hoops when the sun goes down. Since I’m not electrician, we contracted out the work in early February.

Well, it’s now the middle of August and we’re still waiting for the electrician to finish his job. Last week I was pressing the general contractor for a commitment for a specific day for the work to be done. Let’s just say his response was not exactly what I was expecting.

“He said next week for sure. Praying that happens.”

Now, I am a very religious individual and strongly believe in the power of prayer. I even believe prayer should be invoked on behalf of our businesses and livelihood.

However, I believe prayer is a tool to be used after we’ve done everything possible on our end to bring about our desired outcomes. I do not believe prayer should be a tool used as a crutch to overcome our own lack of effort and planning (James 2:20). A general contractor, in my opinion, should be able to effectively work with his team and his subcontractors to gain commitments and delivery dates without doing anything more than throwing it onto the wings of hope and prayer.

How Does this Relate?

So what does this story have anything to do with patching processes for Macs?

To that, I say, good question. In response, I’ll answer your question with a question. Are you secretly relying solely on hope and prayer that the Macs in your environment will simply be self-managed by the savvy users that employ them? After all, Mac users want to be treated differently, right?

I was on a phone call again on Friday and asked the IT administrator if they have just Windows devices employed in their environment, or if they have anything else such OS X devices and/or Linux devices that he would need to manage. His response is about as common as it gets.

“We have some Macs, the total number of which is growing, but it’s mainly just our marketing team and several of our executives. At this time, we don’t manage them.”

You don’t manage them? Wow! How often do we hear the idiom “a chain is only as strong as its weakest link?” Why do organizations invest so much time and money in their infrastructure when they’re only going to patch a percentage of the total attack vectors, leaving the remaining portion to chance…or was that to hope and prayer?

The Vulnerability Data

Common Vulnerabilities and Exposures is reporting that OS X has 178 new security vulnerabilities published in 2015 alone. To compare, that’s more than 2013 and 2014 combined and we still have a third of the year to go – this data only includes vulnerabilities released up until the first week of July. It doesn’t account for the latest zero-day vulnerabilities being reported this week here and here. Furthermore, of the 178 vulnerabilities, 25 of them allow the attacker to gain additional privileges on the compromised system. To put that into perspective, 25 new privilege vulnerabilities is greater than all previously reported exploits of the same type over the last eight years combined!

NumberofVulnerabilities GainPrivileges

Hoping and praying an attack doesn’t surface, through the management process of “look the other way”, is incredibly risky and could potentially cost you millions. Infosec Institute is reporting that in 2013 “the average annualized cost of cybercrime incurred per organization was $11.56 million, with a range of $1.3 million to $58 million.”

So What Do I Do?

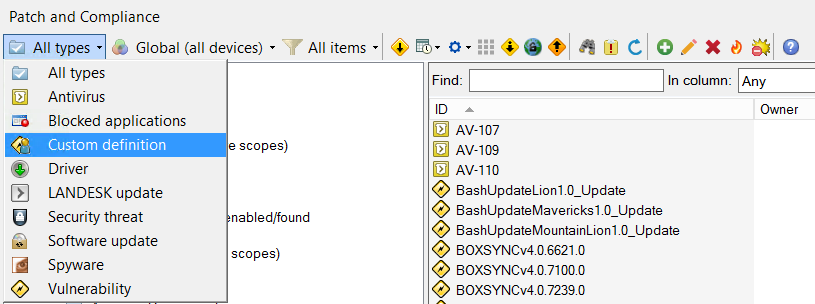
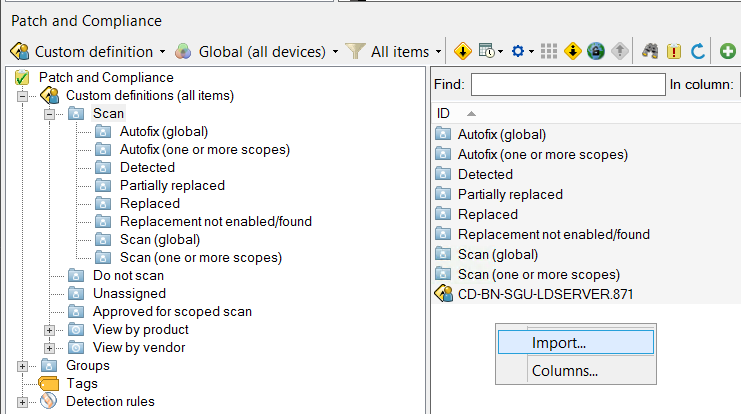
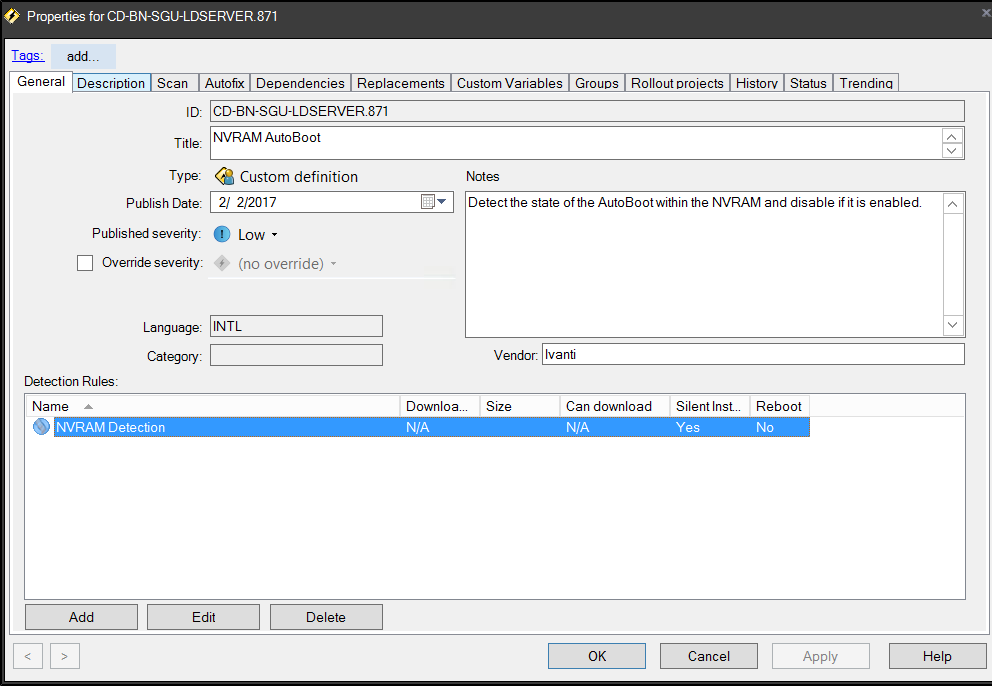
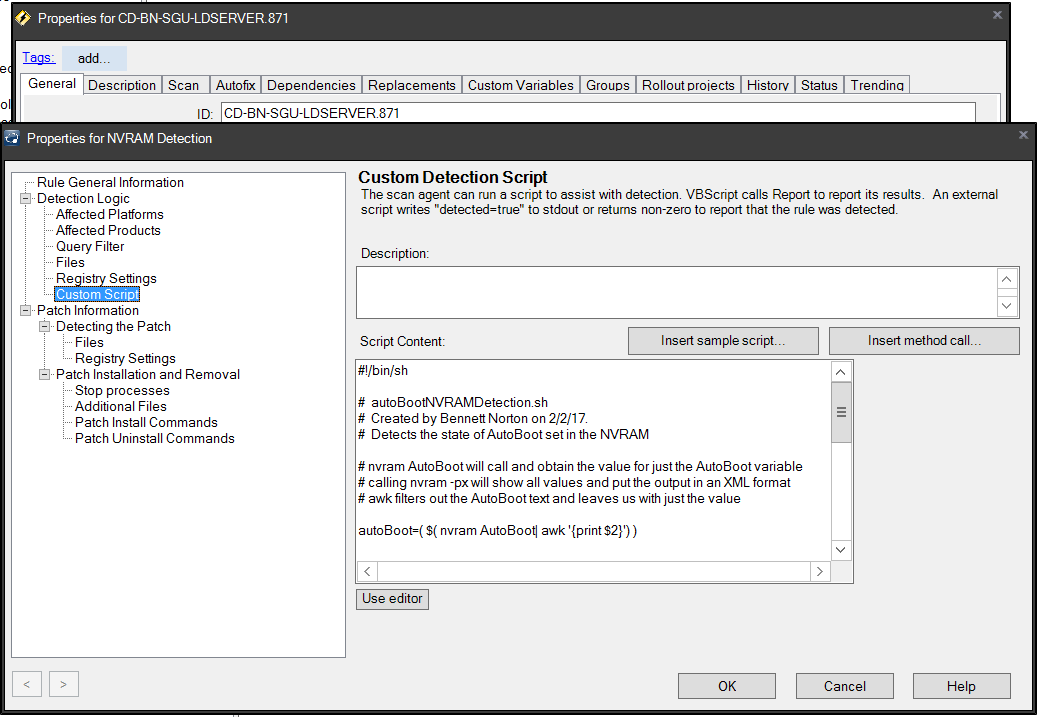
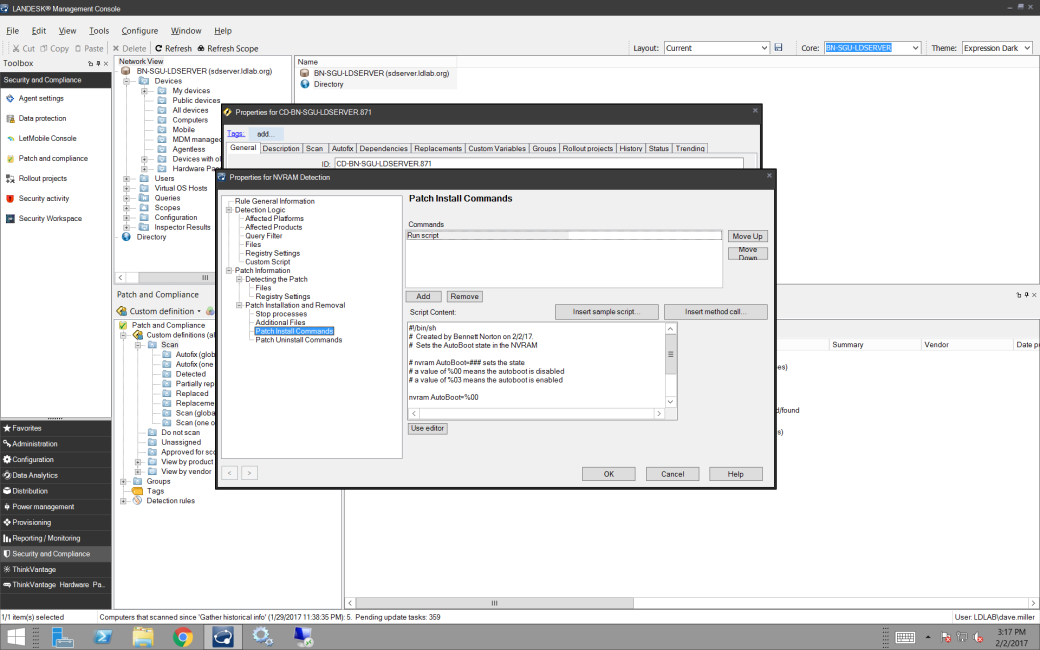
Sounds like it’s time to quit relying on just hope and prayer and to put forth some action. So where do you start? First and foremost, obtain a tool that allows you to scan your managed machines against a known vulnerability list that you can control, and ensure your machines scan on a frequent basis and then centrally report up their results.

Just knowing where you stand against the 178 new vulnerabilities is a great start. It will also give you the information you need to make intelligent business decisions.

Notice that I mentioned you will now have the data to make intelligent business decisions. Blindly patching all 178 vulnerabilities without properly testing them, while better than completely ignoring them altogether, is not moving forward intelligently. If you were to blindly patch everything, there’s a good chance you could break a critical business process which in turn could potentially affect your organization to the tune of millions of dollars as well. So be careful and use caution.

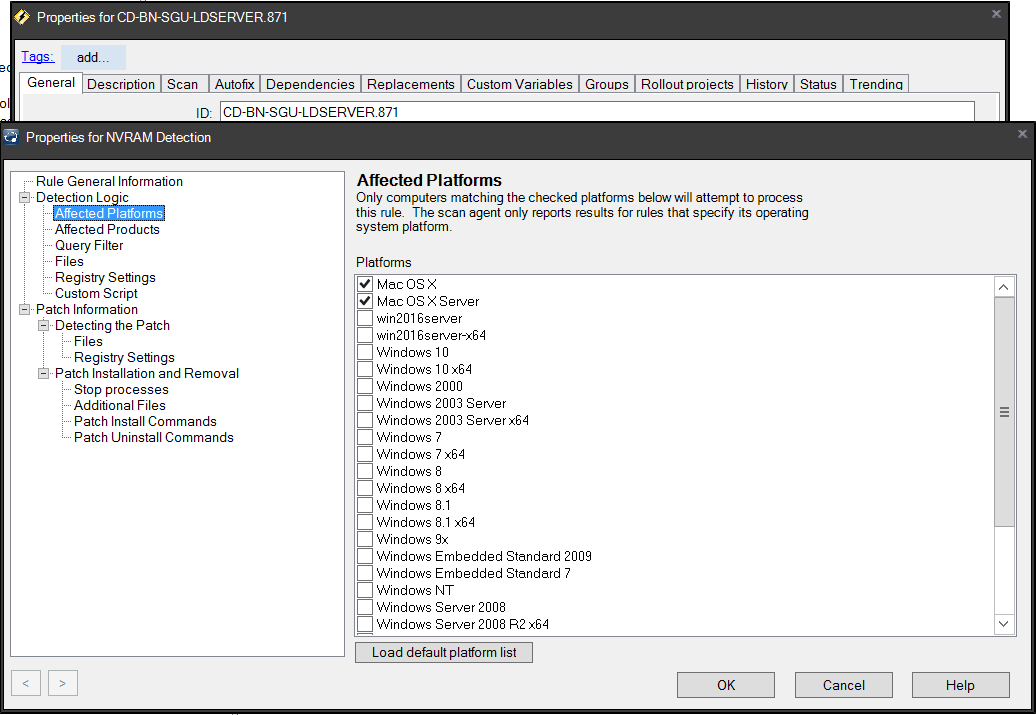
Many security pundits will encourage you to test and evaluate new patches in phases. Apple doesn’t have a “Patch Tuesday” so you’ll need to be constantly vigilant about when Apple releases new security updates. Hopefully the tool you use to scan your machines can notify you of new content. If not, keep on an eye on Apple’s Security Updates page found here.

I personally like to break down my patch process into five distinct phases:

  • The lab test phase
  • The smaller, more controlled initial test pilot phase
  • The larger, greater reach secondary pilot phase
  • The mass rollout phase
  • The exception handling phase

The size of your organization and the resources available may force you to adapt, and that’s alright. It’s the checks and balances part that is critical.

The Lab Test Phase

Inside the lab test phase, you should have replica environments for the different types of configurations you have deployed in your environment. Keep them up to date with reality. Make sure when you update your critical business applications in production that you also update your test lab machines. Almost as important, make sure you downgrade the business critical applications to the current release version when testing new security content. Don’t think just because the Apple security update works with version 2.2.x of your business app that it will also work with version 2.1.x.

In order to advance out of the lab test phase, ensure that your exit criteria has been defined and that it meets your success metrics. These metrics may be as simple as defining a machine has been patched, it still can be logged into and that the critical business applications can still be opened. You may also decide to get much more granular, that’s up to you and your organization’s tolerance for risk. What’s important is that a set of defined exit criteria has been established. You can’t be successful if you don’t know what success looks like. Once you have success, document the status of your exit criteria with times and dates and move on.

In regards to timing, when new content comes out, you should be immediately testing against your lab machines.

The Smaller, More Controlled Initial Test Pilot Phase

Once you’ve validated the content against your lab machines and have met your successful exit criteria, move on to a focused pilot group. This is stating the obvious but members of this pilot group need to be using machines that match the type of devices deployed to your entire corporation. That may mean you’re going to need to find dozens of different types of users to match finance, engineering, marketing, etc. Understanding your different user types is critical. Furthermore, these individuals need to be flexible and must be willing to communicate when things don’t work. Build feedback channels into your process that are easy to use. If something breaks, the pilot test group user should know exactly how to contact you with the information you desire.

The next obvious step is to notify the pilot group that patches are coming so they know to be alert and aware.

Just like with the lab test phase, define your exit criteria and document it. Not everyone in your pilot group is going to be available 100 percent of the time. You may have to settle with a 100 percent approval rating from your test group, or up to seven business days. Define what success is, establish the process, and once you can quantify whether you’ve hit your metrics, move on. If you can’t meet your success metrics due to issues, single out the offender and proceed with the rest while you move the offender into the exception handling process.

Ideally, you should be able to wrap up this phase within three to 10 business days from the initial content publication date.

The Larger, Greater Reach Secondary Pilot Phase

The larger pilot phase is nearly identical to the first, only this time increasing the amount of participants. Maybe you move from 2 percent of your machines to five to 10 percent of your machines. Due to the greater number of participants, you may need to be more lax in your exit criteria. You may decide that if 75 percent of your participants approve, or if seven business days have transpired, you have sufficient information to move on. When things break, people complain. When it comes to patch, no news is often good news, that’s why we can put time down as a successful metric. It’s not perfect, there are always those applications that are run on a periodic basis, but it’s a start. Just document were you stand and move on.

Again, just make sure the proper notification is going out to your pilot group so they know to be aware and provide them with dates they need to respond by. Ensure the proper channels are in place so the pilot users can communicate the good and the bad.

This phase should put you two to three weeks out from the content’s publication date. Remember, time is not on your side. The key is to be disciplined, yet focused on getting the content released.

The Mass Rollout Phase

Here comes the fun part, let’s roll out the patch updates to the rest of the organization. While no process will prevent every potential bad outcome, enter into the mass rollout phase with confidence. It won’t hurt to hope and pray at this point either, but at least you’ve done your part.

The key to this portion is to capture the feedback and learn. If a certain individual or group is adversely affected, understand how he/she/them differ from your pilot test groups. Consider adding in this individual or a member from the group into your pilot phase for future testing. The outspoken, high-energy individuals are usually willing to participate in such programs, so bring them in.

Make sure you’re using your patch tool to track the progress. You should be able to hit a pretty high success criteria within days of release.

Where I see most companies struggle here is with off-network devices. Ideally your patch tool should be able to handle the delivery of a patch regardless of where it sits, whether on or off the network. If it doesn’t, you may want to re-evaluate your tool. Machines are always going to be offline or off network, sometimes for days, weeks, months or even indefinitely. Build your process around the exceptions and you’ll be successful.

The Exception Handling Phase

Use this phase to deal with all of the one-off scenarios. It may be a single system that causes you grief. It may be a patch that will not apply. It may be hardware that fails months after patches have been applied, making you vulnerable to items you thought you had patched months ago.

Every scenario is going to be unique and require a different set of steps to troubleshoot. Figure out what you can and then re-insert it back into your patch workflow when it’s ready to be re-evaluated. For me, what’s important, is to document, learn and use what you can to enhance your established patch process so that with each iteration it gets better and better.

Conclusion

Using your patch tool, you should be able track the trends and understand how quickly you can turn around a patch. What may take 35 days can be gradually improved to 30 days, then into the 20s, the 10s and maybe even into single digits. The size of an organization will have such an impact on turn around that comparing against others is not as important as comparing against yourself.

Now, after implemented your newly minted and customized patch process, continue to hope and pray what you’ve done is enough. Zero-day threats will always be with us, having 100 percent prevention is nigh impossible. But having done all that you can do and covering what is in your control, you can now use that prayer and hope  to overcome what is outside your control.