Distributing Enterprise Applications to macOS devices using MDM

Distributing Enterprise Applications to macOS devices using MDM

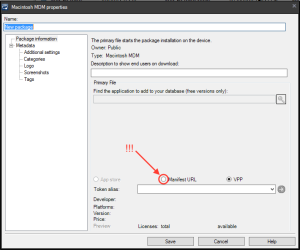
In an earlier blog post, Bennett described how to create and deploy VPP software packages to macOS and iOS devices using LANDESK Management Suite 2016.3 and later. You may have noticed a radio button in the console UI that, at the time, was ignored:

manifest-url-package

Yep, you can deploy your own software packages using LDMS MDM, not just those software applications available on the App Store.

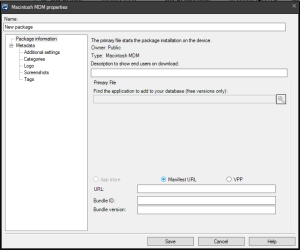
If you select the Manifest URL button, you get some additional UI:

mdm-properties

The additional UI allows you to enter the URL of a manifest plist file, and the Bundle ID and version of the application being installed. This can seem pretty daunting. Thank goodness Apple has provided a web page documenting the requirements for software distribution via MDM. It’s a good read, and answers a lot of questions, but, at least for me, it didn’t get to the point of being able to create something I could distribute via MDM. But let me summarize:

To distribute software or other things (like fonts for example), you need:

  1. Create an installer package (a .pkg file) created with the productbuild command-line tool, and signed with the root certificate of your mdm solution.
  2. A manifest file in the form of a property list (.plist) which describes and points to the installer package in very specific ways (see the above link for a sample)
  3. A webshare, accessible from your intranet or the Internet. You can place the package and manifest file in a hidden directory or in any location that’s readable using https. It must be readable using https, and using a non-self-signed certificate, since Apple URL services will not connect via https to a server with a self-signed cert.

Once you have these three things, you can fill out the Manifest URL UI to create an LDMS package to distribute to enrolled macOS devices using MDM.

The installer package

Creating an installer package for an application you want to install can be as easy as running the command line tool product build. For example, to create an installer package on my external drive “Work” for Google Chrome, which is sitting in my Applications folder, the following terminal command will do the trick:

productbuild --component "/Applications/Google Chrome.app" "/Applications", "/Volumes/Work/Google Chrome.pkg" --sign identity-name

You will need to replace identity-name with the name of a valid signing certificate on your computer. If you have enrolled your macOS device in the LDMS MDM service, you can find the certificate for the MDM service in your system keychain. This is a valid signing certificate for deployment with our MDM solution.

The manifest file

If you read the Apple documentation (see above), you were given an example manifest file to fill out with our package-specific info (I’ve simplified this by removing some items that are not applicable to the LANDESK environment:

Sample macOS content manifest file for an application bundle
<!DOCTYPE plist PUBLIC "-//Apple//DTD PLIST 1.0//EN" "http://www.apple.com/DTDs/PropertyList-1.0.dtd">

<plist version="1.0">
     <dict>
         <key>items</key>
         <array>
              <dict>
                   <key>assets</key>
                   <array>
                       <dict>
                            <key>kind</key>
                            <string>software-package</string>
                            <key>md5-size</key>
                            <integer>10485760</integer>
                            <key>md5s</key>
                            <array>
                                 <string>41fa64bb7a7cae5a46bfb45821ac8b99</string>
                                 <string>51fa64bb7a7cae5a46bfb45821ac8b98</string>
                                 <string>61fa64bb7a7cae5a46bfb45821ac8b97</string>
                            </array>
                            <key>url</key>
                            <string>https://www.example.com/apps/myapp.pkg</string>
                       </dict>
                   </array>
                   <key>metadata</key>
                   <dict>
                       <key>bundle-identifier</key>
                       <string>com.example.myapp</string>
                       <key>bundle-version</key>
                       <string>1.0</string>
                       <key>items</key>
                       <array>
                            <dict>
                                 <key>bundle-identifier</key>
                                 <string>com.example.myapp-unique</string>
                                 <key>bundle-version</key>
                                 <string>1.7.4</string>
                            <dict>
                       </array>
                       <key>kind</key>
                       <string>software</string>
                       <key>sizeInBytes</key>
                       <string>26613453</string>
                       <key>title</key>
                       <string>Example My App Package</string>
                   </dict>
              </dict>
         </array>
     </dict>
</plist>

Things to know about if you are planning to do this by hand:

Once we have the package built as above, to fill out this manifest file, the application needs to know:

  1. The location of the the installer package on the https server. Replace “https://www.example.com/apps/myapp.pkg” with the actual name and location of the hosted package.
  2. The md5-hash of each 1 megabyte chunk of the installer package file. Replace the array of md5 hash (labeled “md5s” above) with the actual hashes.
  3. The bundle identifier and version of the application you are installing. Replace the strings labeled “bundle-identifier” and “bundle-version” above with those strings.
  4. The size in bytes of the application package. Replace the string labeled “sizeInBytes” above with this.

When the manifest file (“something.plist”) has been successfully created, it needs to be moved to the same server that is actually serving the installer package. Best practice is probably to place both the manifest plist file and the installer package file in a directory appropriately named on the https server. So, for example, if our application was named “Example.app”, we might have Example.pkg and manifest.plist files sitting on the server in a directory named “Example”.

The LDMS Manifest Package UI

Once we have the package and manifest file build correctly and hosted on our https server of choice, filling out the LDMS Manifest Package UI is pretty simple. I paste the manifest file url into a web browser, load it up, and copy and paste the bundle id and version into the LDMS Manifest Package UI, along with the manifest file url.

Conclusion

Well, there you go, you now have all of the information you need to be able to build your own manifest distribution packages for the LDMS MDM solution. I can vouch for these instructions, as they have allowed me to attain nearly a 25% success rate manually setting things up. I’m sure you can do even better…

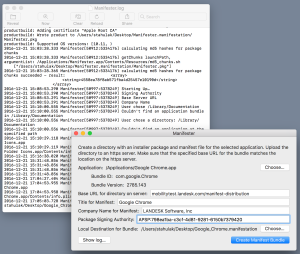
But we couldn’t get anywhere getting our own work done without starting to automate some of the pieces of this task, and at this point we’ve managed to produce an early version of an app we’re calling Manifester, which you can point at an application bundle, or a directory with an application bundle, put in your signing cert, and have it create a directory with an installer package and manifest file in it that you can just copy to the correct location on your https server:

manifester

Manifester will create a .manifestation folder which you then upload to the location on your https webshare that you specified in the Manifester UI.

manifest-output

Manifester currently supports creating manifest distribution for macOS applications. We will be enhancing it as we get time to support other file types (probably fonts will be first). It should be available through the LANDESK Community site soon after the first of the year.


Efficiently Transfer Files to an OS X Device with SDClient

Have you ever needed to copy a file from a share to a more than one Mac in your environment?  My guess is the answer to that is yes, I know it was for the potential customer I spoke with on the phone today.  Whether you’re trying to apply a configuration file for a package, settings for a proxy server, VPN configuration files or any of the myriad of other reasons, what you’re transferring isn’t the important question, it’s how do you do it.

Luckily sdclient, the tool that is the brains behind all things software distribution for the Mac, has a bunch of goodness via command line switches that can be used to download files and place them into specific locations; all the while still taking advantage of the download technologies built into the agent.

To leverage sdclient, we’ll write a shell script that will tell sdclient what file to download and where to place it.  The entire script is very short.  There will be two variables, one for the source file location and the second for the destination location.

The only thing you need to really pay attention to in regards to the source location is to ensure the file is accessible via http.  You can setup a variable or just supply the location.  I like to create a variable so that the code can be better documented and easier to read for others.  Here is my source variable.

fileToCopy="http://ldserver.ldlab.org/SoftwareDist/MacPackages/ExampleFile.txt"

We’ll repeat the process for the destination location.

destinationLocation="/Path/To/Your/Destination/Folder"

In addition to the destination variable, the script will include a quick check to ensure the destination folder exists on the end node and if not, create it.

if [ ! -d "$destinationLocation" ]; then
echo "Location doesn't exist.  Creating directory"
mkdir $destinationLocation
echo "$destinationLocation created"
fi

The actual download and placement of the file will be done by sdclient with three switches: -noinstall, -package and –destdir.  The switch names are pretty self-explanatory, the –noinstall tells sdclient to not execute the file that will be downloaded.  The –package switch is where you insert the path to the source file available, again available on the http share.  Lastly, the –destdir switch tells sdclient where to place the file on the Mac client.

All done, your command sdclient command should look something like:

/Library/Application\ Support/LANDesk/bin/sdclient -noinstall -package "$fileToCopy" -destdir "$destinationLocation"

Here is the entire example script.

#!/bin/sh
#  FileTransfer.sh
#  Created by Bennett Norton on 5/16/16.
#  This script will copy a file from the source destination and place it on the Mac into the destination folder
#  Change the path variables

#File to copy
#change this to match your hosted path, it needs to be http
fileToCopy="http://ldserver.ldlab.org/SoftwareDist/MacPackages/ExampleFile.txt"

#Location to copy file to
#change this to match your destination path
destinationLocation="/Path/To/Your/Destination/Folder "

#Check to see if destination exists and if not, create it
if [ ! -d "$destinationLocation" ]; then
echo "Location doesn't exist.  Creating directory"
mkdir $destinationLocation
echo "$destinationLocation created"
fi

#Download and execute command
#You shouldn't need to make any changes here
#-noinstall ensure the package does not get executed
#-package is the source url path
#-destdir is the destination url path
/Library/Application\ Support/LANDesk/bin/sdclient -noinstall -package "$fileToCopy" -destdir "$destinationLocation"

As discussed in previous posts, save this file as a .sh file and set the execute permission on it by running the command below.

sudo chmod +x /path/to/script.sh

Once you’ve set the execute permissions, copy the script to your package repository and create a LANDESK Software Distribution package to deploy.

Creating LANDESK Management Suite Mac Packages

  1. Open the LANDESK Console
  2. Navigate to the top menu bar, select Tools > Distribution > Distribution Packages.
  3. In the lower left menu tree, highlight My Packages or Public Packages from within the Distribution Packages window
  4. On the Distribution menu bar, press the New Package button and select New Macintosh Package.
  5. Give the package a name
  6. Provide a description as well as any metadata information desired
  7. Set the primary file to the script file you previously transferred to your package share
  8. Fill out the Metadata details if desired, specifically supplying a logo so it shows up properly in the portal
  9. Save the package

Creating a Scheduled Mac Software Distribution Task

  1. Right click on the Mac software distribution package created and select Create Scheduled Task
  2. From the network view, select and drag the desired machine(s), user(s) or query(ies) and drop them onto the task
  3. Now, right click on the task and select properties
  4. Set the desired Task type under Task Settings as to whether you want a push, a policy or a hybrid of the two types in a policy-supported push
  5. Set the radio button in the Portal Settings to either Recommended or Optional if you desire to put the package into Workspaces.  If you’d like to automatically deploy the app, select Run automatically
  6. Change the Reboot Settings or Distribution and Patch settings if desired
  7. Set the schedule task settings with the appropriate start time


Provide Remote Assistance to Your Off-Network OS X Users

It’s forecasted that 202 million laptops will be sold in 2016, compared to 127 million desktops.  As we all know, laptops are mobile and often off of the corporate network.  Not only does that mean the device should have proper encryption to protect the private data, it also means that standard administrative tasks such as patching a machine, distributing software and having access to the device to perform a remote control session can be much more problematic – or even down right impossible with the current management tools.

For LANDESK Management Suite customers, however, off-network access is completely feasible. An administrator can essentially follow the exact same workflow to patch, distribute software or perform a remote control session when properly configured with a LANDESK Cloud Service Appliance.  No VPN is necessary and no end-user interaction is required!

If you need to know how to install a Cloud Service Appliance in your environment, see Best Known Method for Configuring LANDESK Cloud Service Appliance (former Management Gateway) version 4.2 and newer

Better yet, in LANDESK Management Suite 2016, the certificate approval process has been significantly simplified by switching the certificate approval process to the core server. Essentially every agent install will create certificate for the Cloud Service Appliance and present itself to the LANDESK Core Server.  The administrator just needs to approve or block the per device certificate on the LANDESK core to grant or deny that device off-network access.  For more detail around this process, see this LANDESK Community article.

Once the certificate is approved on the core server for the device, an administrator can deploy patches and software distribution via a policy delivery method and perform an on-demand remote control session to the device off the network.  The client will also continue to send in it’s scheduled inventory and security scans assuming it has internet connectivity.

How to Perform a Remote Control Session to an Off-Network OS X Device

  1. Launch the LANDESK Management Suite Console
  2. Expand the Network View and find Devices > All Devices
  3. Find your desired machine from the list or use the search bar at top
  4. Right click on your OS X device and select ‘HTML remote control’ and the machine’s default browser should launch
    • If nothing happens and you don’t see a browser launch, it means the machine is not connected to the CSA and may either be powered off or without internet connectivity.
    • To verify, you can go to the remote control page on the CSA by using the URL: https://cloudserviceappliancename/rc. Not only this an alternative way to remote control a machine, but it will show you a list of all available clients that have an active internet connection.
  5. Enter your LANDESK username, password and the domain associated with the user that has access to perform a remote control session. If you’re using a local account, you can leave the domain blank.
  6. Note: Not only does the user need to be a remote control operator, but the machine must be enabled for remote control as well. Furthermore, the machine may be setup with user permissions that would require someone physically present on the device to grant access.

How to Deploy Software to an Off-network OS X Device

 When a LANDESK agent is deployed to a client device, is creates a scheduled task to call back into the core server to see what policies it has been targeted for.  For machines that are going to be off-network you may want to set policy check in to be every 2 hours. There is obviously a trade-off between over burdening the core server with requests and knowing a machine only checks in once a week, so find what the right balance is for your environment.

  1. Open the Distribution Packages tool within the LANDESK console
  2. Right click on the Mac software distribution package to deploy and select Create Scheduled Task
  3. Right click on the scheduled task that was generated and select properties
  4. Add your desired targets to the Targets menu
  5. Set the Task type under Task Settings as a policy
  6. If you’re targeting a group of machines that may have some of them on the network and some off, you may want to use a policy-supported push
  7. Set the radio button in the Portal Settings to either Recommended or Optional if you desire to put the package into Workspaces.  If you’d like to automatically deploy the app, select Run automatically
  8. Change the Reboot Settings or Distribution and Patch settings if desired
  9. Set the schedule task settings with the appropriate start time

How to Deploy Patches to an Off-network OS X Device

  1. Open the Patch and Compliance tool within the LANDESK console
  2. Ensure your desired content is in the Scan folder
  3. Right click on the definition and select Repair
  4. From the Add targets select on the Repair settings task panel, select Add all affected computers
  5. Set the Task type under Task Settings as a policy
  6. If you’re targeting a group of machines that may have some of them on the network and some off, you may want to use a policy-supported push
  7. Ensure the Display in portal option for the portal settings panel is set to Run automatically (unless you want your users to update their own apps, in which case you can select Recommended or Optional)
  8. Schedule the task to start when desired from the Schedule task panel
  9. Save the task

How to Distribute Mac App Store Apps with LANDESK Management Suite

Introduction

Installing an OS X application purchased with a VPP token can require a lot of man power. Due to digital rights management, Apple ID’s and user agreements, it’s not easy to just deploy an application as can be done for an application you have the installer for. This whitepaper will discuss how an application installer found in the Mac App Store (MAS) can be captured and used to deploy to your OS X devices.

Overview

The LANDESK Management Suite Mac agent is capable of supporting many different package types, such as dmg, pkg, mpkg, shell scripts, a simple .app, mobileconfig and even .workflow scripts built within Automator.  While this flexibility works in most scenarios, you’ll notice that it requires access to the install files.  If a developer only releases their application via the Mac App Store, such as the iWork suite developed by Apple.  However, with a little bit of work, you can capture the installers from the Mac App Store and subsequently push those applications out.

Pre-Requisites

The LANDESK administrator will need to have access to an OS X device that has purchased the application that is intended to be distributed, yet that does not have the application currently installed.  A VM set aside just for downloading Apps may be an efficient method for the ongoing software distribution.

Note: Ensure you have adequate license coverage via a VPP purchase prior to distributing your application.

Enable Debug Mode for the Mac App Store (MAS)

When an application is downloaded from the MAS, the installer file is downloaded, executed and then promptly removed.  By enabling debug mode for the MAS, we can create a link to the downloaded installer(s) allowing for future use on more than just the machine currently downloading the app.

  1. Quit the Mac App Store if currently opened
  2. Open Terminal and run the command ‘defaults write com.apple.appstore ShowDebugMenu -bool true’

EnableDebug.png

Note: To disable debug mode, use the following command: ‘defaults write com.apple.appstore ShowDebugMenu -bool false’

Download the Installer for the App to Patched

Once the debug mode is enabled, it will be possible to capture the download installer file for later use in patching.

  1. Launch the App Store App (notice you should now have a Debug menu item) and navigate to the Purchased tab.  Sign in if prompted.
  2. Select the app to be patched and click Install
  3. Once the install process shows visible progress in the download process, hit the pause button
  4. From the Debug menu, select the option Show Download Folder
  5. Finder will open and you’ll need to navigate inside the com.apple.appstore folder
  6. Locate the folder with a string of numbers, this should be your app, and navigate inside of it

RandomNameAppStoreApp.png

You now need to create a hard link between the randomly named download to a file name and path of where to store the installer.  You’ll do this by opening Terminal and use the ‘ln’ command followed by the path of the installer from the Mac App Store and then the path to where you want to save your copy of the installer that won’t be deleted as soon as . The easiest way to enter the path of the randomly named installer is to drag and drop it into terminal after typing ‘ln’

  1. Launch Terminal and type ln /path/to/macappstore.pkg /path/to/savedinstaller.pkgHardLink.png
  2. Return to the Mac App Store purchased tab and resume the download
  3. When the installation for your app finishes, you’ll have a signed installer from Apple to use to update your fleet of Mac devices

Automating for Multiple Concurrent Downloads

If the manual linking process described above seems a bit burdensome when in need of downloading many applications, Max Schlapfer has created a script to not only automate the creation of the hard links, but it also has the capability to download multiple files at once.  To download Max’s AppStoreExtract script, see https://github.com/maxschlapfer.  These next steps are not requisite, if you have all of the installers you desire, skip to the next section.

Note: You do not need the Debug mode enabled for the Mac App Store, as outlined above, for this script to work.

  1. Download Max’s script from Github and extract it to a folder location of choice
  2. Open terminal and execute the script by typing in ‘./path/to/script/AppStoreExtract.sh’ and hitting Return
    1. Note: Do not run this script as root.                                                                                                        AppStoreScriptWaiting.png
  3. Launch the App Store App and navigate to the Purchased tab.  Sign in if prompted.
  4. Click Install on all of the Apps you want to create installers for and wait for them to complete the install process
  5. When the installation process has finished, return to the Terminal window and hit any key to finish the script.  When asked to finalize the packages, type Y.TerminalAppStoreExtractProcess.png
  6. The script will name the output files according the product and version and then convert them to DMG files and store them in the /Users/Shared/AppStore_Packages folderOutputAppStoreExtract.png

Creating LANDESK Management Suite Mac Packages

Now that you have the installers downloaded from the Mac App Store, creating the LANDESK Mac package is the easy part.  You just need to copy all of the installers you’ve created to your package share.  If you have a .pkg file, make sure you zip it prior to copying into a Windows file share.  If you have dmg files, you can copy those directly to your package location.

  1. Open the LANDESK Console
  2. Navigate to the top menu bar, select Tools > Distribution > Distribution Packages.
  3. In the lower left menu tree, highlight My Packages or Public Packages from within the Distribution Packages window
  4. On the Distribution menu bar, press the New Package button and select New Macintosh Package.
  5. Give the package a name
  6. Provide a description as well as any metadata information desired                PackageProperties.png
  7. Set the primary file to the zip or dmg  file you previously transferred to your software distribution folder
  8. Fill out the Metadata details if desired, specifically supplying a logo so it shows up properly in the portal
  9. Save the package

Creating a Scheduled Mac Software Distribution Task

  1. Right click on the Mac software distribution package created and select Create Scheduled Task
  2. From the network view, select and drag the desired machine(s), user(s) or query(ies) and drop them onto the task
  3. Now, right click on the task and select properties
  4. Set the desired Task type under Task Settings as to whether you want a push, a policy or a hybrid of the two types in a policy-supported push
  5. Set the radio button in the Portal Settings to either Recommended or Optional if you desire to put the package into Workspaces.  If you’d like to automatically deploy the app, select Run automatically
  6. Change the Reboot Settings or Distribution and Patch settings if desired
  7. Set the schedule task settings with the appropriate start time