


Updated video posted here: https://appleintheenterprise.com/2016/08/12/landesk-mac-management-part-7-building-a-netboot-image-for-os-deployment/
Introduction
OS X El Capitan introduced several changes to the System Image Utility when creating a NetInstall Image. This white paper will walk through the required steps to successfully build a NBI file LANDESK can use to provision a Mac with LANDESK Management Suite.
Watch the how-to video here.
Overview
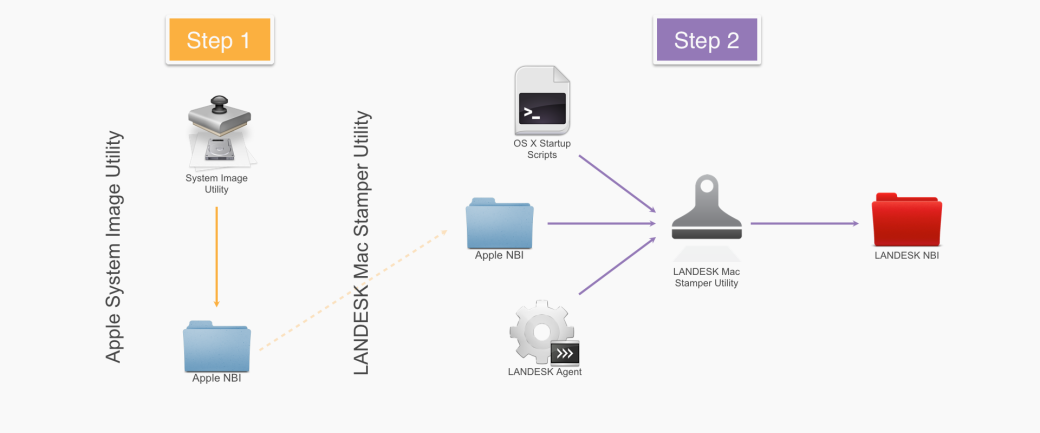
Beginning in LANDESK Management Suite 9.6, LANDESK changed the process to build NBI files. We now leverage Apple’s System Image Utility to create bootable NBI file. LANDESK has created a stamper utility that will subsequently inject the needed LANDESK information, while at the same time, reducing the NBI file down in size. One of the major benefits of this process, is the NBI you have to push over the wire will be in the 500-600 MB size range as opposed to 6 GB+.
Prepare the OS X El Capitan Machine
- The first thing needed is the OS X El Capitan Installer. Download it and place it into the Applications Folder.
- The LANDESK Mac agent also needs to be installed on the device. Make sure you use an agent that is 9.6 SP2 or later. For more information on how to deploy an agent, see https://community.landesk.com/support/docs/DOC-30016
- Download the LANDESK Startup Disk Stamper Utility from https://community.landesk.com/support/docs/DOC-33695
- An administrative account on the box
Build the NetInstall Image with Apple’s System Image Utility
- Launch System Image Utility from the Mac. Use the Spotlight Search to find it as it’s buried in an Applications folder under System > Library > CoreServices
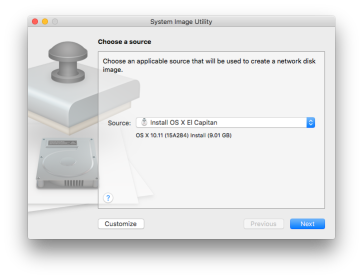
- From the source dropdown picker, select Install OS X El Capitan and click Next. If you don’t see Install OS X El Capitan from the options menu, quit the System Image Utility, download the installer and put it into the Applications folder and then re-launch.
- Select the option NetInstall Image and click Next
- Agree to the License Agreement if prompted
- At this time, we don’t need to add any configuration options, as all of that will be built inside the provisioning process within the LANDESK Console. For the next 4 screens, just click Next with no items added or changed from the defaults. Stop when you get to the Image Settings screen.
- Provide a Network Disk name to your liking. You’ll be asked to create a second name for the NBI file LANDESK’s stamps, so for me, I always put Apple in the name so I can be sure to differentiate the two. Also, each image file needs to have a unique image index. Feel free to choose whichever option best suits your environment. I personally assign my indices so I can ensure a unique value. Also, just by way of note, you’ll need to assign another unique ID when you use the LANDESK stamper.
- Select the computer models you want your NBI to support and click Next.
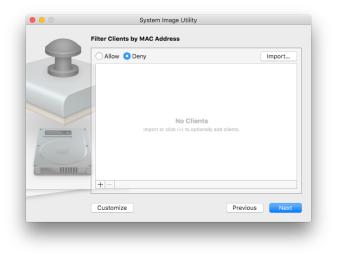
- Pay special attention to the Filter Clients by MAC Address window. This pane essentially creates a whitelist or blacklist of client devices allowed to boot from your NBI file. If you’re more security conscious, leave the radio button set to Allow and provide an import of all of the MAC addresses you care about. Just know as you receive new machines, this will have to rebuild your NBI. If you’re less concerned about unknown machines NetBooting from your NBI file, change the radio button to Deny and click Next.
- Finally, provide the path to where the Apple NBI file will be created and click the Save button. For ease of use when using the LANDESK stamper, I select the desktop.
- Enter your admin credentials on the box and wait for the NBI to be generated.
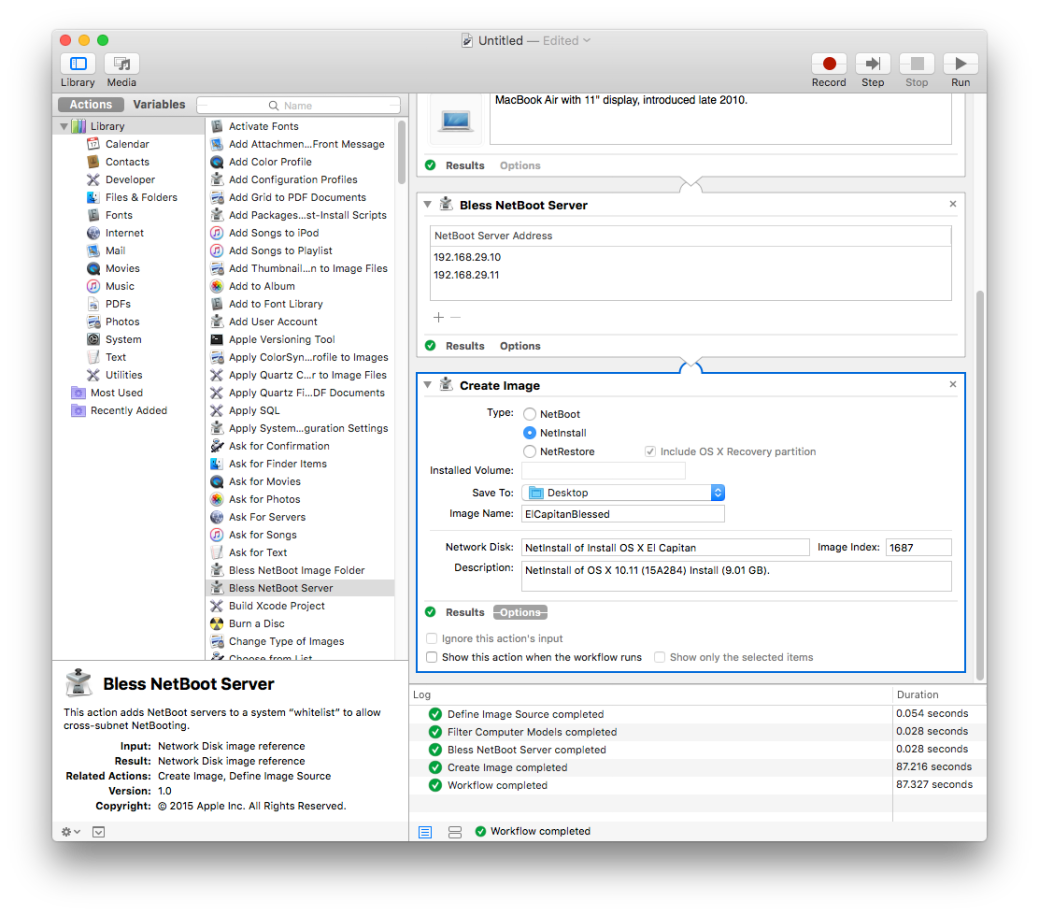
IMPORTANT NOTE: In OS X 10.11 El Capitan, Apple has introduced their new System Integrity Protection feature which affects how you are able to NetBoot devices. If you have need to NetBoot across subnets, you’re going to need to customize the NBI and add in your approved NetBoot server’s IP addresses. To do this, prior to clicking next on step 8, make sure you set your desired filter state and then click Customize.
Once inside the Automater tool, you need to scroll down through the list of actions until you find the Bless NetBoot Server action. Once you find it drag it to the far right, upper panel and drop it prior to the Create Image action. Click on the + object for the Bless NetBoot Server and add in the IPs of your PXE representatives or your OS X NetBoot Servers as well as the IP of the Core Server.
Using this method, you’ll also need to finalize the name of your NBI file and the location to save it inside of the Create Image action. When you have everything configured, click the Run button at the top right. It’ll take it a couple of minutes to write the NBI file. When it’s finished, go ahead and close both the Automator app as well as the System Image Utility app.
For more information on the SIP restrictions and the NetBoot process, see: http://community.landesk.com/support/docs/DOC-35984
Stamp the Apple NBI File with LANDESK’s Startup Disk Stamper
- Launch the LANDESK Startup Disk Stamper. You can find the download link in the Overview section if you have not yet pulled it down from the LANDESK Community.
- Click the Choose button in the NBI Source panel and select the Apple NBI file previously generated
- Although a bit hidden in the dialog box, you can change the desktop background displayed during the NetBoot process by selecting the Choose button in the Agent Source panel. This step is optional.
- Set your destination type.
- If you intend to boot your NBI from the network, select the NetBoot Image radio button and push the Choose button to name your LANDESK NBI file and to indicate where you would like to save it.
- If you need to build a bootable USB drive, select the Removable Drive option and select the Device from the Finder window.
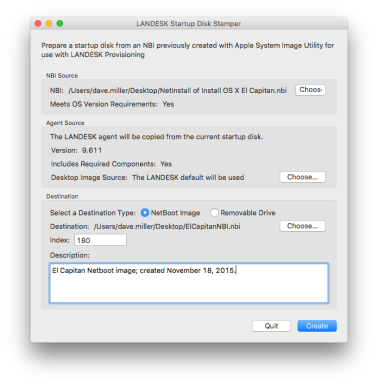
- Set a second unique index. Since LANDESK is generating it’s own NBI file, you’ll want this value to be different from the value selected in step 6 for the System Image Utility NBI creation.
- Provide a description if desired and click Create
- Enter your admin credentials on the box and wait for the LANDESK NBI to be generated.
Note: If you see ?? marks in any of the panels, the tool has not been properly configured or a 9.6 SP2 or later LANDESK Mac agent has not been installed.


Recent Comments