Special Interchange Edition: Ivanti Apple Administrator Base Camp Course

artboard-1

In April of this year, Nine41 Consulting is launching as an Ivanti Expert Solution Provider, specializing in Apple device management for UEM.  As part of that effort, Nine41 Consulting will be hosting a 4-day training course, May 5th – May 8th, just prior to Ivanti Interchange 17.  If you’re interested, register at http://www.nine41consulting.com/training-calendar/

Force the Removal of a Specific macOS Configuration Profile

We’ve all done it.  We installed something without fully vetting it out and now we need to get it off – of all of our machines.  Whoops!

The other day, I received a question from a customer asking how he could remove a configuration profile from all of his machines at once – without having to log in to each machine.

Apple actually makes such a task quite easy as viewing, installing and removing a profile from a Mac is inherently built into the operating system itself.  Therefore, with a short script we can detect whether the profile is installed and then remove it if it is.

To manually check the status of a machine’s profiles, you can run, inside of Terminal, the following command.

View All Profiles

sudo /usr/bin/profiles -P

So doing should give you a report out of both the machine and user based profiles installed.

profiles -P.png

In the screenshot above, all 3 profiles are computer based profiles.  If I wanted to remove all of the profiles listed above, all I need to do is use the ‘profiles -D’ command and call the respective profileIdentifier.

Remove All Profiles

sudo /usr/bin/profiles -D

However, removing all profiles is probably a bit forceful, often a little precision can help us in the long run.  In our example above, we may choose to only remove one of the profiles instead of all of them.  To do this, we just need to specify that we’re removing a profile and what the profile identifier name is.

Remove a Single Profile

sudo /usr/bin/profiles -R -p com.landesk.profile

-R is the command to remove the profile and -p specifies we’re removing it by the identifier name.  There are actually quite a few other options available as well, so check out the man page for more info.  For example, you may need to add in the password to remove so the user doesn’t get prompted.  This switch is -z.

Automation

Now, let’s use LANDESK Management Suite to create a custom patch definition that will detect the machines that have a given profile and remove it if you choose to repair it. You can download the custom definition I built on my GitHub site here or build it yourself using the scripts below.

Custom Patch Detection Logic

Just change the variable profileIdentifier to match your desired profile identifier.

#!/bin/sh

# singleConfigurationProfileDetection.sh
# Created by Bennett Norton on 2/6/17.
# Detects the whether a specific profile exists on a machine

# Profile Identifier Name Variable
# Change this name to match the profile identifier you want to remove
# Find the name by typing sudo /usr/bin/profiles -P in Terminal

profileIdentifier="com.landesk.profile"

#  create an output variable with the the potential profile from the machine
#  grep filters all of the results to only show that which matches our desired configuration profile
#  awk allows us to pull just the data we're looking for from the command line

discoveredProfileIdentifier=( $( sudo /usr/bin/profiles -P | grep "$profileIdentifier" | awk '{print $4}') )


if [[ $profileIdentifier != $discoveredProfileIdentifier ]] ; then
 echo "Found: Configuration profile $profileIdentifier was not found on the machine."
 echo "Reason: $profileIdentifier not intalled."
 echo "Expected: $profileIdentifier to not exist."
 echo "Detected: 0"
 exit 0
else
 echo "Found: Configuration profile $discoveredProfileIdentifier was found on the machine."
 echo "Reason: $discoveredProfileIdentifier intalled."
 echo "Expected: $discoveredProfileIdentifier to not exist."
 echo "Detected: 1"
 exit 1
fi

Custom Definition Repair Script

Just as in the first script, you need to change the variable profileIdentifier to match your desired profile identifier.

#!/bin/sh

# singleConfigurationProfileDeletion.sh
# Created by Bennett Norton on 2/6/17.
# Deletes a specific profile on a machine

# Profile Identifier Name Variable
# Change this name to match the profile identifier you want to remove
# Find the name by typing sudo /usr/bin/profiles -P in Terminal

profileIdentifier="com.landesk.profile"

# Delete
sudo /usr/bin/profiles -R -p "$profileIdentifier"


Disable Your Mac from Automatically Booting On Lid Open

The other day I was “flipping” through Flipboard and came across an article on OSXDaily that discussed how one could prevent a Mac from automatically booting when the lid is opened.

The command to enable or disable this setting is quite simple.  By leveraging Terminal, all you need to do is set the AutoBoot value.

Disable AutoBoot:

sudo nvram AutoBoot=%00

Enable AutoBoot:

sudo nvram AutoBoot=%03

While I personally like the AutoBoot feature, I can see why some people may choose to disable it; especially in an academic or corporate setting.

Using LANDESK Security Suite 2016, the NVRAM AutoBoot setting can easily be scanned for with every vulnerability scan, by building a custom definition to evaluate the NVRAM AutoBoot value.  Then, using the repair logic, you can maintain a desired state in your organization even if an administrative user opts to change it.

And, the best part is, I’ve created the custom definition for you – no scripting needed on your behalf.  Download the custom definition from GitHub here and import it to your core server.

Custom Definition Import

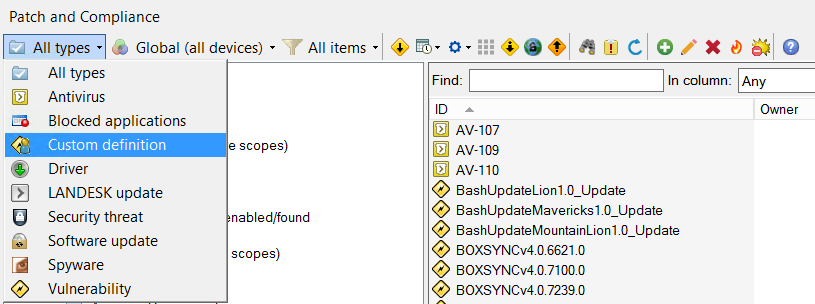
  1. Open the LANDESK console
  2. Go to Tools > Security and Compliance > Patch and Compliance
  3. From the definition types dropdown menu, ensure you have selected Custom definitionpatch and compliance dropdown menu.png
  4. In the white space area, right click and select Import custom definition import.png
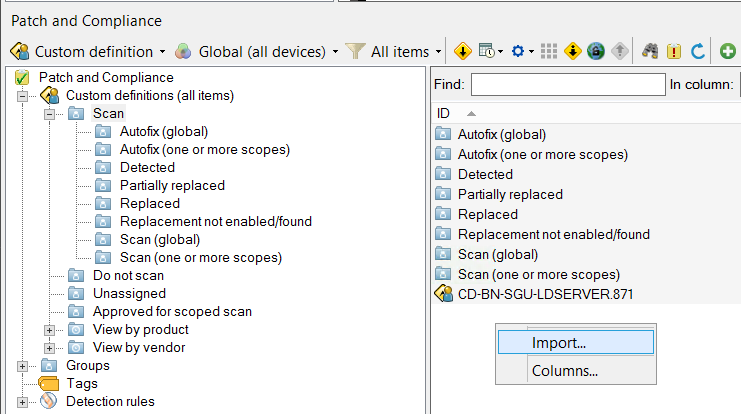
  5. Browse to the custom definition file and click the Open button to import

Once imported, set the definition to Autofix and it will maintain the AutoBoot state for you.  It’s that easy to maintain, pretty nice, isn’t?  It doesn’t matter if a person changes the value themselves, using Autofix it will continually set the value back to the state defined in the defintiion.

Understanding the Custom Definition

If you’re like me and want to understand how I built the custom definition, as opposed to just blindly importing the file I created, then read on.

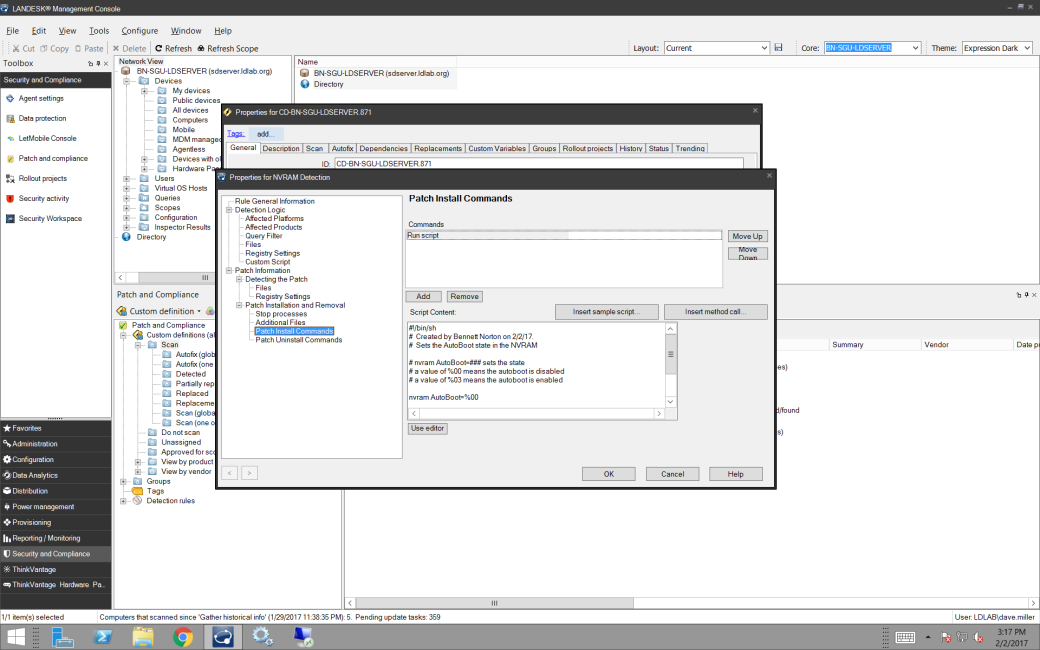
There are 5 basic steps to building a Mac custom definition.  First, you need to create the custom definition and add in the Properties Details.  Secondly, you need to create a detection rule and set the affected platform state.  The third step is to provide a script to do the detection work, add that to the Custom Script panel. The forth step is to specify the repair process in the Patch Information panel.  Lastly, you need to provide Patch Install Commands to make the changes necessary if you initiate a repair.

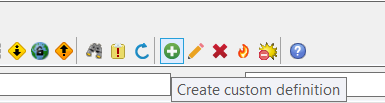
  1. Create a custom definition by clicking on the green circle with a white plus symbol when inside the Custom Definition dropdown panel screen-shot-2017-02-03-at-1-19-16-pm
  2. Enter in your desired information on the General tab and Description tab, like the severity and notes around what the custom definition will do.  Properties Panel.png
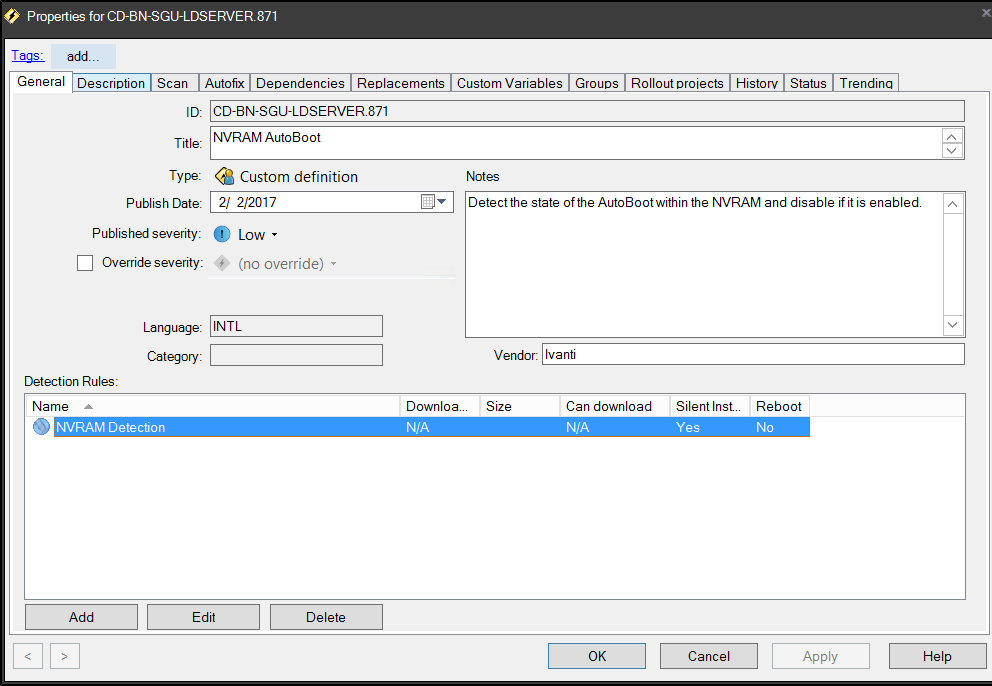
  3. Click the Add button under Detection Rules panel and specify your Affected Platforms.  I check both Mac OS X and Mac OS X Server.Affected Platforms.png
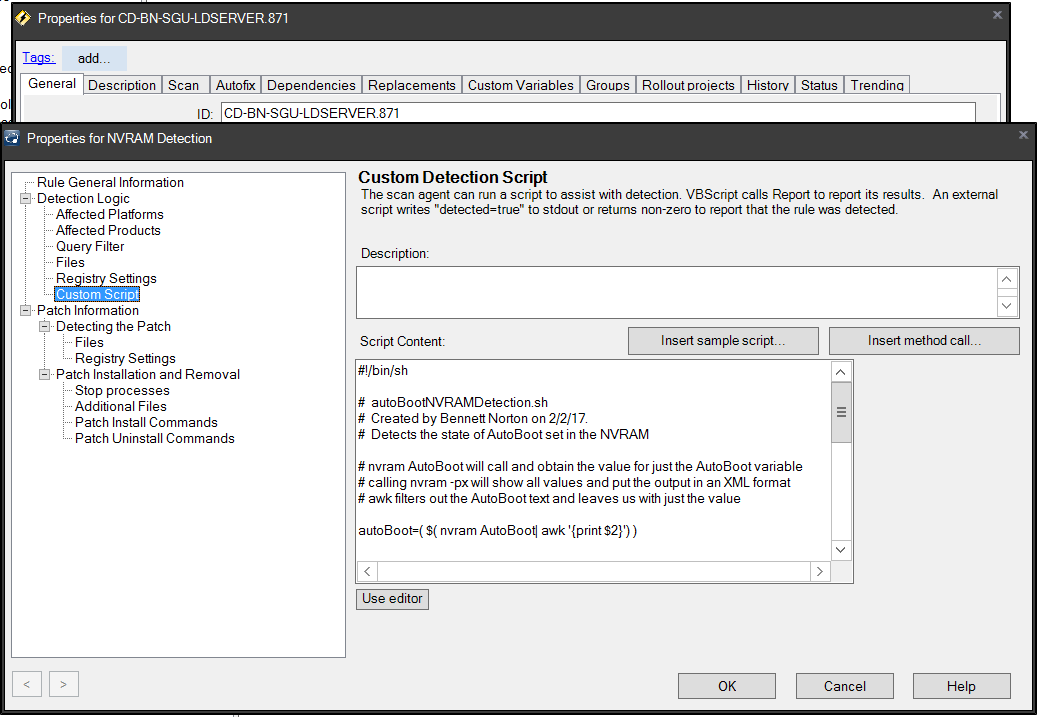
  4. Now you need to add in your detection logic in the Custom Script panel.  For the AutoBoot feature, we really only need two lines.  We need to specify the shebang environment and we need to capture the AutoBoot value.  Now, I have added a few extra lines for documentation, which you can leave to assist your coworkers.  My scripts are all pasted below or available on GitHub.  Also, in every custom definition, you need to return the Found state, Reason state, Expected state and a Detected State of either 0 or 1.  I don’t get into the details of this, so for more info see the Interchange Presentation regarding Custom Definitions.Detection Logic.png
  5. Finally, we need to add in the repair logic on the Patch Install Commands.  Patch Install Commands.png

That’s all there is to it.  Just hit OK at this point.

Now, if you’re wondering why I didn’t add in some Uninstall logic to revert our change back, if we desire, it is because the Mac agent doesn’t support it at this time.  Feel free to put in a request with Product Management if you think this would be helpful.

Scripts

Detection Logic
#!/bin/sh

# autoBootNVRAMDetection.sh
# Created by Bennett Norton on 2/2/17.
# Detects the state of AutoBoot set in the NVRAM

# nvram AutoBoot will call and obtain the value for just the AutoBoot variable
# calling nvram -px will show all values and put the output in an XML format
# awk filters out the AutoBoot text and leaves us with just the value

autoBoot=( $( nvram AutoBoot| awk '{print $2}') )

# compare the nvram state with your desired state
# a value of %00 means the autoboot is disabled
# a value of %03 means the autoboot is enabled
# any other value means the autoboot state is undefined

if [[ $autoBoot == *"%00"* ]] ; then
 echo "Found: NVRAM AutoBoot value is $autoBoot"
 echo "Reason: NVRAM AutoBoot value is $autoBoot"
 echo "Expected: NVRAM AutoBoot to be disabled or set to %00"
 echo "Detected: 0"
exit 0
else
 echo "Found: NVRAM AutoBoot value is $autoBoot"
 echo "Reason: NNVRAM AutoBoot value is $autoBoot"
 echo "Expected: NVRAM AutoBoot to be disabled or set to %00"
 echo "Detected: 1"
exit 1
fi
Disable Logic
#!/bin/sh

# autoBootNVRAMDisable.sh
# Created by Bennett Norton on 2/2/17.
# Sets the AutoBoot state in the NVRAM

# nvram AutoBoot=### sets the state
# a value of %00 means the autoboot is disabled
# a value of %03 means the autoboot is enabled

nvram AutoBoot=%00
Enable Logic

While I don’t use the next script in the custom definition, if you wanted to enable the setting for all machines, you’d use this script instead.

#!/bin/sh

# autoBootNVRAMEnable.sh
# Created by Bennett Norton on 2/2/17.
# Sets the AutoBoot state in the NVRAM

# nvram AutoBoot=### sets the state
# a value of %00 means the autoboot is disabled
# a value of %03 means the autoboot is enabled

nvram AutoBoot=%03


Migrate a Mac’s Outlook Settings from an On Premise Server to a Hosted Office 365 Instance

Last week a customer approached me asking for some assistance in migrating their client devices from an on-premise server to their new Office 365 instance hosted in the cloud. In addition to migrating to a new Exchange server, the customer was also planning on moving all of the clients to Outlook 2016 from Outlook 2011.

Having not had the experience personally in doing this in a business environment, I was unsure what the entire process was going to look like.  Luckily, with only a few minutes of google searching, I discovered a post in which Talkingmoose outlined how a simple Applescript would do the trick.

tell application "Microsoft Outlook"
    set server of exchange account 1 to "https://outlook.office365.com/"
end tell

With the AppleScript in hand, we just needed to put together a process to use LANDESK or what is now rebranded as Ivanti.  The Ivanti Mac agent itself, unfortunately, doesn’t support AppleScript directly.  That means that rather than creating an AppleScript file, I needed to write a shell script and simply change the shebang line environment to be osascript as opposed to the standard shell.

#!/usr/bin/env osascript

And that’s it.  I pushed out the script using LANDESK Management Suite, and even with the Outlook client open on the test device, the server URL was appropriately changed.

You can download the script from GitHub, or as I typically do, the full script is below. You’ll see it’s very short.

#!/usr/bin/env osascript
# changeOutlookServer.sh
# Created by Bennett Norton on 1/25/17.

tell application "Microsoft Outlook"
 set server of exchange account 1 to "https://outlook.office365.com/"
end tell

Remember, after you save your file, set the execute permissions on it by opening terminal and running the command below and then copy it to your package server share.

chmod +x /path/to/your/script.sh

With the script ready, you now need to build the software package to distribute to the Macs.  To do this, follow these steps below:

  • From the LANDESK Console, open Tools > Distribution > Distribution Packages
  • Inside the menu tree, highlight My Packages or Public Packages and then select the New Package button on the menubar and select New > Macintosh > Macintosh Agent
  • Give the package a name, description and point the primary file to the .sh file created previously
  • Fill out the Metadata details if desired
  • Save the package

In a true migration environment, I would create a bundle package that pushes out both the Office upgrade as well as the script to change the Exchange server address.  See my previous blog post on how to build an Office 2016 package.


How to Bind a Mac to Active Directory using Profile Manager and LANDESK

Below is a somewhat brief overview of how you can build a payload with the settings to bind a Mac to a domain.

In order to build this Directory payload, you’ll need to download and install macOS Server.  Your clients won’t need access to the macOS Server, so you can put this on a virtual machine that you start just when you need to build a new profile.

You’ll also need LANDESK Management Suite 9.6 or greater.

Remotely Inject a CylancePROTECT License Token on macOS

Have you found that, after a seemingly random period of time post CylancePROTECT deployment, your help desk is receiving calls about CylancePROTECT not being licensed?

Well, you’re not the only one.

The client / server architecture setup for CylancePROTECT on macOS requires that the client machine check-in on a periodic basis or it will automatically “forget” it’s license key.

This behavior is great if the machine happens to be lost or stolen; however, if you have remote users that don’t frequently get on the network, having a machine forget it’s license is definitely not ideal.

Luckily, we can remotely inject the license key using LANDESK Management Suite to deploy a little script to work the magic.  All remotely might I add.  Neither you nor I want to touch every machine that needs an update.

Furthermore, this script would work if you find that your original license key was compromised and you need to replace it with a new one.

The script is a fairly basic script.  It’ll stop the CylancePROTECT service, run a backup on the existing token XML file, inject the token into the XML, and restart the service.  All you need to do in the script is change the variable value “newCylanceCustomToken” with your actual token value.  You can download the script from my GitHub site or just create your own by copying and pasting from the script below.  Just remember to run chmod +x on your script if you make your own.

Special shout out goes to Logrhythm SIEM for the assist on the SED portion of this script.

Once you have your script ready to go, compress it and copy it to your file share so you can create a LANDESK package and deploy it out.

CylancePROTECT Package Creation

  1. Open the LANDESK Management Suite Console
  2. Navigate to the top menu bar, select Tools > Distribution > Distribution Packages.
  3. In the lower left menu tree, highlight My Packages or Public Packages from within the Distribution Packages window
  4. On the Distribution menu bar, press the New Package button and select New Macintosh Agent package.
  5. Give the package a name
  6. Provide a description as well as any metadata information desired
  7. Set the primary file to the script file you previously transferred to your package share
  8. Fill out the Metadata details if desired, specifically supplying a logo so it shows up properly in the portal
  9. Save the package

CylancePROTECT Package Deployment

  1. Right click on the Mac software distribution package created and select Create Scheduled Task
  2. From the network view, select and drag the desired machine(s), user(s) or query(ies) and drop them onto the task
  3. Now, right click on the task and select properties
  4. Set the desired Task type under Task Settings as to whether you want a push, a policy or a hybrid of the two types in a policy-supported push
  5. Set the radio button in the Portal Settings to Run Automatically
  6. Change the Reboot Settings or Distribution and Patch settings if desired
  7. Set the schedule task settings with the appropriate start time


#!/bin/sh

# CylanceTokenReplacement.sh
# Created by Bennett Norton and Logrhythm SIEM on 10/20/16.
# This script will stop the Cylance service, replace the token file, and restart Cylance

#Script Variable
#change the variable to match your token 
newCylanceToken="newCylanceCustomToken"

#Don't change these variables
cylanceTokenLocation="/Library/Application Support/Cylance/Desktop/registry/LocalMachine/Software/Cylance/Desktop/"
cylanceValuesXML="values.xml"

#Stop the Cylance service
launchctl unload /Library/LaunchDaemons/com.cylance.agent_service.plist

#Make a backup of the values.xml and then edit the by adding in the InstallToken key
sed -i.backup 's/<\/values>/<value name=\"InstallToken\" type=\"string\">'"$newCylanceToken"'<\/value><\/values>/g' "$cylanceTokenLocation/$cylanceValuesXML"

#Start the Cylance service
launchctl load /Library/LaunchDaemons/com.cylance.agent_service.plist

Set and Maintain a Desired Security State for MDM Managed Devices

LANDESK Management and Security Suite 2016.3 has MDM management built into its core functionality.  Once a device is enrolled, you’ll have access to apply a number of different “Agent Settings” commonly known as Configuration Profiles in the Apple world.

LDMS 2016.3 has 4 out-of-the-box editable agent settings that can be built and assigned to a Mac or iOS device; Mobile Compliance, Mobile Connectivity, Mobile Exchange/Office 365 and Mobile Security.  You’ll find all of these profile in the Agent Settings tool within the Configuration toolbar of the Management Suite console.

Mobile Compliance can be used to ensure the device’s integrity.  For example, you can enable a compliance rule to detect if the device has been jailbroken and if it has, choose to selectively wipe it removing access to everything you’ve deployed to the device. mdm-mobilecompliance

Mobile Connectivity is where you would upload certificates to be used to bind to WiFi as well as the appropriate settings for the device to access your corporate WiFi. mdm-wifi-cert

Mobile Exchange/Office 365 should be self-explanatory.  Within this setting you’ll configure how your MDM devices will be configured to access your corporate email. mdm-o365

Mobile Security has the real meat and potatoes for the agent settings.  You can set a password policy, restrict the device functionality such as access to FaceTime, block access to the iTunes store, set the accessible ranges for content and ratings, control the behavior of iCloud and even block TouchID from unlocking the device.  mdm-mobilesecurity

Mix and match the agent settings as desired, when deploying them out you do not need to employ a “one-size-fits-all approach.”   When you create your Agent Settings task, you can select one of each to deploy at, giving you a ton of available combinations of configurations.

Once you have all of your Agent Settings created as desired, just create a Change Agent Settings task and target your MDM devices.

  1. While still in the Agent Settings window, click on the Calendar/Clock icon, it’s the second one in the menu bar and then select Change Settings.change-settings
  2. Give your task an appropriate name, I named mine “Passcode”
  3. Find the “Mobile …” from the list on the right hand side of the panel and click on the corresponding Keep agent’s current settings window area.
  4. Find your newly created Mobile Agent Setting and select it.mdm-changeagentsettings
  5. Now set your desired Task Settings (policy, push, policy supported push) and desired portal settings (required, recommended, optional). I used a policy-supported push and required.
  6. Add in your Targets
  7. Schedule your Change Settings task

Once a device is added to a task and the task is started, every time the device “syncs” with the LANDESK Management Suite server, it will compare itself against the current scheduled tasks on the core with what it currently has applied and will add/remove profiles accordingly.  So don’t delete your task once you’ve successfully applied an agent setting, so doing would in effect tell LANDESK to remove the agent setting from the device the next time it syncs.

Remotely Enroll a macOS Device with LANDESK MDM

With the release of LANDESK Management Suite 2016.3, LANDESK can now manage a Mac using an MDM profile in addition to the traditional LANDESK agent.  One of the main benefits of enrolling with the Mac the MDM service, in addition to already having your regular agent installed, is that you’ll be able to push a VPP app to the Mac.

This blog will walk you through the process of creating a package to install the LANDESK MDM Enroller app on your Mac and then subsequently running a script to enroll the Mac with the MDM service.

Part 1 – Create a LANDESK MDM Enroller Bundle Package Folder

  1. Open the LANDESK Management Suite Console
  2. Navigate to the top menu bar, select Tools > Distribution > Distribution Packages
  3. In the lower left menu tree, highlight My Packages or Public Packages from within the Distribution Packages window
  4. Right click on the selected folder and click on New Package Bundle
  5. Provide your desired package bundle name, I used LANDESK MDM Packages

Part 2 – Create a LANDESK MDM Enroller Package

  1. Download the LANDESK MDM Enroller app from the Community page and copy it to your file share
  2. Right click on your package bundle, hover over New Macintosh Package and select Macintosh Agent
  3. Give the package a name
  4. Browse to the Enroller App file you previously saved and select it from within the Primary File window
  5. Provide a description and any metadata information if desired
  6. Save the package

Part 3 – Create the LANDESK Enrollment Script

The script is pretty basic, you just need to call the command line utility with a -u for username, -p for password and -m for the enrollment server.  The script has been built with variables, so just adjust the variables and you’ll be set.

  1. On a Mac device, save the Enroller script from GitHub as a .sh file or use the script pasted at the bottom of the blog
  2. Open the .sh file with your text editor and edit the variables for the username, password and enrollment server
  3. Save the file
  4. Set the execute permissions by running chmod +x /script/path/name.sh
  5. Compress the .sh file
  6. Copy the .sh file to your package share

Note: The script is calling the command line utility built inside of the LANDESK MDM Enroller application.  That means that in order for this script to properly execute, the LANDESK MDM Enroller must already be installed.  To ensure this takes place, we are bundling the packages together and will tell LANDESK which package to execute first.

Part 4 – Create the Enrollment Script Package

  1. Right click on your package bundle again, hover over New Macintosh Package and select Macintosh Agent
  2. Give the package a name
  3. Browse to the zipped script file you previously copied to your package share and select it from within the Primary File window
  4. Provide a description and any metadata information if desired
  5. Save the package

Part 5 – Deploy the Enrollment Package Bundle

  1. Right click on your package bundle and select Properties
  2. Select the Bundle Package Settings from the menu tree
  3. Use the Up / Down buttons to make sure your packages are listed in the appropriate order, with the MDM Enroller app being first and the script being second; clicking Save when you’re finished
  4. Right click on the bundle package one final time and select Create Scheduled Task(s)…
  5. Right click on the newly created Scheduled Task and click on the Properties option
  6. Add your desired targets
  7. Set your desired Task and Portal settings
  8. Schedule the task
#!/bin/sh

#  mdmAutomaticEnrollment.sh
#  Created by Bennett Norton on 11/1/16.
#  This script will enroll a LANDESK Management Suite managed macOS device with an additional MDM profile for support with features like VPP

# NOTE: This script assumes the Mac to be enrolled with an MDM profile is currently under management within LANDESK Management Suite, with a valid agent, and that the Mac has already installed the LANDESK MDM Enrollment Application found at https://community.landesk.com/docs/DOC-42347


#Script Variables
#change the variables to match with a valid LANDESK Management Suite user, corresponding password and enrollment server URL.  The server URL format should be the fully qualified name of the Cloud Service Appliance / LANDESK Server name.

landeskUserAccount="landeskadmin"
landeskPassword="adminpassword"
enrollmentServerURL="fullyqualified.cloudserviceappliance.com/landeskServerName"


#Enroll the managed Mac device with MDM

/Applications/LANDESK\ MDM\ Enroller.app/Contents/MacOS/ldmdmenroll -u "$landeskUserAccount" -p "$landeskPassword" -m "$enrollmentServerURL"

Create and Deploy a VPP Software Package to a macOS or iOS Device

Creating and deploying a VPP software package to either a macOS or iOS device is a very simple process within LANDESK Management Suite 2016.3.  See the instructions below or watch the short video vignettes to be off and racing down the VPP software distribution track.

macOS VPP Package Creation and Deployment

  1. Open the LANDESK Management Suite Console
  2. Navigate to the top menu bar, select Tools > Distribution > Distribution Packages.
  3. In the lower left menu tree, highlight My Packages or Public Packages from within the Distribution Packages window
  4. On the Distribution menu bar, press the New Package button and select Macintosh > Macintosh MDM macmdmbutton
  5. Give the package a name
  6. Press the arrow button surrounded by the blue circle next to your Token alias mdmpackagecreation
  7. Highlight the desired VPP app and hit the Select button – note only macOS apps will display in this window mdmpackage
  8. Save the package
  9. Right click on the resultant package and select Create Scheduled Task(s)…
  10. Add one or more macOS devices that have been enrolled with MDM
  11. Start the task


iOS VPP Package Creation and Deployment

The iOS package creation is nearly identical, so I won’t include screenshots in these steps.

  1. Open the LANDESK Management Suite Console
  2. Navigate to the top menu bar, select Tools > Distribution > Distribution Packages.
  3. In the lower left menu tree, highlight My Packages or Public Packages from within the Distribution Packages window
  4. On the Distribution menu bar, press the New Package button and select Mobile > iOS
  5. Give the package a name
  6. Select the VPP radio button in the right hand pane, select the appropriate token alias if you have more than one VPP token and then click the arrow within the blue circle
  7. Press the arrow button surrounded by the blue circle next to your Token alias
  8. Highlight the desired VPP app and hit the Select button – note only iOS apps will display in this window
  9. Save the package
  10. Right click on the resultant package and select Create Scheduled Task(s)…
  11. Add one or more iOS devices that have been enrolled with MDM
  12. Start the task