How To Enroll into LANDESK Management Suite’s MDM for both iOS and macOS

As mentioned in my previous post, LANDESK announced their 2016.3 release for Management Suite and with it comes the ability to completely manage macOS and iOS via via an MDM profile.  If you’re lucky enough to have all of your macOS and iOS devices participating in Apple’s DEP, getting the devices enrolled into the LANDESK Management Suite server will be pretty straight forward.  In a later blog post, I’ll cover how to configure DEP within LANDESK

If you’re asking how you place your devices into Apple’s DEP, it may be too late.  As discussed in Apple’s DEP FAQ, in order for a device to be enrolled into the DEP program, it’ll need to be purchased directly from Apple or from an authorized DEP reseller. Which means it’s likely that ship has already sailed for you.

Alas, all is not lost.  You can manually enroll any device into LANDESK, whether or not it’s participating in Apple’s DEP program.

Before you get started, make sure you have all of the architecture pieces in place as outlined here.  Also, if your Macs already have a LANDESK agent installed, at this time, do not place an additional MDM profile on it as well.

macOS Enrollment Steps

  1. Download the enrollment app here or get the latest and greatest version from the LANDESK Community and install it on the desired Macs.  In the future, we will place the enrollment app in the ldlogon/mac directory and possibly even have it available on the Mac App Store if Apple permits it.
  2. Enter a valid Active Directory user account and password.  If you’ve properly configured the DNS TXT entry, it should automatically discover the server URL.  If the enrollment app prompts for a server, enter “fully.qualified.cloudserviceappliancename/coreservername” enrollment-screen
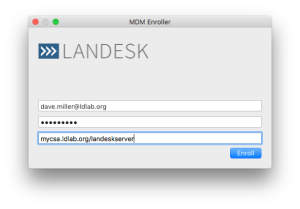
  3. Enter an administrative username and password on the local Mac

iOS Enrollment Steps

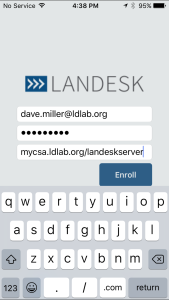
  1. Download the LANDESK enrollment app from the iTunes store
  2. Enter a valid Active Directory user account and password.  If you’ve properly configured the DNS TXT entry, it should automatically discover the server URL.  If the enrollment app prompts for a server, enter “fully.qualified.cloudserviceappliancename/coreservername” img_0002


Configure LANDESK Management Suite 2016.3 for iOS and macOS MDM Management

LANDESK announced their 2016.3 Management Suite release this week and with it comes a number of enhancements to mobility management, including a number of enhancements to the iOS/macOS platforms for MDM management.  Included in the 2016.3 release is the ability to integrate with Apple’s Device Enrollment Program (DEP) and Apple’s Volume Purchase Program (VPP); including supporting multiple VPP tokens.

Luckily, LANDESK has the documentation already available for this configuration.  For ease, I’m going to aggregate all of the needed information to get up and running with LANDESK MDM in one spot.

Architecture Requirement #1 – Cloud Service Appliance

The LANDESK Mobility Device Management does require a LANDESK Cloud Service Appliance.  This can be either a physical appliance you host in your DMZ or a virtual appliance.  If you do not have a CSA, contact your sales representative.  They’re inexpensive and give you the ability to manage devices off your network.

  1. Configure the LANDESK Cloud Service Appliance as discussed in the how-to articles on the LANDESK community page
  2. Ensure your on build 179 or greater – to do this login to your CSA by browsing to https://csa.fqdn/gsb and hit the System Tab on the left hand side.  Then select the Updates tab from the main page and hit Scan For Updates and apply the latest screen-shot-2016-10-20-at-11-27-05-am
  3. Purchase and apply a valid 3rd party SSL certificate for your CSA; see https://community.landesk.com/docs/DOC-32498

Architecture Requirement #2 – LANDESK Management Suite

  1. Install LANDESK Management Suite 2016.3 – https://community.landesk.com/docs/DOC-42261
  2. Import Apple’s APNS certificate to the Core Server – https://community.landesk.com/docs/DOC-39856

Optional Architecture Configurations

  1. Configure the Core server for DEP (optional) – https://community.landesk.com/docs/DOC-42090
  2. Configure the Core server for VPP (optional) – https://appleintheenterprise.com/2016/10/18/import-apples-vpp-token-into-landesk-management-suite/
  3. Configure a DNS TXT entry for easier enrollment (optional) – https://community.landesk.com/docs/DOC-39871

Import Apple’s VPP Token into LANDESK Management Suite

With the release of 2016.3, LANDESK Management Suite supports deploying Volume Purchased Applications (VPP) directly within the LANDESK Management Suite console.

To configure LANDESK Management Suite, you need to download your VPP token and import it into the Software Distribution tool.  The directions below will you walk you through each step of this process.

Part 1 – Download Your Token from Apple

  1. Browse to https://vpp.itunes.apple.com/ and login to your appropriate store; either the Business or Education store
  2. Login with your appropriate Apple ID
  3. Press the dropdown button with your appleID at the top right corner and select Account Summary vpptokendownload1
  4. Once on the Account Summary page, click the Download Token link from the Managed Distribution sectionvpptokendownload2

Part 2 – Import your VPP Token into LANDESK Management Suite

  1. Launch the LANDESK Management Suite Console
  2. Go to Tools > Distribution > Distribution Packages and select the second to last icon from the menu bar titled Volume Purchase Program Configuration vpptokenconfig
  3. Click on the Add VPP Token button at the bottom right
  4. Provide an appropriate alias token name.  Since you can import more than one token, make sure your alias helps you identify the difference between your tokens
  5. Click on the ellipsis to import your token you downloaded from Apple’s site
  6. Click the add button vpptokenconfig2

Part 3 – Review Your Purchases and See Available Licenses

You should automatically see all of your purchases and available licenses after clicking the Add button.  If at any point in the future you need to see where you stand, you can open the Volume Purchase Program Configuration utility in SWD or check your Software License Monitoring as all VPP token information is imported into SLM. VPPTokenConfig3.png

Fix Safari’s Slow Page Loads So You Can Ditch Google Chrome on macOS Sierra

Are you frustrated with how slow Safari loads its web pages?  Are you also fed up with Chrome turning your Mac into a full blown wind turbine and draining the battery on your laptop all too fast? Well I was too, until this morning when I was up at 3 AM and sick and tired of Safari loading so slow and Chrome causing my Mac to sound like it was going to fly off my desk.

Why I didn’t google this years ago, I don’t know.  But this morning, I found a way to fix Safari’s slow page loads allowing me to ditch Google Chrome…at least for those websites that don’t require Java.  The tweak is not perfect, not every website I tried responded as fast as Google Chrome, but Safari’s performance is much better – and doesn’t run my fans at full speed so I’ll take what I can get for now.

In your own testing, just make sure to quite and re-launch Safari after you’ve made the change.

To be honest, the part that frustrates me about my browser dilemma the most is that I’ve been suffering with mediocre performance for so long with an all too simple fix available.  To bring Safari back to life, just disable Safari’s DNS prefetch with the simple Terminal command below.  Thanks to WebNots, for providing this little gem of a trick in this article.

defaults write com.apple.safari WebKitDNSPrefetchingEnabled -boolean false

Give it a shot and see how it works for you.  For me, well, I’ve removed Google Chrome from my Dock and excited to enjoy the peace and quiet in my office.

If you’re a LANDESK Management Suite user, you may want to create a patch definition that will disable the DNS prefetch. By setting the definition it to Autofix, you can make sure your users macOS devices are always optimized for fast page loading.  I’ve built a custom definition and made it available on my GitHub page a long with the scripts I used within the definition.

The definition, at this time, is designed for a single user to machine scenario – as I don’t check for all users.  But nonetheless, it can be enhanced with a little bit of effort.

For ease in writing your own scripts if a non-LANDESK user, my detection script and repair scripts are below.

Detection:

#!/bin/sh

# WebKitDNSPrefetching Detection.sh
# Created by Bennett Norton on 10/3/16

# The WebKitDNSPrefetching setting is found at /Users/$username/Library/Preferences/com.apple.safari WebKitDNSPrefetchingEnabled
safariPrefetchSetting=( $( defaults read com.apple.safari WebKitDNSPrefetchingEnabled ) )

# compare the returned value with your desired state
# a safariPrefetchSetting of 0 means it is disabled - this is what you want if you want to speed up the browser
# a safariPrefetchSetting of does not exist means it is enabled 
if [[ $safariPrefetchSetting == 0 ]] ; then
 echo "Found: The option for 'WebKitDNSPrefetching' is already disabled"
 echo "Reason: The value for 'WebKitDNSPrefetching' is: $safariPrefetchSetting."
 echo "Expected: The value for 'WebKitDNSPrefetching' should be Manual"
 echo "Detected: 0"
 exit 0
 else
 echo "Found: The option for 'WebKitDNSPrefetching' is currently enabled"
 echo "Reason: The value for 'WebKitDNSPrefetching' is currently applied"
 echo "Expected: The value for 'WebKitDNSPrefetching' should be disabled"
 echo "Detected: 1"
 exit 1
fi

Repair:

#!/bin/sh

# disableSafariPrefetch.sh
# Created by Bennett Norton on 10/03/16.
# This script will disable the prefetching for Safari

defaults write com.apple.safari WebKitDNSPrefetchingEnabled -boolean false