


If you’re an existing 3.x consumer of Cisco AnyConnect you may be surprised when you load up the 4.x installer and find your users have a plethora of additional features; like Web Security, System Scan, Roaming Security and AMP Enabler.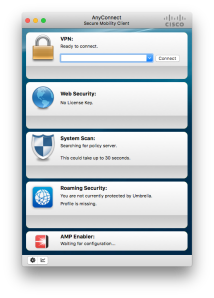
If these are features you’re planning on using, great, you’re all set. If you were just hoping to leverage the VPN, well, all is not lost. You can easily customize the installer, providing it a set of instructions indicating what modules you want installed and what modules you want blocked – and it’s all done via a simple PLIST file.
I’ve included the entire example PLIST I used to block everything but the VPN as well as the installer script for LANDESK on my GitHub site here.
Let’s discuss the PLIST first. Here is an example of one of the dictionary objects found in the PLIST file, in this case it is for the VPN feature.
 <dict>
    <key>attributeSetting</key>
    <integer>1</integer>
    <key>choiceAttribute</key>
    <string>selected</string>
    <key>choiceIdentifier</key>
    <string>choice_vpn</string>
 </dict>
Basically we have a dictionary of values that define the module and tell the installer of whether it should be installed by setting the Integer value to 1. If you want to block the given module, set the integer value to 0. Look at the string value to figure out what module you’re enabling or disabling.
You shouldn’t need to adjust any of the other settings. So go ahead and download the example PLIST file I have on my GitHub site and finish customizing it for your environment. My PLIST file has everything disabled outside of the VPN. If you were to manually install the application, you’d see the window below. 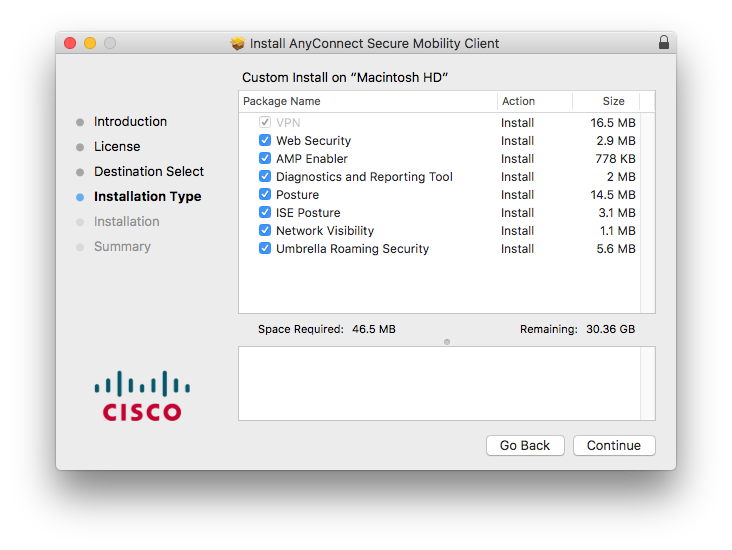
Now that you have your PLIST ready to go, you need to save it as ‘ChoiceChangesCiscoAnyConnect.plist’ so it can be properly referenced in our installer script. If you save it as something else, just make sure you make the appropriate change in your installer script.
OK, we’re now ready to create the installer script. For simplicity, I’m going to build my installer script to do both the downloading of the AnyConnect package file, the PLIST file we just created and then it’ll kick off the installer – all using SDClient so I can take advantage of the bandwidth and throttling settings.
The entire installer script is pasted below. In your environment, you’ll likely only need to change the plistFilePath and packageFilePath variables. The script copies everything to a folder titled CiscoAnyConnect inside of sdcache. I purposely chose to put everything in the sdcache folder as the script doesn’t purge anything when finished, letting the standard sdcache cleanup process take care of that at the appropriate time.
Once you have your paths set, you should be ready to go. You’ll notice that SDClient is used, with several arguments, to download the files. The -noinstall argument is quite obvious, it tells SDClient to just download and not do anything else. The -package is telling SDClient where to obtain the file and the -destdir argument is telling SDClient where to copy the file to.
/Library/Application\ Support/LANDesk/bin/sdclient -noinstall -package "$packageToCopy" -destdir "$destinationLocation"
As mentioned before, the script copies down the PLIST file and the Cisco installer. If you have a DMG version of the Cisco Installer, just mount it on a Mac and copy out the AnyConnect.pkg from the DMG. I copied mine directly to my standard SWD file share.
Then the scripts wraps up by executing the AnyConnect.pkg installer with a few arguments as well. We tell macOS we want it to run a pkg intsaller and point to where that file is. In my example, it’s in the /Library/Application Support/LANDesk/sdcache/CiscoAnyConnect folder. I leave the -target path empty, basically letting the installer put where it’s designed to. I then add the flag -applyChoiceChangesXML so that it knows customization is to be performed and I supply the path to that name/file.
installer -pkg "$destinationLocation"/"$packageName" -target / -applyChoiceChangesXML "$destinationLocation"/"$plistName"
And that’s it. You now have everything you need to deploy your package. Save out your installer script, I named mine ciscoAnyConnect4.3Deploy.sh but you can name yours whatever you want.
As always, once saved, make sure you give the script the execution permissions by opening Terminal and running:
sudo chmod +x /path/to/script.sh
Now copy your installer script to your LANDESK SWD file share. I used the same path for my script, PLIST file and AnyConnect.pkg installer.
Once you’ve copied up your script, you just need to create your LANDESK Mac package so you can target and silently deploy Cisco AnyConnect with all of your customizations.
Creating LANDESK Management Suite Mac Packages
- Open the LANDESK Console
- Navigate to the top menu bar, select Tools > Distribution > Distribution Packages.
- In the lower left menu tree, highlight My Packages or Public Packages from within the Distribution Packages window
- On the Distribution menu bar, press the New Package button and select New Macintosh Agent package.
- Give the package a name
- Provide a description as well as any metadata information desired
- Set the primary file to the script file you previously transferred to your package share
- Fill out the Metadata details if desired, specifically supplying a logo so it shows up properly in the portal
- Save the package
Creating a Scheduled Mac Software Distribution Task
- Right click on the Mac software distribution package created and select Create Scheduled Task
- From the network view, select and drag the desired machine(s), user(s) or query(ies) and drop them onto the task
- Now, right click on the task and select properties
- Set the desired Task type under Task Settings as to whether you want a push, a policy or a hybrid of the two types in a policy-supported push
- Set the radio button in the Portal Settings to either Recommended or Optional if you desire to put the package into Workspaces. If you’d like to automatically deploy the app, select Run automatically
- Change the Reboot Settings or Distribution and Patch settings if desired
- Set the schedule task settings with the appropriate start time
PLIST File
<?xml version="1.0" encoding="UTF-8"?>
<!DOCTYPE plist PUBLIC "-//Apple//DTD PLIST 1.0//EN" "http://www.apple.com/DTDs/PropertyList-1.0.dtd">
<plist version="1.0">
<array>
 <dict>
 <key>attributeSetting</key>
 <integer>1</integer>
 <key>choiceAttribute</key>
 <string>selected</string>
 <key>choiceIdentifier</key>
 <string>choice_vpn</string>
 </dict>
 <dict>
 <key>attributeSetting</key>
 <integer>0</integer>
 <key>choiceAttribute</key>
 <string>selected</string>
 <key>choiceIdentifier</key>
 <string>choice_websecurity</string>
 </dict>
 <dict>
 <key>attributeSetting</key>
 <integer>0</integer>
 <key>choiceAttribute</key>
 <string>selected</string>
 <key>choiceIdentifier</key>
 <string>choice_fireamp</string>
 </dict>
 <dict>
 <key>attributeSetting</key>
 <integer>0</integer>
 <key>choiceAttribute</key>
 <string>selected</string>
 <key>choiceIdentifier</key>
 <string>choice_dart</string>
 </dict>
 <dict>
 <key>attributeSetting</key>
 <integer>0</integer>
 <key>choiceAttribute</key>
 <string>selected</string>
 <key>choiceIdentifier</key>
 <string>choice_posture</string>
 </dict>
 <dict>
 <key>attributeSetting</key>
 <integer>0</integer>
 <key>choiceAttribute</key>
 <string>selected</string>
 <key>choiceIdentifier</key>
 <string>choice_iseposture</string>
 </dict>
 <dict>
 <key>attributeSetting</key>
 <integer>0</integer>
 <key>choiceAttribute</key>
 <string>selected</string>
 <key>choiceIdentifier</key>
 <string>choice_nvm</string>
 </dict>
 <dict>
 <key>attributeSetting</key>
 <integer>0</integer>
 <key>choiceAttribute</key>
 <string>selected</string>
 <key>choiceIdentifier</key>
 <string>choice_umbrella</string>
 </dict>
</array>
</plist>
Installer Script
#!/bin/sh

# ciscoAnyConnect4.3Deploy.sh
# Created by Bennett Norton on 11/30/16.


#File to copy
#change this to match your hosted path, it needs to be http
plistName="ChoiceChangesCiscoAnyConnect.plist"
packageName="AnyConnect.pkg"
plistFilePath="http://yourFileShareServer/Path/To/PLIST"
packageFilePath="http://yourFileShareServer/Path/To/CiscoAnyConnect"
packageToCopy="$packageFilePath"/"$packageName"
plistToCopy="$plistFilePath"/"$plistName"

#Location to copy file to
#change this to match your destination path
destinationLocation='/Library/Application\ Support/LANDesk/sdcache/CiscoAnyConnect'

#Check to see if destination exists and if not, create it
if [ ! -d "$destinationLocation" ]; then
echo "Location doesn't exist. Creating directory"
mkdir $destinationLocation
echo "$destinationLocation created"
fi

#Download and execute command
#You shouldn't need to make any changes here
#-noinstall ensure the package does not get executed when downloaded
#-package is the source url path
#-destdir is the destination url path
/Library/Application\ Support/LANDesk/bin/sdclient -noinstall -package "$packageToCopy" -destdir "$destinationLocation"
/Library/Application\ Support/LANDesk/bin/sdclient -noinstall -package "$plistToCopy" -destdir "$destinationLocation"
installer -pkg "$destinationLocation"/"$packageName" -target / -applyChoiceChangesXML "$destinationLocation"/"$plistName"

Recent Comments